
If you’re ready to enjoy cleaner, better-tasting water right from your kitchen sink, installing an under sink water filter system is a smart move. You might think it’s a complicated task, but with the right steps, you can do it yourself quickly and easily.
Imagine having fresh, filtered water whenever you want, without the hassle of buying bottled water or waiting for pitchers to fill. In this guide, you’ll find simple, clear instructions that anyone can follow. By the end, you’ll have a reliable water filter set up, giving you peace of mind about the quality of your drinking water.
Keep reading—you’re just a few steps away from better water in your home.

Choosing The Right Filter
Choosing the right under sink water filter is important for clean water. The filter must match your needs and sink setup. Think about water quality, space, and filter type. This helps ensure safe drinking water and easy installation.
Types Of Under Sink Filters
There are several types of filters for under sink use. Carbon filters remove bad taste and chlorine. Reverse osmosis filters clean more impurities but need more space. Ceramic filters block bacteria and dirt. Choose based on your water issues and space.
Filter Capacity And Lifespan
Filter capacity means how much water it can clean before changing. Lifespan tells how long the filter works well. A filter with higher capacity lasts longer. Check the filter life on the package. Pick one that suits your water use and budget.
Compatibility With Plumbing
Not all filters fit every sink plumbing. Check the size and connection type first. Some filters need extra parts for installation. Measure your pipes and space under the sink. Choose a filter that fits easily with your plumbing setup.
Gathering Tools And Materials
Before installing an under sink water filter system, gather all necessary tools and materials. This step saves time and avoids interruptions. Being prepared helps the installation go smoothly and safely. Having everything ready makes the process easier, even for beginners.
Essential Tools List
- Adjustable wrench for tightening fittings
- Screwdriver, both flathead and Phillips
- Teflon tape to seal pipe threads
- Utility knife for cutting tubing
- Bucket to catch any water spills
- Measuring tape for accurate placement
Safety Gear
- Protective gloves to avoid cuts and scrapes
- Safety goggles to protect your eyes
- Old towel or rag to clean spills
Replacement Parts
- Filter cartridges specific to your system
- Replacement tubing or connectors if needed
- Mounting brackets or screws included with the filter
Preparing The Installation Area
Preparing the installation area is a key first step for fitting an under sink water filter system. This step helps to avoid problems during installation. It also ensures a smooth and safe process. Taking time to prepare the space properly saves effort later.
Clearing Space Under The Sink
Remove all items from under the sink. Clear the area completely to allow easy access. This space helps you work freely and prevents accidents. Wipe down the cabinet floor to clean any dust or dirt. A clean, clear area makes installation faster and easier.
Shutting Off Water Supply
Locate the water shut-off valves under the sink. Turn them clockwise to close the water flow. Shutting off the water stops leaks during installation. Check that no water flows from the faucet by turning it on briefly. This step keeps the area dry and safe.
Draining The Pipes
Open the faucet to let remaining water drain out. This reduces water pressure in the pipes. Draining the pipes prevents spills when disconnecting plumbing parts. Wait a few minutes to ensure all water has drained. Dry any wet spots before continuing the installation.
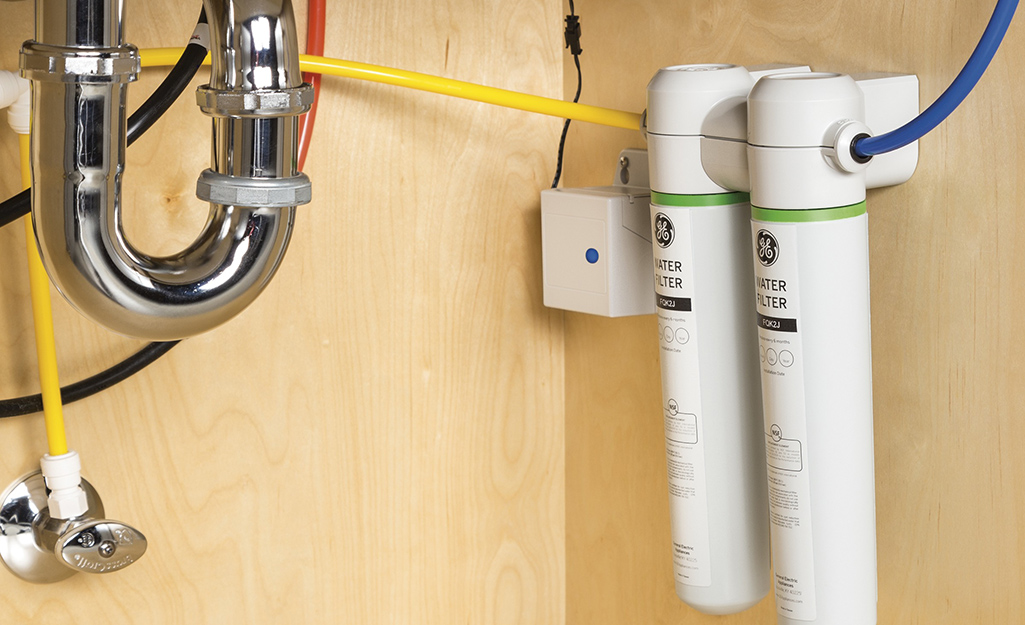
Mounting The Filter System
Mounting the under sink water filter system is an important step. It keeps the filter secure and easy to access. A good mount prevents leaks and damage. Follow these steps to mount your filter correctly.
Positioning The Filter
Find a spot under the sink with enough room. Keep the filter away from pipes and valves. The filter should be easy to reach for changes and cleaning. Mark the spot where the filter will hang. Make sure there is space to open the filter cover.
Securing The Bracket
Use the bracket that comes with the filter. Hold the bracket on the marked spot. Use a pencil to mark the screw holes. Drill small pilot holes for the screws. Attach the bracket firmly using screws. Ensure the bracket does not move or wiggle.
Checking Stability
Hang the filter on the bracket. Check if it fits tightly without wobbling. Push and pull gently to test the hold. The filter should stay in place during use. Adjust screws if the filter moves. A stable mount protects your filter and plumbing.
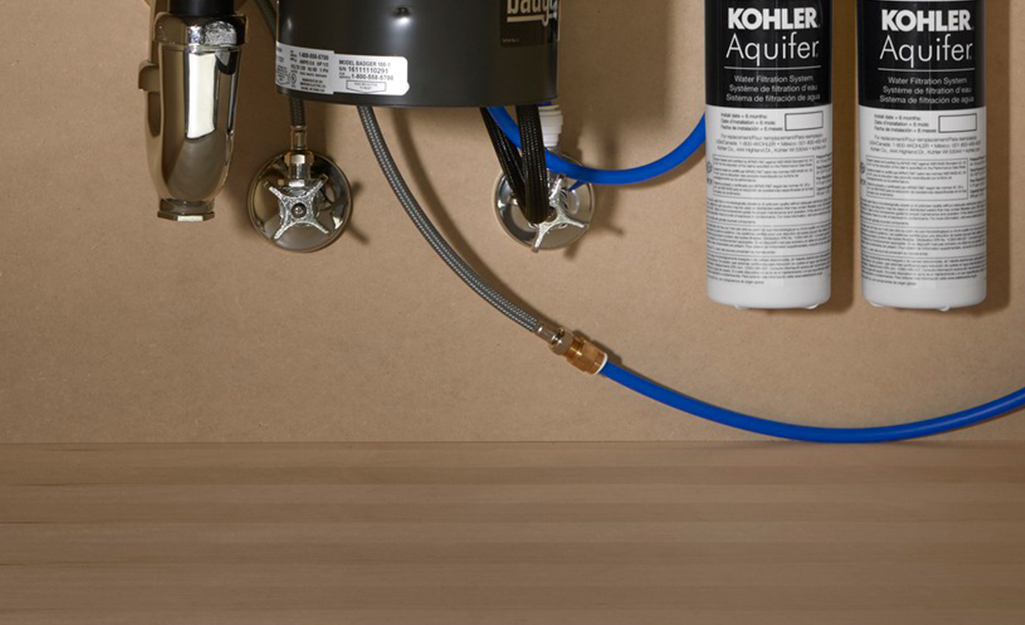
Connecting Water Lines
Connecting water lines is a key step in installing an under sink water filter system. This part ensures clean water flows correctly through the filter. Proper connection prevents leaks and keeps your system working well.
Identifying Inlet And Outlet
First, find the inlet and outlet ports on the filter. The inlet brings water into the filter. The outlet sends filtered water out to your faucet. Usually, the ports are labeled. Check the user manual for exact locations. Correctly identifying these ensures water flows in the right direction.
Attaching Tubing
Cut the tubing to the needed length. Use a sharp cutter for clean cuts. Attach one end to the inlet port and the other to your water supply. Attach the second tube from the outlet port to the faucet line. Push tubing firmly onto the ports. Secure connections help stop leaks.
Using Teflon Tape And Fittings
Wrap Teflon tape around threaded fittings before connecting. This tape seals the threads and prevents leaks. Wrap tape clockwise around the threads two to three times. Screw fittings tightly by hand, then use a wrench for a snug fit. Avoid over-tightening to prevent damage.
Flushing And Testing
Flushing and testing the under sink water filter system is an important step. It helps remove any air and loose carbon particles inside the filter. This process also ensures the system works correctly and safely.
Following the right steps for flushing and testing will protect your water quality. It will also prevent leaks and other issues before regular use.
Opening The Water Supply
Turn on the water supply valve slowly. Open it enough to let water flow into the filter. Avoid opening it too fast to prevent pressure damage.
Listen for unusual sounds. If you hear hissing or dripping, check the connections again.
Flushing The Filter
Run cold water through the filter for about 5 minutes. This removes dust and loose particles from inside the filter.
Let the water flow until it runs clear. Flushing also activates the filter media for better performance.
Checking For Leaks
Look closely at all connections and fittings. Use a dry cloth to spot any water drops or wet areas.
Tighten any loose fittings carefully. Leaks can cause water damage and reduce filter efficiency.
Check again after running water for a few minutes. Make sure the system stays dry and secure.
Maintaining The Filter System
Maintaining your under sink water filter system keeps water clean and safe. Regular care helps the system work well for a long time. Simple steps can prevent damage and ensure fresh water flow. Understanding how to maintain the system saves time and money.
Replacing Filter Cartridges
Change filter cartridges as the manufacturer suggests. Most filters need replacement every 6 to 12 months. Use the right cartridge for your model. Turn off water before removing the old filter. Install the new cartridge firmly to avoid leaks. Check for leaks after replacement.
Cleaning Tips
Clean the filter housing when changing cartridges. Use a soft cloth and mild soap. Avoid harsh chemicals that can damage parts. Rinse thoroughly before putting the filter back. Keep the area under the sink dry and clean. This prevents mold and bacteria buildup.
Troubleshooting Common Issues
Low water flow may mean a clogged filter. Replace the cartridge to restore flow. Leaks usually come from loose connections or worn seals. Tighten fittings or replace seals to fix leaks. Odd taste or smell signals it’s time to change filters. Follow the user manual for specific problems.
Frequently Asked Questions
How Do I Install An Under Sink Water Filter System?
To install, first turn off the water supply under the sink. Attach the filter system to the cold water line using the provided adapter. Connect the filter’s output to the faucet and check for leaks before turning the water back on.
What Tools Are Needed For Installation?
You will need an adjustable wrench, a drill with bits, a screwdriver, plumber’s tape, and a bucket. These tools help to secure fittings, create mounting holes, and prevent leaks during the installation process.
How Long Does Installation Usually Take?
Installation typically takes 30 to 60 minutes. It depends on your plumbing experience and the specific filter model. Following the manufacturer’s instructions can speed up the process.
Can I Install The Filter Without A Professional?
Yes, many under sink water filters are designed for DIY installation. Basic plumbing knowledge and the right tools are required. However, if unsure, hiring a professional ensures correct setup and avoids damage.
Conclusion
Installing an under sink water filter system can improve your water quality. The steps are simple and clear to follow. You need only basic tools and a little time. Clean water helps protect your health and tastes better. Regular filter changes keep the system working well.
Take your time and check each step carefully. Soon, you will enjoy fresh water straight from your tap. This small effort can bring big benefits to your daily life.

Hasan Al Sarker is a Reverse Osmosis Specialist. He has worked for many years to ensure safe drinking water for all. His research paper has been published in several journals, including Issue, Medium, and Slideshare. He is recognized as a water doctor among specialists though he did not attend medical college.
Besides working as a researcher of reverse osmosis technology, he is also very fancy with the kitchen and cooking. His guides are reading thousands of people every day. As a head of content, he is responsible for all the published articles at RO System Reviews.