If you rely on your KitchenAid water filter for clean, fresh-tasting water, knowing how to replace it quickly and correctly is key. A clogged or old filter can affect the taste and safety of your water without you even realizing it.
In this guide, you’ll discover simple, step-by-step instructions to swap out your KitchenAid water filter with ease. By following these easy tips, you’ll keep your water tasting great and your appliance running smoothly. Ready to take control of your water quality?
Let’s get started.

Signs You Need To Replace The Filter
Knowing when to replace your KitchenAid water filter is important. A worn-out filter can affect water quality and taste. Watch for clear signs that show the filter needs changing. Acting quickly helps keep your water clean and fresh.
Reduced Water Flow
Water flow slows down noticeably from the dispenser. The filter may be clogged with dirt and debris. This blockage limits water passing through the filter. A steady, strong flow means the filter is working well.
Unpleasant Taste Or Odor
Water tastes or smells strange or bad. The filter can no longer remove impurities effectively. This causes off-flavors or odors in your drinking water. Fresh, clean water should taste neutral and smell fresh.
Filter Indicator Alerts
Your KitchenAid may have a filter indicator light. This light signals when it is time to replace the filter. Ignoring the alert reduces water quality over time. Always check and replace the filter when the alert appears.
Choosing The Right Replacement Filter
Choosing the right replacement filter for your KitchenAid water filter is important. The correct filter ensures clean, fresh water. It also keeps your appliance working well. Using the wrong filter can cause leaks or poor water quality. Understanding which filter matches your model helps avoid mistakes. This guide explains how to find the right filter for your KitchenAid.
Compatible Filter Models
KitchenAid water filters come in different types. Each model fits specific KitchenAid refrigerators or water systems. Check your fridge’s manual or look on the filter itself. You will find a model number or code there. Common KitchenAid filters include UKF8001, KWF, and KCF. Match the replacement filter exactly to this code. Using an incompatible model can stop water flow or cause damage.
Some KitchenAid filters fit multiple refrigerator models. Confirm the filter’s compatibility before buying. This ensures the filter works well and fits snugly. Using the right model keeps your water clean and safe.
Where To Buy Filters
Buy KitchenAid water filters from trusted stores or websites. Official KitchenAid dealers guarantee genuine products. Online marketplaces also sell filters, but check seller ratings first. Avoid very cheap filters from unknown sellers. They may not meet safety or quality standards.
Hardware stores and appliance shops often stock KitchenAid filters. Check availability before visiting. Buying from official sources ensures you get a real filter. Real filters protect your health and appliance better than fake ones.
Preparing To Change The Filter
Preparing to change your KitchenAid water filter ensures a smooth and quick process. It helps avoid spills and makes the task safe. Taking a few simple steps before starting can save time and prevent mistakes.
Gathering Necessary Tools
First, collect all tools needed for the job. Usually, you need a new filter compatible with your model. Keep a towel or small bucket nearby to catch any water drips. Some models may require a filter wrench or pliers. Check your user manual to know exactly what is needed.
Turning Off Water Supply
Next, turn off the water supply to your refrigerator. This stops water flow and avoids leaks during filter removal. Locate the water valve, often found behind or under the fridge. Turn the valve clockwise until it stops. Confirm water is off by trying to dispense water or ice.
Removing The Old Filter
Removing the old KitchenAid water filter is the first step in keeping your water fresh and clean. It is important to do this carefully to avoid leaks or damage. Follow these simple instructions to find and take out the filter safely.
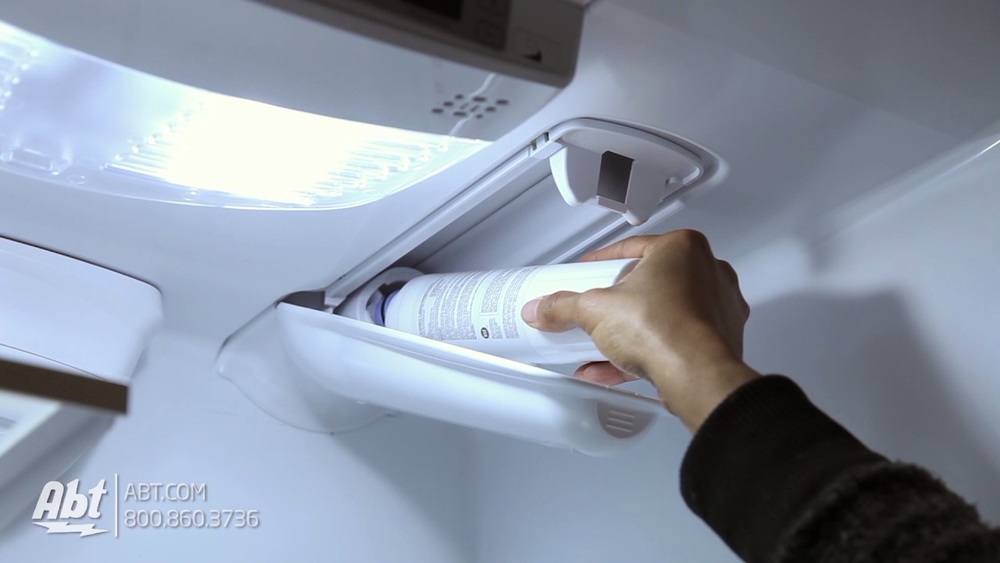
Locating The Filter Compartment
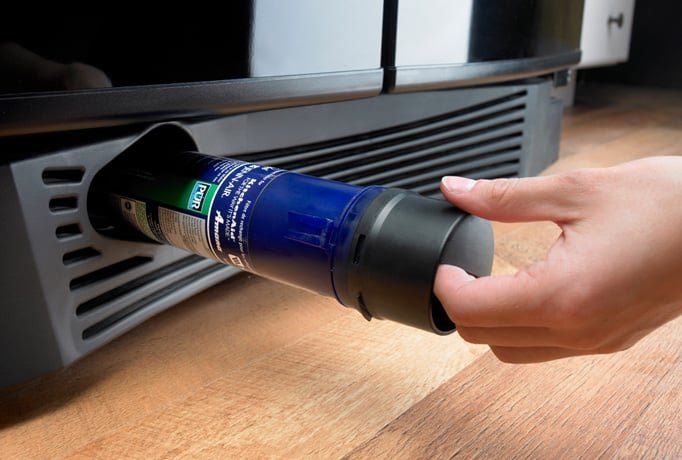
The filter compartment is usually inside the refrigerator. Open the fridge door fully to see inside. Look for a small, rectangular or cylindrical housing. It is often near the top right or bottom left corner.
Some models have the filter in the base grille under the fridge. Check your user manual if you do not see it inside. Knowing the exact spot helps you remove the old filter quickly.
Steps To Remove Filter Safely
Start by turning off the water supply to the fridge. This prevents water from spilling out. Next, press the release button or twist the filter counterclockwise. Pull the filter straight out once it is loose.
Be gentle to avoid breaking the filter or housing. Have a cloth ready to catch any drips. Dispose of the old filter according to local guidelines. Your fridge is now ready for a new filter.
Installing The New Filter
Installing the new water filter in your KitchenAid refrigerator is a simple step. It ensures clean and fresh water for your family. Follow these steps carefully to fit the new filter properly. Doing this right helps avoid leaks and keeps your water safe to drink.
Aligning And Inserting The Filter
Hold the new filter with the label facing out. Look for the arrows or marks on the filter and the filter slot. Line up these marks carefully. Gently push the filter into the slot. Do not force it. It should slide in smoothly until it stops.
Securing The Filter In Place
Turn the filter clockwise to lock it in place. You will feel it click or stop turning. This means the filter is secure. Check that it is tight but do not over-tighten. Run water through the dispenser for a few minutes. This clears out any air and loose particles from the new filter.

Flushing The New Filter
Flushing the new KitchenAid water filter is a vital step after installation. This process clears out any loose carbon particles and activates the filter. Proper flushing ensures clean water and improves taste. Skipping this step might cause cloudy water or unusual taste.
Running Water Through The Filter
Turn on the cold water tap slowly. Let the water run for about 5 minutes. This flushes the filter completely. The first water may look dark or cloudy. This is normal and will clear up quickly. Use a container to catch the water if you want. After flushing, the water should flow clear and clean.
Resetting The Filter Indicator
After flushing, reset the filter indicator light. This light shows when to change the filter. Press and hold the reset button on the refrigerator. Hold it for 3 to 5 seconds. The light will turn off or change color. Resetting helps keep track of filter life. This step keeps your water fresh and safe.
Maintenance Tips For Longevity
Keeping your KitchenAid water filter in good shape ensures clean water and a longer filter life. Simple maintenance steps help avoid clogging and bad tastes. Follow these tips to get the best from your filter every day.
Regular Replacement Schedule
Change the water filter every six months. This keeps water fresh and pure. A worn-out filter can let dirt and chemicals pass through. Mark your calendar or set a reminder. Don’t wait until the water tastes strange. Regular swaps save money by preventing damage to your fridge.
Cleaning The Filter Housing
Clean the filter housing during each filter change. Remove any dirt or buildup inside the compartment. Use a soft cloth and warm water to wipe it clean. Avoid harsh chemicals that can damage the housing. Dry it well before installing a new filter. This keeps the water flow smooth and stops mold growth.
Frequently Asked Questions
How Often Should I Replace My Kitchenaid Water Filter?
You should replace your Kitchenaid water filter every 6 months. Regular replacement ensures clean, fresh-tasting water and maintains appliance efficiency.
What Tools Do I Need To Replace The Filter?
No special tools are needed. Simply twist and pull the old filter out, then insert the new one firmly.
How Do I Reset The Water Filter Indicator?
After replacing the filter, press and hold the reset button for 3 seconds. This resets the indicator light.
Can I Use Any Water Filter With Kitchenaid?
No, use only Kitchenaid-approved filters. This guarantees proper fit and optimal water filtration performance.
Conclusion
Replacing your KitchenAid water filter keeps water clean and fresh. The process is simple and takes only a few minutes. Regular changes help your appliance work well and last longer. Clean water tastes better and is healthier for your family.
Follow the steps carefully, and you will do it right. Stay consistent to enjoy pure water every day. Easy to do, good for you.

Hasan Al Sarker is a Reverse Osmosis Specialist. He has worked for many years to ensure safe drinking water for all. His research paper has been published in several journals, including Issue, Medium, and Slideshare. He is recognized as a water doctor among specialists though he did not attend medical college.
Besides working as a researcher of reverse osmosis technology, he is also very fancy with the kitchen and cooking. His guides are reading thousands of people every day. As a head of content, he is responsible for all the published articles at RO System Reviews.