Are you noticing a drop in your water’s taste or flow? It might be time to replace your Zero Water filter.
Changing this filter is easier than you think, and doing it right means you’ll enjoy clean, fresh water every time. In this guide, you’ll learn simple steps to swap out your filter quickly and confidently. Keep reading to make sure your water stays pure and your Zero Water system works perfectly.
Why Replace Your Zero Water Filter
Replacing your Zero Water filter is important for clean, safe drinking water. Over time, filters collect impurities and lose effectiveness. Fresh filters keep water tasting pure and free from harmful contaminants.
Regular replacement ensures your water stays healthy and fresh. It prevents clogging and extends your water filter system’s life. Knowing when to change the filter helps maintain water quality and saves money in the long run.
Signs It’s Time For A New Filter
Water tastes different or has a strange odor. Flow rate slows down noticeably. The TDS meter shows higher numbers than usual. Filter replacement indicator light turns on. Cloudy or discolored water appears. These signs mean your filter no longer works well.
Benefits Of Regular Replacement
Fresh filters remove more contaminants and improve water taste. They protect your family from harmful chemicals and particles. Regular changes keep your filter system running smoothly. Prevent buildup that can cause damage or leaks. Save money by avoiding costly repairs or replacements. Clean water supports better health every day.
Tools And Materials Needed
Replacing a Zero Water filter needs a few tools and materials. Having them ready makes the process smooth and quick. These items help remove the old filter and install the new one properly. This section lists what you need to gather before starting.
Filter Replacement Kit
The main item is the Zero Water filter replacement kit. It usually includes the new filter cartridge and a sealing ring. The cartridge fits inside the pitcher or dispenser where water passes through. The sealing ring keeps the filter tight and stops leaks. Always choose the right filter model for your Zero Water system.
Additional Supplies
Extra tools help make the job easier. A clean cloth or paper towel is useful for wiping spills. Some filters need a small wrench or pliers to loosen caps. A bucket or bowl can catch water drips during removal. Having clean hands or gloves keeps the filter clean. These small supplies make the process neat and safe.
Preparing For Replacement
Preparing to replace your Zero Water filter is a key step. Proper preparation saves time and avoids mess. It also ensures the filter works well after replacement.
Start by turning off the water supply. Next, drain any water left in the pitcher or dispenser. Follow these steps carefully for a smooth replacement process.
Turning Off Water Supply
Locate the water source connected to your Zero Water filter. Turn the valve clockwise to stop water flow. This prevents leaks during replacement. Make sure the water is fully off before moving on.
Draining The Pitcher Or Dispenser
Remove the pitcher or dispenser from its base. Pour out all the water inside into a sink or container. Emptying the pitcher avoids spills and makes filter removal easier. Check that no water remains before starting the filter change.

Removing The Old Filter
Removing the old Zero Water filter is the first step in keeping your water fresh. This process is simple and quick. You only need to follow a few easy steps to get the filter out safely. This helps prepare for installing the new filter without any trouble.
Opening The Filter Compartment
Start by locating the filter compartment. It is usually at the bottom of the pitcher or dispenser. Hold the base firmly and twist the compartment counterclockwise. The compartment will loosen and come off easily. Be careful not to spill water while opening.
Safely Taking Out The Used Filter
After opening the compartment, gently pull out the used filter. It may feel tight at first. Wiggle it slightly to loosen. Avoid squeezing the filter to prevent water spills. Place the old filter in a trash bag for disposal. Cleaning the compartment before adding the new filter is a good idea.
Installing The New Filter
Installing the new Zero Water filter is simple and quick. Follow clear steps to ensure your filter works well. Proper installation keeps your water clean and fresh.
Rinsing The New Filter
Start by rinsing the new filter under cold water. This removes dust and loose carbon particles. Rinse for about 10 seconds or until water runs clear. This step prevents any black specks in your water.
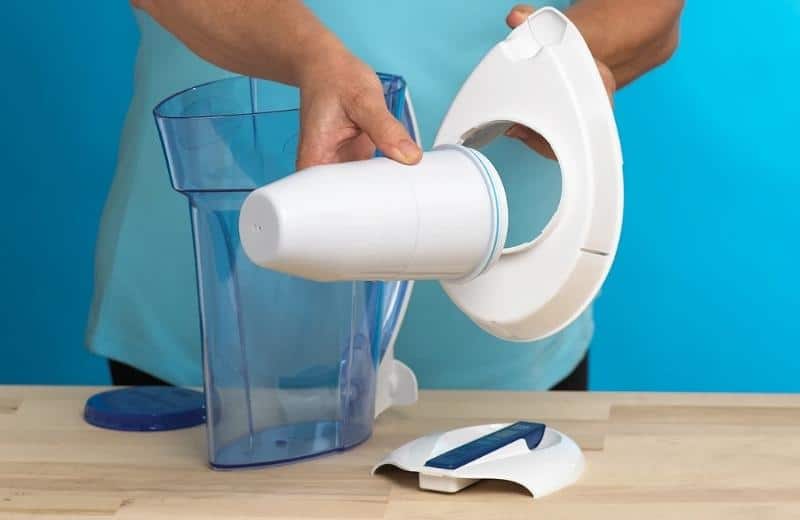
Proper Placement And Sealing
Place the filter firmly in the pitcher’s filter compartment. Push down gently but firmly until it fits snugly. Ensure the seal is tight to avoid leaks. Check the edges for any gaps. A good seal keeps water flowing through the filter properly.

Flushing The New Filter
Flushing the new Zero Water filter is an important step. It removes loose carbon dust and prepares the filter for clean water. Without flushing, the water may taste odd or have particles. Follow these simple steps to flush your filter properly.
Running Water Through The Filter
Place the new filter in the pitcher or dispenser. Fill the reservoir with cold tap water. Let the water flow through the filter completely. Discard the first two pitchers of filtered water. This step clears out any dust or debris from the new filter.
Ensuring Optimal Performance
Flush the filter every time you replace it. This keeps the filter working well and improves water taste. Monitor the water clarity and taste after flushing. Clear, fresh water means the filter is working fine. Flushing helps your Zero Water filter last longer and perform better.
Maintenance Tips For Longevity
Keeping your Zero Water filter in good shape helps it last longer. Simple care steps protect water quality and the filter’s performance. Follow easy routines to keep your pitcher or dispenser clean and check the filter often. This care saves money and gives you fresh water every day.
Regular Cleaning Of Pitcher Or Dispenser
Clean the pitcher or dispenser every few days. Use mild soap and warm water for washing. Avoid harsh cleaners that might damage the plastic. Rinse thoroughly to remove all soap traces. Dry parts before putting them back together. This stops mold and bacteria from growing inside.
Monitoring Filter Life
Check the filter life indicator regularly. Most Zero Water filters have a meter for this. When the meter shows the filter is low, replace it soon. Using the filter beyond its life reduces water quality. Track the date of the last filter change to stay on schedule.
Troubleshooting Common Issues
Troubleshooting common issues with your Zero Water filter can save time and keep your water clean. Problems like leaks or odd tastes happen. Fixing these issues is simple and keeps your water safe to drink.
Leaks And Drips
Leaks usually happen if the filter is not properly installed. Check if the filter fits tightly in its place. A loose filter allows water to drip. Also, inspect the O-rings or seals. Damaged seals cause leaks and need replacement. Clean the filter area from dirt or debris. Dirty connections can stop a tight seal. Tighten any loose parts carefully but do not force them. A proper fit stops leaks and drips fast.
Unusual Taste Or Odor
Bad taste or smell means the filter is no longer working well. This happens if the filter is old or clogged. Replace the filter if it has passed its lifespan. Sometimes, new filters have a slight smell. Flush new filters with water before use. Clean the water reservoir regularly to avoid mold or bacteria. Store the filter in a cool, dry place to keep it fresh. Clean water tastes better and is safer to drink.
Frequently Asked Questions
How Often Should I Replace My Zero Water Filter?
Replace the Zero Water filter every 2-3 months or after filtering 15 gallons. Frequent replacement ensures clean, fresh-tasting water and optimal filtration performance.
What Are The Signs My Zero Water Filter Needs Changing?
Watch for slow water flow, bad taste, or the Total Dissolved Solids (TDS) meter reading high. These signs indicate the filter is clogged or exhausted.
Can I Use Any Water Filter With Zero Water Pitchers?
No, only Zero Water filters are compatible. Using other filters can reduce effectiveness and may damage the pitcher or dispenser.
How Do I Dispose Of A Used Zero Water Filter?
Dispose of used filters in regular household waste. Zero Water filters are not recyclable, so follow local waste disposal guidelines for safety.
Conclusion
Replacing your Zero Water filter is simple and quick. Follow the steps carefully to keep your water clean. Change the filter regularly for the best taste and safety. Clean water helps your health and makes drinks better. Take a moment to check your filter now.
Small efforts bring big benefits to your daily life. Enjoy fresh water every day with a new filter. Easy to do. Worth the time.

Hasan Al Sarker is a Reverse Osmosis Specialist. He has worked for many years to ensure safe drinking water for all. His research paper has been published in several journals, including Issue, Medium, and Slideshare. He is recognized as a water doctor among specialists though he did not attend medical college.
Besides working as a researcher of reverse osmosis technology, he is also very fancy with the kitchen and cooking. His guides are reading thousands of people every day. As a head of content, he is responsible for all the published articles at RO System Reviews.