Have you ever found yourself needing clean water but had nothing around except a simple bottle? What if you could turn that bottle into a lifesaving water filter right now?
You’re about to discover an easy, step-by-step way to make your own water filter using just a bottle and a few common materials. This isn’t just a clever trick—it’s a skill that can help protect your health in emergencies or outdoor adventures.
Keep reading, because by the end, you’ll have the confidence to create clean, safer water anytime you need it.
Materials Needed
Making a water filter with a bottle needs simple materials. These items help remove dirt and impurities from water. You can find most materials at home or local stores. Preparing the right materials makes the process easy and effective.
Choosing The Right Bottle
Pick a clean plastic bottle, about 1 to 2 liters. A clear bottle helps see the water level inside. Avoid bottles with cracks or holes. The bottle should be easy to cut and handle.
Essential Filtration Components
Use layers that filter water well. Start with clean cloth or coffee filter to stop big dirt. Add activated charcoal to remove bad smells and chemicals. Use fine sand and gravel to catch small particles. Each layer plays a key role in cleaning water.
Additional Tools
Gather scissors or a sharp knife to cut the bottle. Use a lighter or tape to fix parts if needed. Have a container to catch filtered water below. Clean hands and a workspace keep the process safe.
Preparing The Bottle
Preparing the bottle is the first step in making a simple water filter. It sets the base for all the filtering layers. A clean and well-prepared bottle helps the filter work better. This part focuses on cutting the bottle and making the filter layers inside it.
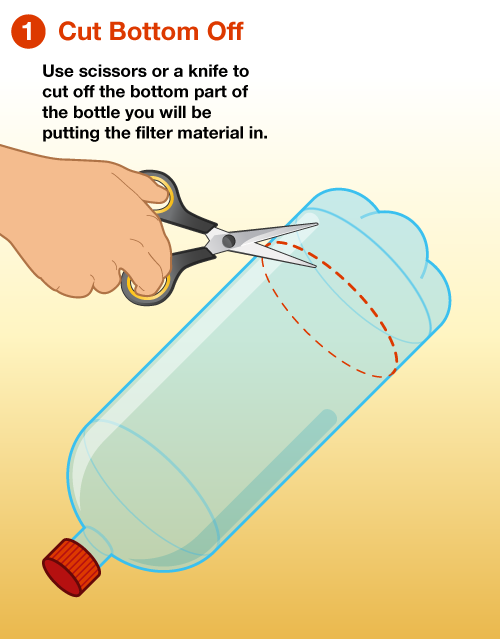
Cutting The Bottle
Start with a clean plastic bottle. Use scissors or a sharp knife carefully. Cut the bottle in half or a little above the middle. The top part will hold the filter materials and water. The bottom part will catch the clean water. Make sure the cut is smooth to avoid injuries.
Creating The Filter Layers
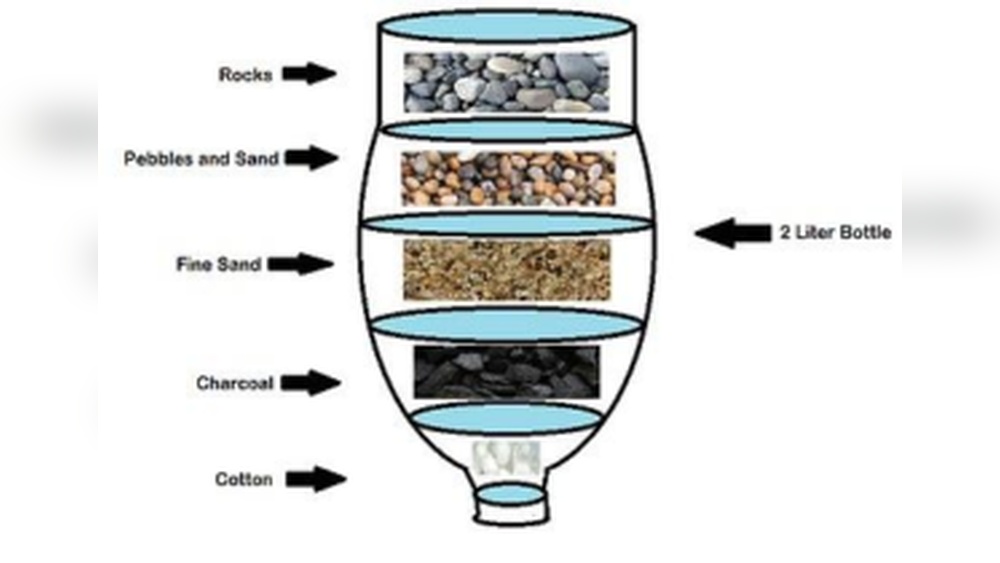
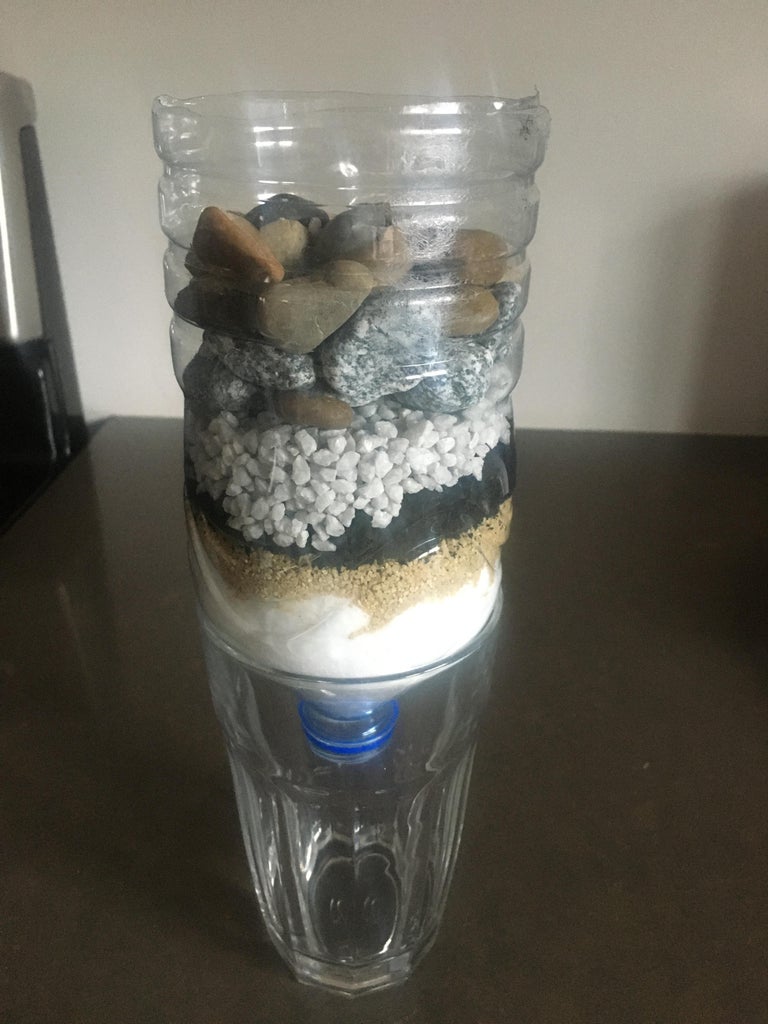
Turn the bottle top upside down like a funnel. Add the filter materials in layers. Start with a small piece of cloth or coffee filter at the neck. Next, add fine sand to trap small particles. Then add coarse sand or dirt. Finally, put activated charcoal or small stones on top. Each layer helps clean the water step by step.
Assembling The Filter
Assembling the water filter is a simple and important step. It helps clean water by trapping dirt and particles. Using a plastic bottle, you can create a basic filter at home. This section explains how to build the filter correctly.
Layering Materials Correctly
Start by cutting the bottle in half. Use the top part upside down like a funnel. Place cloth or coffee filter at the neck to stop materials from falling out. Add layers carefully.
First, put small stones or gravel. It blocks big debris and dirt. Next, add sand. Sand helps trap smaller particles. On top of sand, add activated charcoal. This removes bad smells and chemicals.
Finish with another cloth layer. It keeps all materials in place. Each layer must be even and tight. This helps water flow smoothly through the filter.
Securing The Filter Setup
Hold the filter layers firmly in place. Use rubber bands or tape to wrap around the bottle neck. This keeps layers from mixing. Make sure the filter does not move.
Place the bottom half of the bottle under the filter funnel. It collects clean water. Keep the filter steady on a flat surface. Pour water slowly into the filter top. Watch the clean water drip down.
Using The Water Filter
Using the water filter made from a bottle is simple and practical. This section explains how to use your homemade filter effectively. Follow each step carefully to ensure the water gets cleaner and safer to drink.
Filtering Process Steps
First, pour the dirty water slowly into the top of the filter. Let the water pass through each layer inside the bottle. The layers trap dirt, sand, and other particles.
Collect the clean water from the bottom of the bottle. It may take a few minutes for the water to filter completely. Repeat the process if the water still looks cloudy or dirty.
Do not rush. Give the filter time to work. Clean water is safer and tastes better.
Tips For Effective Filtration
Use small amounts of water at a time. This helps the filter clean the water well. Avoid pouring water too fast. Fast flow means less cleaning.
Replace the filter materials regularly. Old materials lose their ability to clean water. Keep the bottle and layers dry when not in use. This stops mold and bacteria from growing.
Use the filter only for clear water sources. Very muddy or chemical-contaminated water may need other treatment methods.
Cleaning And Maintenance
Keeping your homemade water filter clean is very important. Clean filters work better and last longer. Regular care stops bad smells and dirt build-up. This keeps the water safe and fresh.
When To Replace Filter Materials
Filter materials like charcoal, sand, and cloth wear out over time. Change them every 1 to 2 months. Watch for slow water flow or strange smells. These signs mean the filter is dirty. Using old materials can let dirt pass through. Always use fresh materials for clean water.
Cleaning The Bottle
Wash the bottle every week with warm soapy water. Rinse it well to remove soap. Avoid strong chemicals that can harm the filter. Dry the bottle completely before refilling. Clean bottles stop bacteria from growing inside. This keeps your water pure and safe.
Troubleshooting Common Issues
Making a water filter with a bottle is simple, but sometimes problems occur. These issues can affect how well the filter works. Knowing how to fix common problems helps keep the water clean and safe to drink.
Slow Filtration Problems
Slow filtration happens when water moves too slowly through the filter. Dirt or small particles can block the filter layers. Check if the filter materials are packed too tightly. Loosen them gently to allow water to pass easier. Make sure the bottle holes are not clogged. Clean the holes with a small tool or needle. Using fresh filter materials also improves flow speed.
Dealing With Cloudy Water
Cloudy water means the filter is not cleaning well. Tiny particles may still be in the water. Replace the sand, charcoal, or cloth layers if they look dirty. Wash the filter parts with clean water before reuse. Avoid using dirty or old materials that reduce filter quality. Adding a fine layer of charcoal helps clear the water better. Let the water sit a little after filtering to allow particles to settle.
Safety Considerations
Making a water filter with a bottle is a helpful skill. It can provide cleaner water in emergencies or outdoor trips. Safety matters most when using these filters. Knowing what they can and cannot do keeps you safe. Understanding how to check water safety is very important. This section covers key safety points for DIY water filters.
Limitations Of Diy Filters
DIY water filters remove dirt and some particles. They do not remove all germs or chemicals. Viruses can pass through these filters. Chemicals from pollution may still be in the water. Using these filters alone may not make water safe. Do not rely only on a bottle filter for drinking water.
These filters help improve water clarity. They work best with water that looks clean. Cloudy or smelly water needs more treatment. Boiling or using chemical purifiers may be necessary. Always know the limits before drinking filtered water.
Ensuring Water Is Safe To Drink
Boil filtered water to kill bacteria and viruses. Boiling for at least one minute is best. Use chemical tablets or drops if boiling is not possible. Follow instructions carefully for safe use. Store filtered water in clean containers only.
Check water for strange color or smell before use. If water looks or smells bad, do not drink it. Use clear, fresh water sources for filtering. Clean your DIY filter parts regularly. Dirty filters can cause more harm than good.
Frequently Asked Questions
How Do You Make A Water Filter With A Bottle?
Cut the bottle in half and invert the top as a funnel. Layer cotton, sand, and charcoal inside. Pour water through to filter out impurities effectively.
What Materials Are Needed For A Bottle Water Filter?
You need a plastic bottle, cotton balls, activated charcoal, fine sand, and gravel. These layers help remove dirt and contaminants from water.
How Effective Is A Homemade Water Filter Bottle?
It removes large particles and some impurities but doesn’t eliminate all bacteria or viruses. Use it as a basic filter, not a complete purifier.
Can A Bottle Water Filter Remove Chemicals From Water?
No, homemade filters mainly remove sediments and debris. Chemicals and dissolved contaminants require advanced filtration methods like activated carbon filters or purification tablets.
Conclusion
Making a water filter with a bottle is simple and useful. You only need a few basic materials. This filter helps remove dirt and some impurities from water. It is not perfect for all water types but works well in emergencies.
Always try to boil water after filtering for safety. This easy method can help when clean water is hard to find. Practice making the filter before you need it. Stay safe and keep water clean wherever you go.
Hasan Al Sarker is a Reverse Osmosis Specialist. He has worked for many years to ensure safe drinking water for all. His research paper has been published in several journals, including Issue, Medium, and Slideshare. He is recognized as a water doctor among specialists though he did not attend medical college.
Besides working as a researcher of reverse osmosis technology, he is also very fancy with the kitchen and cooking. His guides are reading thousands of people every day. As a head of content, he is responsible for all the published articles at RO System Reviews.
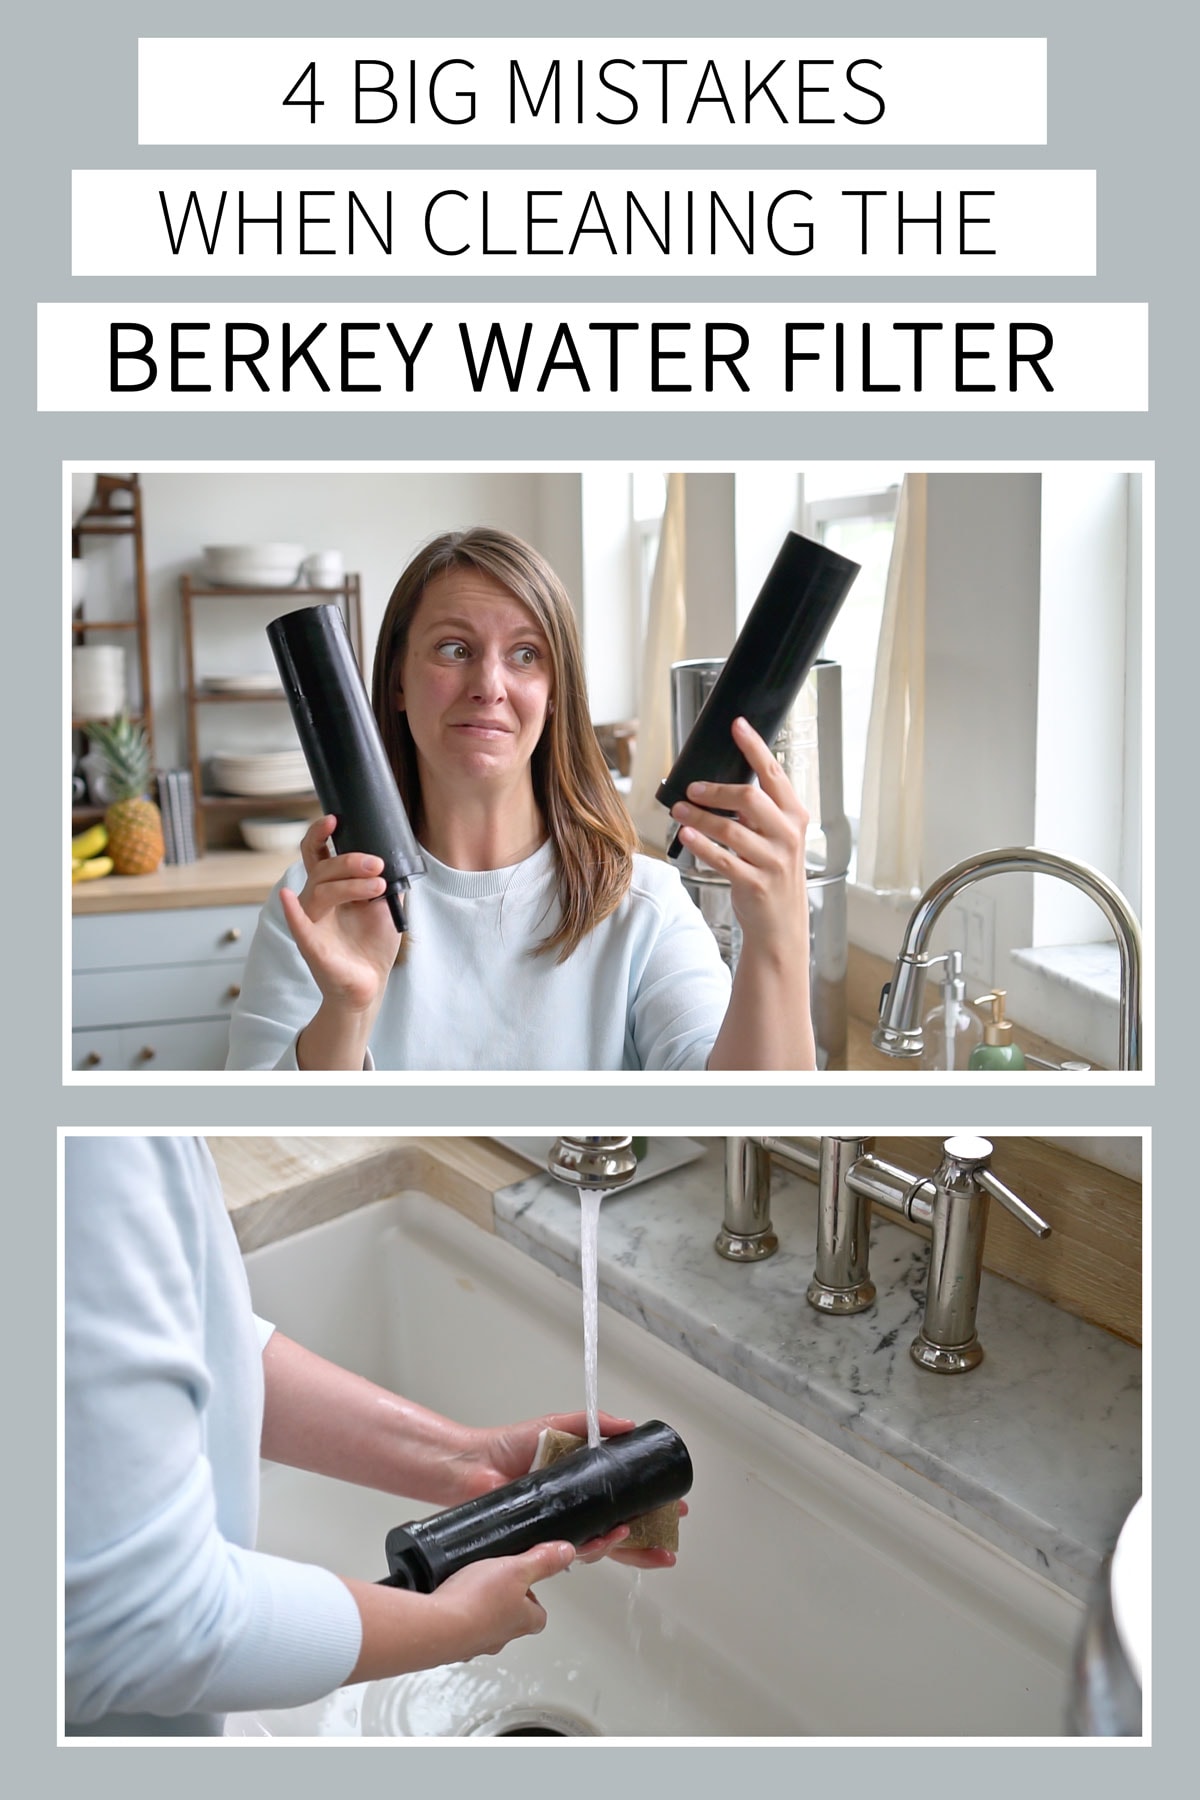
You rely on your Berkey water filter to provide clean, fresh water every day. But did you know that keeping your filter in top shape means regular cleaning?
If you want to enjoy pure water without any hassle, knowing how to clean your Berkey water filter properly is key. In this guide, you’ll discover simple steps to maintain your filter’s performance and extend its life. Ready to keep your water tasting its best?
Let’s dive in.
Berkey Filter Basics
The Berkey water filter is a popular choice for clean drinking water. It uses a special system to remove many harmful substances. Understanding its basics helps in proper cleaning and maintenance. This ensures pure water every time.
Knowing how the filter works and its parts makes the cleaning process easier. Below are the key components and the working principle of the Berkey filter.
Key Components
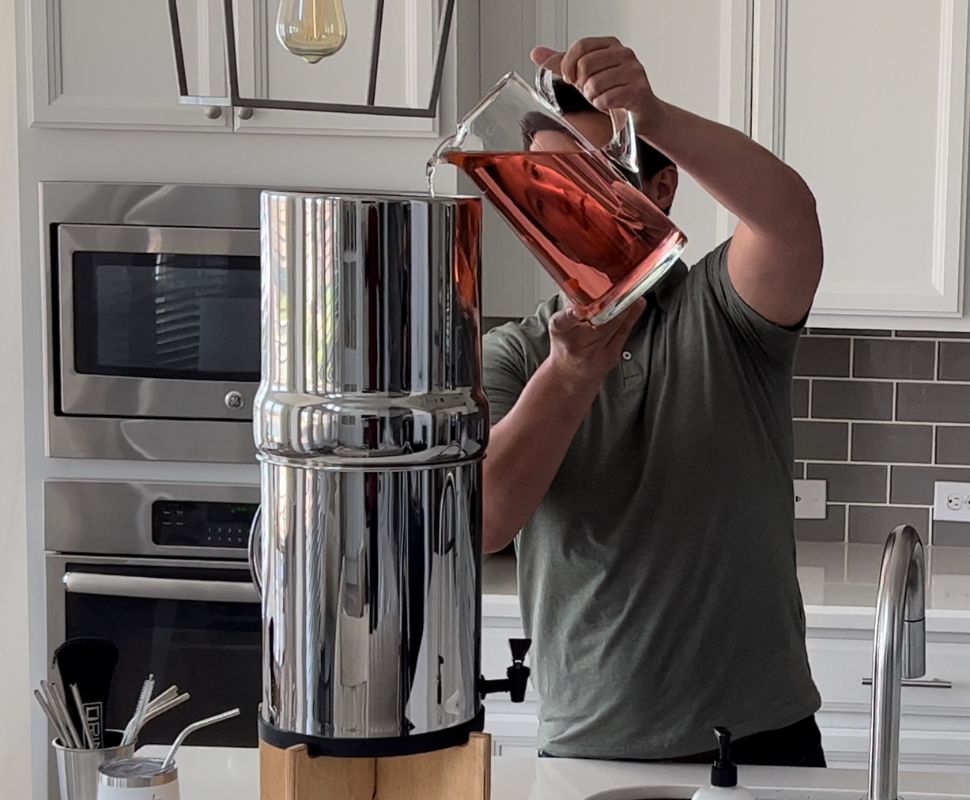
The Berkey system has two main parts. The upper chamber holds the dirty water. The lower chamber collects the clean water. Between these chambers are the Black Berkey filters. These filters remove contaminants from the water.
The unit also includes spigots for easy water access. The chambers are made of stainless steel or BPA-free plastic. This design keeps the water safe and fresh.
How It Works
Water flows from the top chamber through the filters. The Black Berkey filters trap bacteria, viruses, and chemicals. They also reduce bad tastes and odors. Clean water then drips into the lower chamber.
This process does not use electricity or chemicals. It relies on gravity and the special filter media. The result is safe, fresh water ready for drinking or cooking.
When To Clean Your Berkey
Knowing when to clean your Berkey water filter helps keep water pure and fresh. Regular cleaning stops dirt and buildup from harming the filter’s performance. It also extends the life of your Berkey system.
Cleaning at the right time ensures smooth water flow and good taste. Watch for signs that show your Berkey needs cleaning soon. Follow a cleaning schedule based on use and water quality.
Signs Of Clogging
Slow water flow is the first sign of clogging. Water may take longer to pass through the filter. The taste of water may change, becoming odd or stale. You might see dirt or black particles in the water. These signs mean it’s time to clean the filter elements. Ignoring clogging can reduce water quality and filter life.
Cleaning Frequency
Clean the Berkey filter elements every 3 to 6 months. Heavy use or dirty water calls for more frequent cleaning. If the water flow slows or taste worsens, clean the filters sooner. Regular cleaning keeps your Berkey working well and your water safe. Follow the manufacturer’s instructions for the best results.
Tools Needed For Cleaning
Cleaning your Berkey water filter keeps it working well and ensures safe water. Having the right tools makes the job easier and faster. You need simple items that you might already have at home.
Soft Brush Or Sponge
A soft brush or sponge helps remove dirt without damaging the filter. Avoid hard brushes that can scratch the surface. Use gentle strokes to clean the filter elements and the container walls.
Mild Dish Soap
Mild dish soap works well to clean the filter parts. Use only a small amount to avoid leaving soap residue. Rinse thoroughly with clean water after washing.
Clean Water
Clean water is important for rinsing the filter and parts. Use fresh, cold water to wash away dirt and soap. Avoid using hot water as it can harm the filter elements.
Soft Cloth Or Towel
A soft cloth or towel helps dry the filter parts after cleaning. Pat dry gently to avoid damage. Make sure all parts are fully dry before reassembling the filter.
Step-by-step Cleaning Process
Cleaning your Berkey water filter ensures clean, fresh water every day. The process is simple and takes only a few steps. Follow this guide to keep your filter in top shape.
Disassembling The Filter
Start by removing the top chamber from the bottom. Take out the Black Berkey elements carefully. Avoid touching the filter holes to keep them clean. Set the parts on a clean surface.
Scrubbing The Elements
Use a soft brush or sponge to scrub the filter elements. Focus on removing any dirt or buildup on the surface. Do not use soap or detergent. Rinse the elements under cold water after scrubbing.
Rinsing And Reassembling
Rinse the chambers with clean water to remove any debris. Place the Black Berkey elements back into the top chamber. Secure the top chamber on the bottom part tightly. Your Berkey filter is ready for use again.
Deep Cleaning Tips
Deep cleaning your Berkey water filter keeps it working well. It removes dirt and buildup that regular cleaning might miss. This helps your filter last longer and keeps your water pure. Follow these tips for a thorough clean.
Soaking Techniques
Fill a clean container with warm water. Add a small amount of mild dish soap. Submerge the filter elements in the solution. Let them soak for 30 minutes to loosen dirt. After soaking, rinse the filters with clean water. Avoid using harsh chemicals or bleach. These can damage the filter’s material.
Removing Stubborn Deposits
Use a soft brush to scrub away tough spots. Gently clean the surface without pressing too hard. Focus on areas with visible buildup or stains. Rinse the filter thoroughly after scrubbing. Repeat the process if deposits remain. Clean filters ensure better water flow and taste.
Maintaining Your Berkey Filter
Maintaining your Berkey filter is key to clean, safe drinking water. Proper care helps the filter work longer and better. Simple steps keep your water pure and fresh. Regular attention prevents problems and saves money.
Storage Advice
Store your Berkey filter in a dry, cool place. Avoid direct sunlight to protect the filter parts. Keep the system covered with a clean cloth when not in use. This stops dust and dirt from entering. Empty water from the system if storing for a long time. Dry all parts well before storage to prevent mold growth.
Avoiding Contamination
Always wash your hands before handling the filter. Use clean containers and tools when cleaning or refilling. Avoid touching the inside of the filter or the filtered water. Replace filter elements on time to keep water safe. Clean the system regularly to stop bacteria and dirt buildup. Follow the manufacturer’s instructions for cleaning and care.
Troubleshooting Common Issues
Berkey water filters are reliable, but some issues may arise over time. Troubleshooting common problems helps keep your filter working well. Understanding simple fixes can save time and ensure clean water.
Low Flow Rate
Low flow rate means water takes too long to pass through the filter. Dirt or sediment may block the filter elements. Clean the filters by soaking them in water and gently scrubbing with a soft brush.
Check if the filter elements are fully tightened. Loose filters can slow water flow. Also, make sure the water level in the upper chamber is high enough. Low water pressure affects flow speed.
Off Tastes Or Odors
Strange tastes or smells often come from new filters or dirty parts. Before first use, prime the filters as instructed. Rinse the system thoroughly to remove any residue.
Regular cleaning of the chambers and spigot helps avoid odors. Replace filters after their lifespan to keep water fresh. Avoid using soap inside the filter parts, as it may leave a taste.
Extending Filter Lifespan
Extending the lifespan of your Berkey water filter saves money and ensures clean water longer. Taking care of the filter is easy with simple steps. These steps keep the filter working well and improve water quality.
Regular Maintenance
Rinse the Black Berkey filters every 3-6 months. Use clean water and a soft brush to remove buildup. Avoid harsh soaps or chemicals that harm the filter. Clean the clear elements gently to keep pores open. Check the system parts often for cracks or leaks. Replace worn parts promptly to avoid damage. Regular checks prevent common problems and keep water flowing well.
Proper Usage Tips
Only use the Berkey filter with clean, clear water. Avoid filtering muddy or salty water. Do not let water sit in the filter for days. Store the system in a cool, dry place when not in use. Fill the system slowly to avoid overflow and damage. Follow the manufacturer’s instructions for best results. Proper use helps the filter last longer and work better.
Frequently Asked Questions
How Often Should I Clean My Berkey Water Filter?
You should clean your Berkey water filter every 3 to 6 months. This keeps it efficient and free from buildup. Regular cleaning ensures better water flow and taste. Always follow manufacturer instructions for best results.
What Is The Best Way To Clean Berkey Filters?
Use a soft brush and clean water to scrub the filter elements gently. Avoid soap or chemicals as they can damage the filters. Rinse thoroughly before reassembling. This method maintains filter effectiveness and longevity.
Can I Use Vinegar To Clean Berkey Filters?
No, using vinegar or harsh chemicals can damage the Berkey filters. Stick to using water and a soft brush for cleaning. This preserves the filter’s integrity and ensures safe drinking water.
How Do I Remove Black Residue From Berkey Filters?
Black residue is normal and comes from the filter’s purification process. Rinse and scrub the filters gently with water to remove excess residue. Do this during regular cleaning to maintain filter performance.
Conclusion
Cleaning your Berkey water filter keeps water fresh and safe. Regular cleaning stops dirt and buildup from clogging the system. Use gentle scrubbing and clean water to protect the filter. Take care of your filter to enjoy pure water daily.
A clean Berkey means healthy water for you and your family. Simple steps can extend your filter’s life and improve water taste. Keep your Berkey clean and enjoy fresh water every day.
Hasan Al Sarker is a Reverse Osmosis Specialist. He has worked for many years to ensure safe drinking water for all. His research paper has been published in several journals, including Issue, Medium, and Slideshare. He is recognized as a water doctor among specialists though he did not attend medical college.
Besides working as a researcher of reverse osmosis technology, he is also very fancy with the kitchen and cooking. His guides are reading thousands of people every day. As a head of content, he is responsible for all the published articles at RO System Reviews.
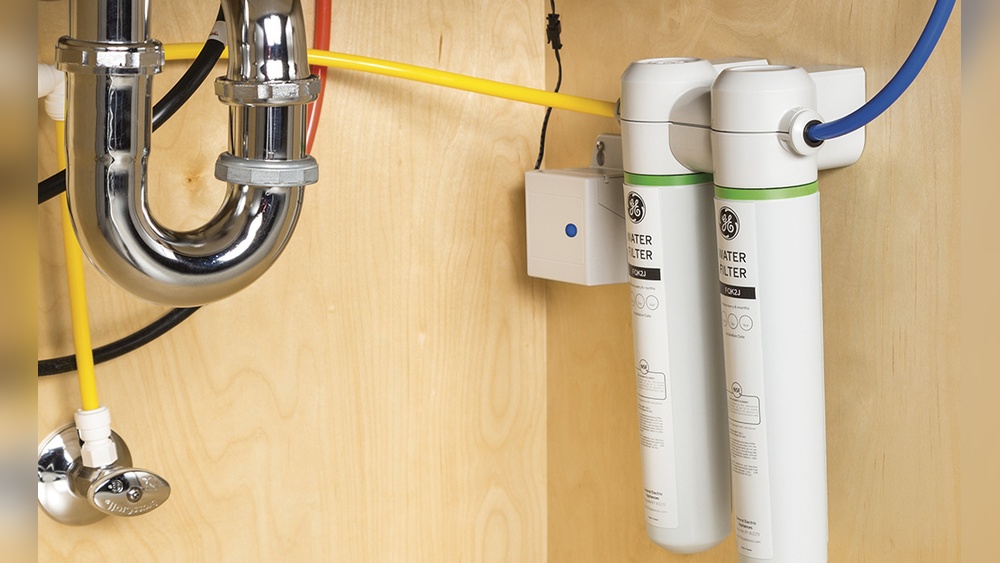
Thinking about installing a water filter under your sink but unsure how much it will cost? You’re not alone.
Knowing the price upfront can help you decide if this upgrade fits your budget—and your lifestyle. You’ll discover the real costs involved, from buying the filter to professional installation. By the end, you’ll have a clear idea of what to expect, so you can make the best choice for your home and health.
Keep reading to find out how much you need to invest for clean, fresh water right at your fingertips.
Factors Affecting Installation Cost
Several factors influence the cost to install a water filter under your sink. Understanding these elements helps you plan your budget better. Costs can vary widely based on the type of filter, plumbing work, and other needs.
Type Of Water Filter
The kind of water filter affects installation costs significantly. Basic filters are cheaper and easier to install. Advanced systems like reverse osmosis need more work and cost more. Some filters require electrical connections, adding to the price.
Complexity Of Plumbing
Simple plumbing setups lower installation costs. Older or complicated plumbing raises the price. Extra work like cutting pipes or adding valves takes more time. Difficult access to the sink area can also increase labor costs.
Labor Charges
Labor costs depend on where you live and the professional’s experience. Experienced plumbers charge more but work faster and better. Some installers charge a flat fee, others by the hour. Always ask for a clear quote before work begins.
Additional Materials Needed
Extra materials can add to the total cost. This includes fittings, brackets, or tubing not included with the filter. Sometimes you need a new faucet or drain parts. These small items add up and affect the final price.
Average Price Range
Installing a water filter under your sink can improve water quality. Prices vary based on the type and features of the system. Knowing the average cost helps plan your budget wisely.
Basic Filters
Basic under-sink water filters cost between $50 and $100. They usually include simple cartridges that remove chlorine and sediment. Installation is often easy and can be done without a plumber. These filters suit small households or renters.
Mid-range Filters
Mid-range systems range from $100 to $300. They offer better filtration, including removing heavy metals and bacteria. These filters often have multiple stages and longer-lasting cartridges. Installation might require professional help for best results.
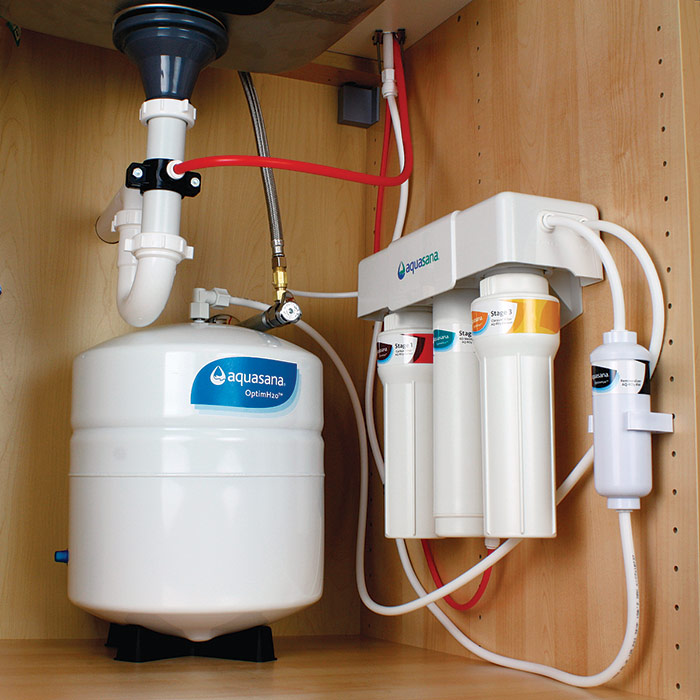
High-end Systems
High-end under-sink filters cost $300 to $600 or more. They provide advanced filtration like reverse osmosis and UV purification. These systems deliver the purest water but need professional installation. Maintenance is more frequent but keeps water quality high.
Diy Vs Professional Installation
Deciding between DIY and professional installation for an under-sink water filter can affect your budget and time. Some homeowners choose to install the filter themselves to save money. Others prefer to hire a professional to ensure the job is done right. Understanding the pros and cons of each option helps you make the best choice for your needs.
Pros And Cons Of Diy
Doing the installation yourself saves money on labor costs. You only pay for the filter and materials. You can start the project anytime without waiting for an appointment. Learning new skills can be satisfying and useful for future repairs.
DIY installation may take longer if you lack experience. Mistakes can cause leaks or damage under your sink. Some filters need special tools or plumbing knowledge. Warranty may be void if you install it incorrectly. Troubleshooting problems can be frustrating without guidance.
When To Hire A Pro
Hire a professional if you lack plumbing skills or tools. Complex plumbing systems or older pipes need expert handling. Professional installation usually comes with a warranty on work done. It saves time and reduces the risk of damage. Pros ensure proper filter setup for clean, safe water. They can also advise on filter maintenance and replacement.
Cost-saving Tips
Installing a water filter under your sink can be costly. Saving money on this project is possible with smart choices. Small steps can reduce expenses without losing quality. Focus on picking the right filter, combining services, and keeping your system well maintained. These tips help stretch your budget and ensure clean water.
Choosing The Right Filter
Select a filter that fits your water needs and budget. Avoid buying the most expensive model. Basic filters often remove common impurities effectively. Check product reviews and certifications for quality assurance. A suitable filter saves money on replacements and repairs later.
Bundling Installation Services
Hire professionals who offer package deals. Combining plumbing and filter installation cuts labor costs. Many companies give discounts for bundled services. This approach saves time and money. It also ensures proper setup, avoiding future problems.
Regular Maintenance Benefits
Keep your filter clean and change cartridges on time. Regular care prevents damage and maintains water quality. A well-maintained system lasts longer and needs fewer repairs. This reduces unexpected expenses. Set reminders to check your filter regularly.
Common Installation Challenges
Installing a water filter under the sink can improve your home’s water quality. The process seems simple but often comes with challenges. Knowing common problems helps prepare for a smooth installation. Below are key issues many face during setup.
Space Constraints
Under-sink areas are usually tight and crowded. Pipes, garbage disposals, and other items reduce available space. Finding a spot for the filter can be tough. Small filters fit better but may cost more. Measuring the space first saves time and trouble.
Water Pressure Issues
Water filters need the right pressure to work well. Too low pressure means slow water flow. Too high pressure can damage the filter system. Checking your home’s water pressure helps pick the right filter. Sometimes, a pressure regulator is needed to protect the filter.
Leak Prevention
Leaks can cause water damage and waste. Tight connections and proper sealing stop leaks. Using plumber’s tape on threads helps secure fittings. Testing for leaks after installation is important. Fix any drips immediately to avoid bigger problems.
Long-term Investment Value
Installing a water filter under the sink is more than a one-time cost. It is a smart choice that pays off over time. This upgrade supports your health, saves money, and can even boost your home’s worth. Understanding its long-term value helps you see why it matters.
Health Benefits
Filtered water removes harmful chemicals and germs. Drinking clean water supports your body’s organs and immune system. It also improves taste and smell. Good water means fewer health problems and less chance of sickness. This leads to fewer doctor visits and lower medical bills.
Reducing Bottled Water Expenses
Bottled water costs add up quickly. Installing a filter cuts down the need to buy bottled water. Clean water from your tap is ready anytime. This saves you money every month. Less plastic waste also helps the environment.
Increasing Home Value
Homes with modern features attract buyers. A water filter under the sink shows care and quality. It can make your home more appealing. This upgrade may increase your home’s resale price. It is a small change with a big impact on value.
Frequently Asked Questions
How Much Does Under Sink Water Filter Installation Cost?
Installation costs typically range from $100 to $300. Prices vary based on filter type, labor fees, and location. Simple DIY installations cost less, while professional services increase expenses. Additional plumbing work may add to the total cost. Always get multiple quotes for the best price.
Is Professional Installation Necessary For Under Sink Filters?
Professional installation ensures proper setup and leak prevention. Complex plumbing connections may require expertise. DIY installation suits experienced homeowners but risks errors. A professional guarantees warranty and system efficiency. Consider hiring a plumber for reliable results and peace of mind.
How Long Does Installing An Under Sink Water Filter Take?
Installation usually takes 1 to 2 hours. Time depends on plumbing complexity and filter model. DIY setups may take longer for beginners. Professionals complete the job faster with proper tools. Scheduling extra time ensures thorough testing for leaks and function.
What Factors Affect The Cost Of Installation?
Factors include filter type, labor charges, and plumbing complexity. High-end filters cost more to install. Additional parts or modifications increase expenses. Regional labor rates also impact pricing. Understanding these helps budget for your water filter project.
Conclusion
Installing a water filter under your sink helps improve water quality at home. The cost depends on the filter type, brand, and installation complexity. Basic models and DIY installation save money but take time. Professional help costs more but ensures correct setup.
Consider long-term savings on bottled water and health benefits. Choose a filter that fits your budget and needs. Clean water is worth the investment for your family’s health and peace of mind. Take time to compare options before deciding. Clear, fresh water is always a smart choice.
Hasan Al Sarker is a Reverse Osmosis Specialist. He has worked for many years to ensure safe drinking water for all. His research paper has been published in several journals, including Issue, Medium, and Slideshare. He is recognized as a water doctor among specialists though he did not attend medical college.
Besides working as a researcher of reverse osmosis technology, he is also very fancy with the kitchen and cooking. His guides are reading thousands of people every day. As a head of content, he is responsible for all the published articles at RO System Reviews.
Have you ever stopped to think about what’s really in the water you drink every day? When you use a water filter, you probably expect it to make your water cleaner and healthier.
But what about the minerals your body needs? Does filtered water still contain those essential minerals, or are they stripped away? Understanding this can make a big difference in your health and hydration. Keep reading to discover the truth about filtered water and minerals—and what it means for you.
Minerals In Natural Water
Natural water carries minerals that come from soil and rocks. These minerals dissolve into water as it moves through the earth. They give water its unique taste and can support health in small amounts.
Not all water contains the same minerals. The type and amount depend on the source and the path water takes underground. Rivers, lakes, and springs all have different mineral profiles.
Common Minerals Found In Water
Calcium is a major mineral in many water sources. It helps build strong bones and teeth. Magnesium is another mineral often found in water. It supports muscle and nerve function. Potassium helps with cell function and heart health. Sodium appears in small amounts and helps balance fluids in the body. Trace minerals like iron, zinc, and fluoride can also be present.
Health Benefits Of Minerals
Minerals in water provide essential nutrients for the body. Calcium and magnesium help keep bones healthy and strong. These minerals may also improve heart health by supporting blood pressure regulation. Some minerals aid muscle function and reduce cramps. Trace minerals support the immune system and overall wellness. Drinking mineral-rich water can be a simple way to boost daily mineral intake.
How Water Filtration Works
Water filtration removes dirt, chemicals, and impurities from water. It makes water safer and cleaner to drink. Filters use different methods to catch unwanted particles. Some keep minerals, while others remove almost everything.
Understanding how filtration works helps in choosing the right filter. Some filters remove harmful substances but keep healthy minerals. Others may strip water of almost all minerals.
Types Of Water Filters
There are many types of water filters. Carbon filters trap chlorine and bad tastes. Reverse osmosis filters push water through tiny membranes. This removes most impurities but also minerals. Ceramic filters block bacteria and sediments. Each type serves a different need.
Filtration Processes And Their Effects
Carbon filtration uses activated charcoal to absorb chemicals. It keeps minerals like calcium and magnesium. Reverse osmosis forces water through a fine filter. It removes nearly all minerals and contaminants. Ultraviolet filters use light to kill bacteria. They do not remove minerals. Distillation boils water and collects steam. It removes minerals and impurities completely.
Impact Of Filtration On Minerals
Water filtration is popular for cleaner and safer drinking water. It removes many impurities and harmful substances. But this process can also affect minerals in the water. Minerals like calcium, magnesium, and potassium are important for health.
Some filters remove these minerals, while others keep them. Understanding how filtration affects minerals helps you choose the right water filter. It also explains the difference between filtered and tap water.
Mineral Removal By Different Filters
Not all water filters remove minerals the same way. Activated carbon filters mainly remove chlorine and bad tastes. They keep most minerals intact. Reverse osmosis filters remove nearly all minerals and impurities. They produce very pure water but with fewer minerals.
Distillation also strips water of minerals by boiling and condensing it. Ceramic filters block bacteria but do not remove minerals. Ion exchange filters reduce hardness by replacing calcium and magnesium with sodium.
Comparing Filtered And Tap Water Mineral Content
Tap water usually contains natural minerals from the source. These minerals add taste and provide health benefits. Filtered water often has fewer minerals, especially after reverse osmosis or distillation. This water tastes flat to some people.
Some filtered water is re-mineralized by adding minerals back. This improves taste and nutrition. Knowing your filter type helps you understand mineral levels in your water. It guides choices for both health and taste preferences.
Mineral Retention Filters
Mineral retention filters help keep important minerals in your water. They remove harmful substances but leave minerals like calcium and magnesium. These minerals improve water taste and support health. Understanding how these filters work helps you choose the right water filter.
Many people worry about losing minerals after filtering water. Mineral retention filters address this by balancing purity and mineral content. This makes filtered water both safe and nutritious.
Filters Designed To Preserve Minerals
Some filters use special materials that block chemicals but allow minerals through. Activated carbon filters often keep minerals while removing chlorine and bad odors. Ceramic filters trap bacteria but do not remove minerals.
Other filters combine layers to protect mineral content. These designs focus on cleaning water without stripping valuable nutrients. This helps maintain water’s natural benefits.
Effectiveness Of Mineral Retention
Mineral retention filters vary in how well they keep minerals. Some remove up to 95% of harmful substances yet keep most minerals intact. Others may reduce mineral levels slightly but still offer healthy water.
Testing shows these filters improve water safety and taste. They also support hydration and body functions by preserving minerals. Choosing a filter with proven mineral retention ensures balanced water quality.
Adding Minerals Back To Filtered Water
Filtered water often loses essential minerals during the purification process. Adding minerals back to filtered water improves taste and health benefits. This process is called mineralization. It helps balance water’s purity with its natural nutrients.
Mineralization Techniques
One common way to add minerals is through mineral cartridges in water filters. These cartridges release calcium, magnesium, and potassium into the water. Another method uses mineral drops that mix with filtered water. Some systems pass water through mineral stones or layers. These techniques restore minerals without compromising water cleanliness.
Benefits Of Re-mineralized Water
Minerals improve water taste and make it more refreshing. They support bone health and muscle function. Drinking mineral-rich water helps keep electrolyte balance. It also boosts hydration efficiency in the body. Re-mineralized water feels smoother and less flat. This water supports overall well-being in a natural way.
Choosing The Right Filter For You
Choosing the right water filter is important for clean and healthy water. Different filters remove different things from water. Some filters take out harmful chemicals but also remove minerals. Others keep minerals but may not remove all impurities. Understanding your needs helps pick the best filter for your home.
Factors To Consider
Think about the quality of your tap water first. Check for chlorine, lead, or other contaminants. Some filters remove bacteria and viruses; others do not. Consider your budget and how often filters need changing. Also, size and installation type matter for your space and convenience.
Balancing Purity And Mineral Content
Some filters remove almost everything, including healthy minerals like calcium and magnesium. These minerals are good for your body. Filters like reverse osmosis remove minerals but provide very pure water. Other filters keep minerals but may not remove all toxins. Decide which is more important: pure water or mineral content.
Health Considerations
Health is a key point when choosing the right water to drink. Filtered water often removes many substances, including minerals. This fact raises questions about its impact on health. Understanding how minerals in water affect the body helps make informed choices.
Minerals like calcium and magnesium support bones and heart health. Their presence in water can add to daily mineral intake. Filtered water may lack these minerals, so it is important to consider other sources.
Do You Need Minerals From Water?
Our bodies need minerals for many functions. Most minerals come from food, not water. Fruits, vegetables, and dairy provide enough minerals. Drinking water minerals add a small amount only. Missing minerals in water rarely cause health problems. People with special health needs should check with a doctor. For most, filtered water is safe and healthy.
Alternatives To Water Minerals
Getting minerals from food is the best way. Foods like spinach, nuts, and milk are rich in minerals. Taking mineral supplements is another option if needed. Some use mineral drops to add to filtered water. Balanced meals cover most mineral needs well. Drinking filtered water does not block mineral absorption from food.
Frequently Asked Questions
Does Filtered Water Contain Essential Minerals?
Filtered water may lose some minerals during purification. However, many filters retain beneficial minerals like calcium and magnesium, depending on the filter type. Reverse osmosis often removes most minerals, while carbon filters typically preserve them.
How Does Filtration Affect Water’s Mineral Content?
Filtration removes impurities and contaminants from water. Some filtration methods also reduce mineral levels, especially reverse osmosis. Other filters, like activated carbon, mainly target chemicals without stripping essential minerals.
Is Mineral Content Important In Drinking Water?
Yes, minerals like calcium and magnesium support bone and heart health. Drinking water contributes to daily mineral intake, but most minerals come from food sources. Balanced mineral levels in water enhance taste and nutritional value.
Can Filtered Water Be Remineralized?
Yes, some filtration systems include remineralization stages. These add back essential minerals lost during purification. Remineralization improves water taste and health benefits by restoring calcium, magnesium, and other vital minerals.
Conclusion
Filtered water often loses some minerals during purification. This can affect taste and health benefits. Some filters remove minerals, while others keep them. You can add minerals back using special filters or supplements. Drinking enough minerals from food also helps.
Clean water remains important for safety and health. Choosing the right filter depends on your needs. Think about mineral content and water quality. Stay informed and pick what suits your lifestyle best.
Hasan Al Sarker is a Reverse Osmosis Specialist. He has worked for many years to ensure safe drinking water for all. His research paper has been published in several journals, including Issue, Medium, and Slideshare. He is recognized as a water doctor among specialists though he did not attend medical college.
Besides working as a researcher of reverse osmosis technology, he is also very fancy with the kitchen and cooking. His guides are reading thousands of people every day. As a head of content, he is responsible for all the published articles at RO System Reviews.
If you’ve noticed your Frigidaire fridge isn’t cooling quite right or the water tastes off, it might be time to change the water filter. But how do you remove that filter without causing damage or making a mess?
You’re in the right place. This guide will walk you through simple, clear steps to take out your Frigidaire water filter quickly and safely. By the end, you’ll feel confident handling this task yourself—and keep your water fresh and clean.
Ready to get started? Let’s dive in.
Identify Your Water Filter Type
Knowing the type of water filter in your Frigidaire fridge helps with removal. Different filters fit different models and locations. Identifying the filter type saves time and avoids mistakes. Start by locating the filter inside the fridge. Then check the model number to find the exact filter type.
Locate The Filter
Open your fridge door to look for the water filter. Most Frigidaire filters sit in the upper right corner or in the base grille. Some models have the filter inside the fridge near the top shelf. Check for a round or rectangular cover that hides the filter. It may have a twist or push release.
Check The Model Number
Find the model number on the fridge label, usually inside the door frame. Write down this number to use it for filter identification. You can also find the filter model number on the filter itself. This helps confirm the correct filter type for replacement. Use this information to get the right filter for your fridge.
Gather Necessary Tools
Gathering the right tools makes removing your Frigidaire water filter easier. It saves time and prevents damage to the filter or fridge. Preparing ahead helps you work smoothly and safely.
Recommended Tools
You will need a clean cloth to catch drips from the filter. A small container or bowl works well for holding the old filter. Most Frigidaire filters twist out by hand. If it is tight, a rubber jar opener can give extra grip.
Keep a pair of gloves handy. They protect your hands and keep them clean. A flashlight helps if the filter area is dark or hard to see. These simple tools ensure the removal process goes well.
Safety Precautions
Turn off the water supply before removing the filter. This prevents leaks and water damage. Unplug the fridge to avoid any electrical issues. Handle the filter gently to avoid breaking it.
Wear gloves to keep your hands safe from sharp edges inside the filter housing. Work slowly and carefully. Stop if you feel resistance or if the filter does not move easily.
Prepare The Refrigerator
Preparing your refrigerator is the first step before removing the water filter. This step ensures safety and prevents water leaks. Taking these simple actions saves time and avoids damage.
Turn Off Water Supply
Locate the water valve behind or under the refrigerator. Turn the valve clockwise to stop the water flow. This step prevents water from spilling during filter removal.
Check if the water stops by trying the dispenser briefly. No water flow means you are ready for the next step.
Unplug The Appliance
Find the power cord at the back of the refrigerator. Pull the plug from the wall outlet gently. This action avoids electrical hazards while you work on the filter.
Do not skip this step to ensure your safety. Always handle electrical appliances with care.
Remove The Water Filter
Removing the water filter from your Frigidaire refrigerator is simple. This step is important before replacing the filter or cleaning the unit. Knowing the right method helps avoid damage and keeps your fridge working well.
Different Frigidaire models use different removal methods. Most filters come out with either a twist and pull or a push and release action. Both methods are quick and easy once you understand them.
Twist And Pull Method
Locate the water filter inside the fridge. It usually sits in the upper right corner or near the fresh food section.
Grip the filter firmly. Turn it counterclockwise about a quarter turn. You will feel it loosen.
After twisting, pull the filter straight out. Keep a steady hand to avoid dropping it.
Dispose of the old filter properly or prepare it for recycling.
Push And Release Method
Find the water filter inside your fridge. Look for a button or latch near the filter.
Press the release button firmly. This action unlocks the filter from its place.
While pressing the button, gently pull the filter out. It should slide out smoothly.
Handle the filter carefully to avoid spills or damage.
Handle The Old Filter
Handling the old water filter from your Frigidaire is a simple task. It requires care to avoid spills and keep your fridge clean. After removing the filter, focus on proper steps to manage it safely. Follow these key points to handle the old filter well.
Proper Disposal
Dispose of the old filter according to local rules. Many filters contain plastic parts that should not go into regular trash. Some areas offer recycling programs specifically for water filters. Check if your community has such options. If not, wrap the filter in a plastic bag to prevent leaks before throwing it away. Proper disposal helps protect the environment and your home.
Check For Leaks
Leaks can cause water damage inside your fridge. After removing the filter, inspect the filter housing closely. Look for any water droplets or wet spots. Use a cloth to wipe around the area. If you notice leaks, ensure the new filter fits correctly. Tighten it just enough to stop dripping, but avoid over-tightening. Regular checks help keep your fridge dry and working well.
Install A New Filter
Installing a new water filter in your Frigidaire refrigerator is easy. This step ensures clean, fresh-tasting water and ice. Follow these simple instructions to fit the new filter correctly and avoid leaks or damage.
Aligning The Filter
First, check the new filter for any protective covers. Remove these before installation. Hold the filter with the label facing out. Look for the arrows or marks on the filter and the filter housing. Match these marks carefully. Gently insert the filter into the slot. Do not force it. It should slide in smoothly when aligned correctly.
Securing In Place
Once the filter is in position, turn it clockwise. This action locks the filter securely. You will feel a slight resistance when it is tight. Do not over-tighten the filter. Stop turning as soon as it feels snug. Open the water dispenser to check for leaks. If water flows normally, the filter is properly installed.
Reset The Filter Indicator
After replacing your Frigidaire water filter, reset the filter indicator light. This step helps the fridge track the new filter. It stops unnecessary alerts and keeps your water clean and fresh.
Locate The Reset Button
Find the reset button on your fridge’s control panel. It is usually near the water filter indicator light. The button may say “Reset” or “Filter.”
Some models have a small pinhole button. Use a paperclip to press it gently.
Follow Reset Steps
Press and hold the reset button for about 3 seconds. The filter light should blink or turn off. This means the reset worked.
If the light stays on, repeat the process. Make sure you press the right button firmly. Your Frigidaire is now ready to track the new filter.
Troubleshooting Tips
Removing a water filter from a Frigidaire fridge can sometimes cause problems. This section covers common issues and simple fixes. These tips help you handle trouble quickly. Stay calm and follow each step carefully.
Filter Not Releasing
Sometimes the filter sticks and does not come out easily. Check if the filter is in the right position. Turn the filter counterclockwise gently to unlock it. Avoid using too much force to prevent damage. Clean around the filter housing to remove dirt or debris. Use a cloth to wipe the area before trying again. If the filter still won’t release, try pushing the release button firmly. This button helps unlock the filter from inside. Patience is key during this process.
Water Leaks After Replacement
Leaks may happen after putting in a new filter. Ensure the new filter matches your Frigidaire model. Insert the filter straight and push it until it clicks. A loose filter can cause water to drip. Check the O-ring seal on the filter for damage or dirt. Replace the O-ring if it looks worn out. Tighten the filter properly to avoid leaks. Run water through the dispenser for a few minutes to clear air. Watch the area closely to catch leaks early.
Frequently Asked Questions
How Do I Safely Remove A Frigidaire Water Filter?
Turn off the water supply first. Locate the filter inside the fridge. Twist the filter counterclockwise until it releases. Pull it out gently to avoid damage.
What Tools Are Needed To Remove The Water Filter?
No tools are typically required. The filter is designed for hand removal. Ensure your hands are dry to maintain grip.
How Often Should I Replace My Frigidaire Water Filter?
Replace the filter every six months. Frequent use or poor water quality may require earlier changes. Regular replacement ensures clean water and ice.
Can I Remove The Water Filter Without Shutting Off Water?
It is safer to turn off the water supply. This prevents leaks or spills during removal. Avoid potential water damage by shutting the water off.
Conclusion
Removing a water filter from a Frigidaire is simple and quick. Follow each step carefully for the best results. Keep your fridge clean and your water fresh by changing filters regularly. Doing this helps your appliance work well and keeps your water tasting good.
Now, you can handle this task with confidence and ease. No need to call for help every time. Just take your time and enjoy fresh water every day.
Hasan Al Sarker is a Reverse Osmosis Specialist. He has worked for many years to ensure safe drinking water for all. His research paper has been published in several journals, including Issue, Medium, and Slideshare. He is recognized as a water doctor among specialists though he did not attend medical college.
Besides working as a researcher of reverse osmosis technology, he is also very fancy with the kitchen and cooking. His guides are reading thousands of people every day. As a head of content, he is responsible for all the published articles at RO System Reviews.