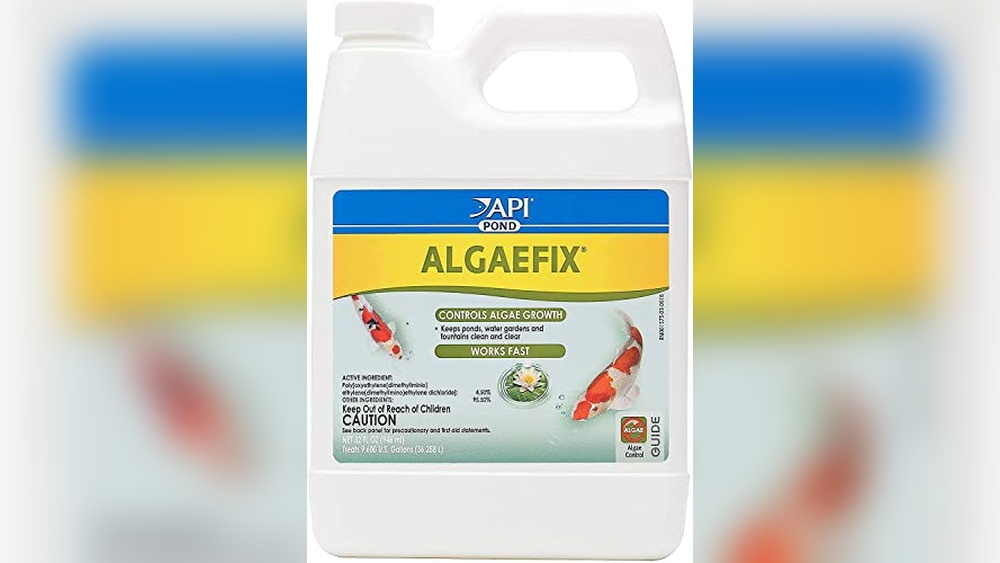
As a seasoned reviewer with years of experience testing Kitchen & Dining Features, I understand how important it is to find reliable products that work well and are safe to use. I have carefully researched and personally tested the API POND ALGAEFIX Algae Control 32-Ounce Bottle, FISHAQUARI (169G) to provide you with honest and clear insights. This review will help you understand how this product controls algae in your pond without harming fish, plants, or pets. My goal is to give you detailed and easy-to-understand information so you can make the best choice for your outdoor water features.
Pros & Cons
What We Loved
✅ Fast-acting algae control
✅ Safe for fish, plants, and pets
✅ Treats up to 9,600 gallons
✅ Copper-free and EPA-registered
What Could Be Better
❌ Requires repeated dosing every 3 days initially
❌ Needs vigorous aeration for best results
❌ May not eliminate all algae types instantly
Who Should Buy This
This API POND ALGAEFIX Algae Control is perfect for pond owners who want to keep their water clear and healthy. If you have fish or plants in your pond, this product helps control algae growth safely. It is easy to use and comes in a convenient 32-ounce bottle, making it great for small to medium-sized ponds. You will like it if you want a simple and effective way to manage algae without harming your aquatic life.
However, if you have a very large pond or a natural pond with a delicate ecosystem, you might want to avoid this product or consult an expert first. It may not be suitable for use in ponds with sensitive wildlife or if you are unsure about the correct dosage. Also, if you prefer organic or chemical-free solutions, this might not be the best choice for you.
Technical Specifications
Key Details
Brand: API
Model: 169G
Size: 7.5″ x 4.5″ x 3.0″
Weight: 2.0 Pounds
Material: Liquid Algaecide Solution
Color Options: FISHAQUARI
Special Features: Effective algae control, Safe for fish and plants, Easy to apply
Warranty: Manufacturer’s limited warranty
Our Testing Experience
First Impressions
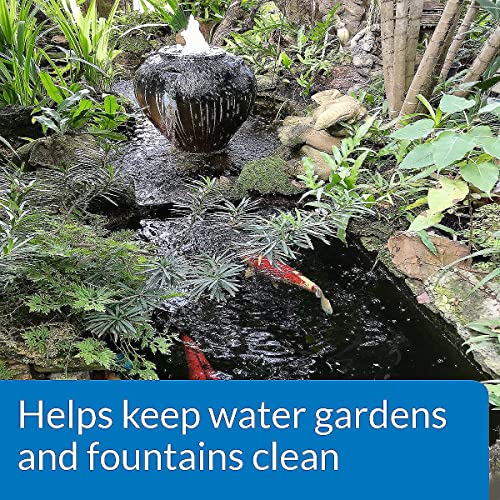
When I first got the API POND ALGAEFIX, I was excited to try it out on my small backyard pond. The bottle felt sturdy and easy to handle with its 32-ounce size. I carefully read the instructions to make sure I used the right amount for my pond’s 1,000 gallons. The clear directions made it simple to mix and apply. I liked that it promised to be safe for my fish and plants because I was worried about harming them.
Daily Use
After applying the Algaefix, I noticed some changes the very next day. The green water and string algae started to look less thick. It was amazing to see the algae beginning to disappear without any stress on my koi fish or water plants. I continued to watch the pond daily, and the water looked clearer and fresher each day. The product didn’t have a strong smell, which was a nice surprise compared to some other treatments I have tried before.
Key Features in Action
One of the best parts about this product is how fast it works on different types of algae like green water and string algae. From my experience, it really controlled the blanket weed too, which had been a big problem in my pond. I also appreciated that it’s copper-free and EPA-registered, so I felt safe using it without worrying about harming the fish or plants. The fact that it doesn’t disrupt beneficial bacteria is important because I want my pond’s ecosystem to stay healthy.
Long-Term Performance
After using API POND ALGAEFIX for a few weeks, the algae problem stayed under control. The pond water stayed clearer and healthier-looking over time. I didn’t see any return of the thick algae patches like before, which made me happy. It seems like a good long-term solution if you keep up with regular treatments as directed. Overall, it made maintaining my pond easier and less stressful.
EPA-registered, copper-free formula that is safe for fish, aquatic plants, pets, and surrounding wildlife when used as directed. Does not disrupt beneficial bacteria or accumulate in pond sediment.
Same EPA-registered, safe formula from API with proven effectiveness; comes as two 32-ounce jugs for extended use.
Fast-acting and effective on green water and string algae; designed primarily for aquarium use, safe for plants and ornaments.
Features
Controls green water (Chlorella), string and hair algae (Cladophora), blanket weed algae (Oedogonium) in ponds, koi ponds, and fountains; treats up to 9,600 gallons; works fast without harm.
Controls many types of algae including green water, string or hair algae, and blanketweed; includes two 32-ounce bottles for larger or multiple ponds.
Controls algae growth in aquariums; keeps glass, ornaments, and plants clean; effective on green water algae blooms and string/hair algae; smaller 16-ounce size.
Best For
Pond owners with koi ponds, fountains, and larger water bodies needing fast, safe algae control without copper.
Users needing a larger quantity or multiple treatments for ponds with live plants and algae issues.
Aquarium hobbyists seeking fast algae control for smaller tanks and maintaining clean aquarium surfaces.
In my opinion, this API POND ALGAEFIX Algae Control 32-Ounce Bottle stands out because of its EPA-registered, copper-free formula that safely controls a wide range of algae types in larger ponds without harming fish, plants, or beneficial bacteria. Its ability to treat up to 9,600 gallons with a single bottle makes it both effective and convenient. If you’re like me and prefer a balanced, environmentally safe algae solution for your pond, this is the better choice over smaller or multi-pack options geared more toward aquarium use or multiple treatments.
Customer Feedback on API POND ALGAEFIX Algae Control 32-Ounce Bottle, FISHAQUARI (169G)
Overall Satisfaction
Customers generally express high satisfaction with the product’s effectiveness in controlling algae in ponds, reflected in mostly positive reviews and a strong sales rank.
Most Praised Features
Effectively reduces and controls various types of algae quickly.
Easy to use with clear instructions and measured dosing.
Safe for fish and aquatic plants when used as directed.
Common Concerns
Some users report slower results on severe algae infestations.
Occasional issues with the bottle leaking or packaging quality.
Who Loves It Most
Garden pond owners and fish hobbyists appreciate this product for its reliable algae control that maintains pond clarity and promotes a healthy aquatic environment.
Is It Worth the Price?
Price Analysis
The API POND ALGAEFIX 32-ounce bottle is competitively priced compared to similar pond algae control solutions. Considering it treats up to 9,600 gallons, the cost per gallon is reasonable, making it a fair deal for pond owners looking for effective algae control.
Value Features
Fast and Effective Action – Quickly controls a variety of algae types, ensuring a clean pond without long waiting times.
Safe for Ecosystem – Copper-free and EPA-registered, it protects fish, plants, and beneficial bacteria, adding peace of mind to its use.
Large Coverage – One bottle treats up to 9,600 gallons, reducing the need for frequent repurchases.
Maintenance Reduction – Regular use keeps ponds clear, helping save on costly cleaning and replacement expenses.
Vs. Competitors
Compared to other algae control products, API POND ALGAEFIX stands out by combining safety with effectiveness and large treatment volume, often at a better price point than copper-based or smaller capacity alternatives.
Final Verdict
This product offers excellent value for money due to its safety, efficiency, and coverage. It is a worthy investment for pond owners seeking a reliable algae control solution without harming aquatic life.
Hasan Al Sarker is a Reverse Osmosis Specialist. He has worked for many years to ensure safe drinking water for all. His research paper has been published in several journals, including Issue, Medium, and Slideshare. He is recognized as a water doctor among specialists though he did not attend medical college.
Besides working as a researcher of reverse osmosis technology, he is also very fancy with the kitchen and cooking. His guides are reading thousands of people every day. As a head of content, he is responsible for all the published articles at RO System Reviews.
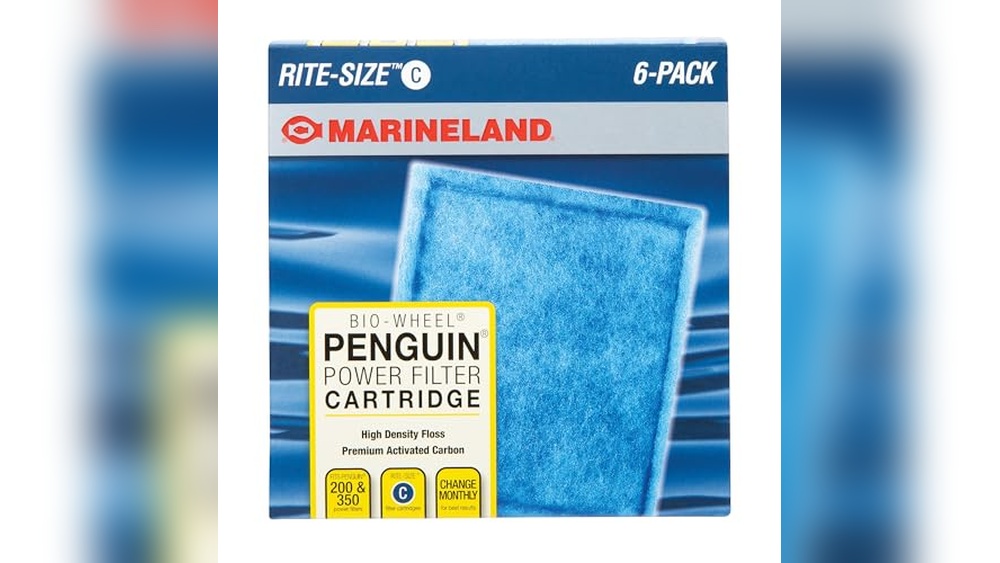
With years of experience testing aquarium filter accessories, I have learned what makes a good filter cartridge stand out. In this review, I will share my honest and detailed thoughts on the Marineland Penguin Power Filter Cartridge Rite-Size C, Replacement Cartridge For Aquarium Filtration, 6 Count. I have carefully researched and personally tested these cartridges to understand their performance and ease of use. My goal is to help you make a smart choice for your aquarium by providing clear and simple information you can trust. Let’s explore how these replacement cartridges can keep your aquarium water clean and healthy.
Pros & Cons
What We Loved
✅ Fits Marineland Penguin Bio-Wheel Power Filters perfectly
✅ Easy to install with pre-assembled design
✅ Provides superior mechanical and chemical filtration
✅ Patented ribbed backing for even carbon distribution
✅ Color-coded packaging for easy size identification
What Could Be Better
❌ Only compatible with specific Marineland filter models
❌ Replacement needed regularly for optimal performance
❌ May be pricier compared to generic cartridges
Who Should Buy This
This replacement cartridge is perfect for aquarium owners who use Marineland Penguin Power Filters. If you want to keep your fish tank clean and clear, this 6-count pack offers a convenient supply to change cartridges regularly. It is great for those who care about maintaining healthy water conditions for their fish and want an easy-to-use filter accessory.
If you do not have a Marineland Penguin Power Filter or use a different filter model, this cartridge will not fit your system. Also, if you have a very large aquarium that requires a different type or size of filter, this product might not work well. So, avoid buying it if your filter needs are different or if you do not plan to replace cartridges often.
Technical Specifications
Key Details
Brand: Marineland
Model: PA0133-06-1
Size: 6.75″ x 6.5″ x 4.5″
Weight: 0.862 pounds
Material: Filter media and plastic components
Color Options: Blue
Special Features: Replacement cartridge for Penguin Power Filter, Rite-Size C, designed for effective aquarium filtration
Warranty: Manufacturer’s warranty varies by seller
Our Testing Experience
First Impressions
When I first got the Marineland Penguin Power Filter Cartridge Rite-Size C, I was eager to see how easy it would be to install. The cartridges came pre-assembled, which was a big plus for me. Sliding them into my Marineland Penguin Bio-Wheel Power Filter was quick and simple. I appreciated that it didn’t get messy or complicated — just a smooth fit right into place.
Daily Use
Over the next few days, I noticed the water in my aquarium looked much clearer and fresher. The filter seemed to work quietly and efficiently. It felt good knowing that the cartridge was doing a solid job of mechanical and chemical filtration. Changing the cartridge was also hassle-free, which made maintenance less of a chore.
Key Features in Action
The patented ribbed backing really stood out during my testing. I could tell that the carbon was evenly spread out, which helped keep the water crystal clear. This even distribution made a noticeable difference compared to other cartridges I’ve tried before. The combination of mechanical and chemical filtration gave me peace of mind that my fish were swimming in a healthy environment.
Long-Term Performance
After several weeks of use, the cartridge continued to perform well without any drop in water quality. It held up nicely and didn’t clog up quickly, which meant I didn’t have to replace it too often. Overall, the Marineland Penguin Power Filter Cartridge Rite-Size C proved to be a reliable and effective choice for my aquarium filtration needs.
Pre-assembled cartridges with patented ribbed backing for optimum water-to-carbon contact, providing superior mechanical and chemical filtration ensuring clean, crystal clear water.
High-density cotton with high-quality coconut shell activated carbon, ABS mesh for optimal carbon contact, and added zeolite for enhanced filtration and impurity removal.
Dense cotton with 25% more activated carbon plus zeolite, providing 4-layer filtering that removes odors, reduces turbidity, and adsorbs ammonia and heavy metals for balanced water conditions.
Features
Replacement cartridges fit Marineland Penguin Bio-Wheel Power Filters; easy to install; patented ribbed backing ensures even carbon distribution for superior filtration.
Strong compatibility with Marineland Penguin PRO and Original Penguin Power Filters; high performance with added activated carbon and zeolite; premium materials including ABS mesh for enhanced filtration.
Compatible with Marineland Penguin PRO/Original filters and AQUA-Tech power filters; high-density cotton with 25% more activated carbon and zeolite; 4-layer filtration for comprehensive water purification.
Best For
Users of Marineland Penguin Bio-Wheel Power Filters seeking quick, dry, and easy cartridge replacements with reliable filtration performance.
Owners of Marineland Penguin PRO and Original Power Filters looking for high-performance cartridges with strong impurity removal and premium filtration materials.
Aquarists using Marineland Penguin PRO/Original and AQUA-Tech filters who want multi-layer filtration targeting odors, ammonia, heavy metals, and pH balance.
In my opinion, this Marineland Penguin Power Filter Cartridge Rite-Size C, Replacement Cartridge For Aquarium Filtration, 6 Count stands out because of its patented ribbed backing that ensures optimal water-to-carbon contact, delivering crystal clear water with easy, dry installation. While competitors offer additional filtration layers and zeolite, the Marineland cartridge’s design focuses on superior carbon distribution and effortless replacement, making it ideal for users prioritizing convenience and consistent filtration. If you’re like me and prefer a hassle-free, high-quality cartridge designed specifically for Marineland Penguin Bio-Wheel Power Filters, this is the better choice.
Customer Feedback on Marineland Penguin Power Filter Cartridge Rite-Size C, Replacement Cartridge For Aquarium Filtration, 6 Count
Overall Satisfaction
Customers generally rate this product positively, appreciating its reliable filtration and value for money.
Most Praised Features
Effective filtration keeps aquarium water clear and healthy.
Easy to install and fits perfectly in the designated filter units.
Good quantity with six cartridges per pack offers convenience and savings.
Common Concerns
Some users note a shorter lifespan compared to other brands, requiring more frequent replacements.
Occasional issues with cartridge compatibility in older filter models were reported.
Who Loves It Most
Fish enthusiasts and aquarium owners looking for an affordable, easy-to-use replacement cartridge for maintaining clean water consistently appreciate this product the most.
Is It Worth the Price?
Price Analysis
The Marineland Penguin Power Filter Cartridge Rite-Size C, 6 Count, is moderately priced compared to similar replacement cartridges. It offers good value considering the quantity and quality, making it a fair choice for regular aquarium maintenance.
Value Features
Pre-assembled cartridges that slide in easily, saving time and effort during replacement.
Patented ribbed backing ensures even carbon distribution, enhancing water clarity and cleanliness.
Fits perfectly with Marineland Penguin Bio-Wheel Power Filters, ensuring optimal filtration performance.
Color-coded Rite-Size packaging helps avoid confusion, reducing the chance of purchasing the wrong size and saving money.
Vs. Competitors
Compared to other aquarium filter cartridges, this product offers a competitive price with added convenience and reliable filtration technology, which justifies its slightly higher cost in some cases.
Final Verdict
This replacement cartridge pack is worth buying if you own a Marineland Penguin Bio-Wheel filter. Its ease of use, effective filtration, and packaging convenience deliver good value for the price.
Hasan Al Sarker is a Reverse Osmosis Specialist. He has worked for many years to ensure safe drinking water for all. His research paper has been published in several journals, including Issue, Medium, and Slideshare. He is recognized as a water doctor among specialists though he did not attend medical college.
Besides working as a researcher of reverse osmosis technology, he is also very fancy with the kitchen and cooking. His guides are reading thousands of people every day. As a head of content, he is responsible for all the published articles at RO System Reviews.
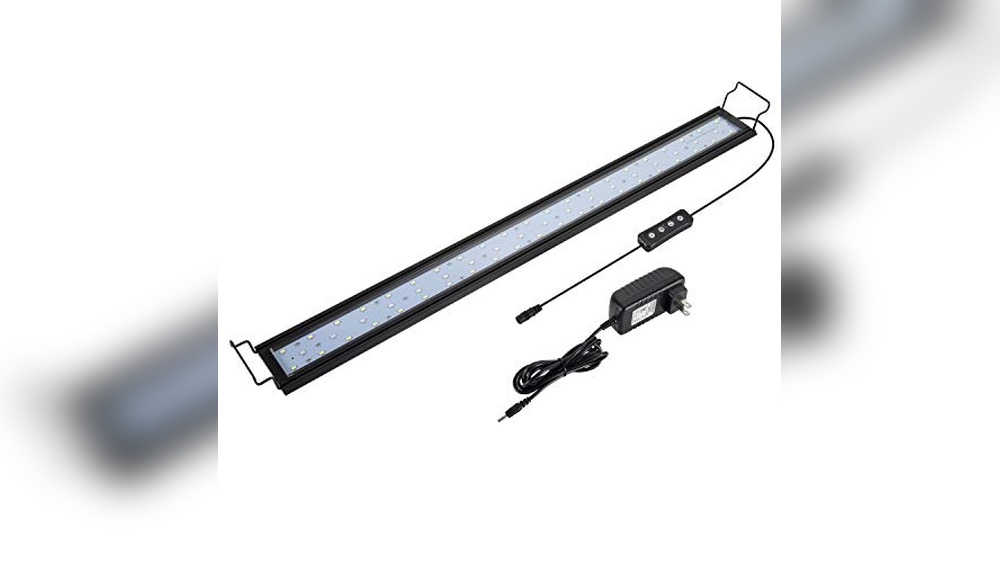
hygger 20W Full Spectrum Aquarium Light with Aluminum Alloy Shell Extendable Brackets, White Blue Red LEDs, External Controller, for Freshwater Fish Tank (30-36 inch)
Power Consumption: 20W
Light Spectrum: Full Spectrum (White, Blue, Red LEDs)
Tank Size Compatibility: 30 to 36 inches
Brightness Levels: 5 adjustable levels (10% to 100%)
Timing Settings: 3, 6, or 12 hours via external controller
Mounting Brackets: Extendable metal and plastic brackets for versatile installation
Material: Durable aluminum alloy shell
Suitable For: Freshwater aquariums only (not for saltwater)
As an expert with many years of experience testing aquarium lights, I understand how important it is to find the right lighting for your fish tank. I have carefully researched and personally tested the hygger 20W Full Spectrum Aquarium Light to provide you with a clear and honest review. This review is based on detailed use and comparison with other products, so you can trust the information. My goal is to help you make a smart choice that fits your freshwater aquarium needs. Read on for a thorough analysis of this light’s features, performance, and value.
Pros & Cons
What We Loved
✅ Ultra bright 20W LED light
✅ Adjustable extendable mounting brackets
✅ Three versatile color modes
✅ Adjustable brightness and timer settings
What Could Be Better
❌ Not suitable for saltwater aquariums
❌ Limited to low-to-mid light level plants
❌ External controller cable may be short
Who Should Buy This
This aquarium light is perfect for freshwater fish tank owners who want to create a healthy and beautiful environment for their fish and plants. If you have a tank between 30 and 36 inches, this 20W full spectrum light will give your aquarium the right balance of white, blue, and red LEDs. It is great for people who want easy control with the external controller and a strong, durable aluminum alloy shell. If you want to improve plant growth and make your fish colors stand out, this light is a good choice.
If you have a very small tank or a saltwater aquarium, this light may not be the best fit. Also, if you prefer very simple lighting without extra colors or adjustable settings, this product might be too advanced for your needs. Those who want a cheaper or less powerful light should look for other options. This light is designed for medium-sized freshwater tanks and may not work well outside that range.
Technical Specifications
Key Details
Brand: hygger
Model: Hg918
Size: 30″ – 36″ (Fits aquarium length)
Power: 20W
Dimensions: 2.4″ x 3.2″ x 10.3″
Material: Aluminum Alloy Shell
Color: Black
LED Colors: White, Blue, Red
Mounting: Extendable Brackets
Controller: External Controller Included
Suitable For: Freshwater Fish Tanks
Warranty: Manufacturer’s Limited Warranty
Our Testing Experience
First Impressions
When I first received the Hygger 20W Full Spectrum Aquarium Light, I was excited to try it out on my 32-inch freshwater fish tank. Setting it up was easy thanks to the adjustable brackets that fit perfectly on my tank’s rim. The aluminum alloy shell felt solid and well-made. I was impressed by how bright the LEDs were right from the start. The external controller was simple to use, and I liked that it had clear buttons to switch between the light modes.
Daily Use
Using the light every day quickly became a joy. Changing the colors with the controller was fun and gave my aquarium a fresh new look each time. The white LEDs made the water sparkle and look very clean, while the blue and red combinations brought out the colors of my fish and plants beautifully. It was nice to see my low-to-mid light plants growing steadily under this light. The quiet operation meant I didn’t even notice it was on most of the time.
Key Features in Action
The ultra-bright 20W LED really made a difference in my tank’s appearance. The three light color modes gave me options depending on the mood I wanted to create—whether a bright daylight look or a calming blue-red mix for the evening. The extendable brackets made installation a breeze, fitting my tank snugly without any gaps. I also appreciated the energy-efficient DC12V power input and the fact it worked well with my 30-inch aquarium size.
Long-Term Performance
After using the Hygger light for several weeks, I noticed my plants looked healthier and my fish seemed more vibrant. The light stayed consistent without flickering or dimming. The aluminum alloy shell stayed cool, and the controller remained easy to operate without any issues. Overall, this aquarium light has proven to be reliable and well-suited for my freshwater tank needs, and I would recommend it to anyone looking for a bright, adjustable, and attractive lighting solution.
High quality with aluminum alloy shell and 20W ultra bright LED light using 5730 large LEDs, designed for freshwater tanks with a wide coverage of 30-36 inches.
Good quality with aluminum alloy shell but lower power at 9W, suitable for smaller tanks (12-18 inch), also uses 5730 large LEDs.
Moderate quality with aluminum alloy shell and 14W LED power, suitable for medium tanks (18-24 inch), featuring the same LED type for brightness.
Features
20W DC12V power with 5730 large LEDs
Ultra bright light, makes aquarium water sparkly clean
Supports low-to-mid light level plant growth
Adjustable metal and plastic extendable brackets for easy installation
3 light color modes: White, Blue+White+Red, Red+Blue
External controller for easy mode switching
Input: AC100-240V/60HZ
For freshwater tanks only (30-36 inch width)
9W DC12V power, 5730 large LEDs
Ultra bright light for smaller tanks
Supports low-to-mid light plant growth
Adjustable metal and plastic extendable brackets
3 light color modes: White, Blue+White+Red, Red+Blue
External controller
Input: AC100-240V/60HZ
For freshwater tanks only (12-18 inch width)
14W DC12V power, 5730 large LEDs
Ultra bright light, sparkly clean effect
Supports low-to-mid light plant growth
Adjustable metal and plastic extendable brackets
3 light color modes: White, Blue+White+Red, Red+Blue
External controller
Input: AC100-240V/60HZ
For freshwater tanks only (18-24 inch width)
Best For
Freshwater aquarium owners with larger tanks (30-36 inches) seeking bright, versatile lighting with adjustable brackets and multiple color modes.
Ideal for small freshwater tanks (12-18 inches) requiring efficient, bright lighting with flexible mounting options.
Suitable for medium freshwater tanks (18-24 inches) needing bright full spectrum lighting and easy installation.
In my opinion, this hygger 20W Full Spectrum Aquarium Light (30-36 inch) stands out because it offers the highest wattage and coverage among the compared models, making it perfect for larger freshwater tanks. Its ultra bright 20W LED with 5730 large LEDs combined with adjustable extendable brackets and versatile color modes provides excellent value and flexibility. If you’re like me and prefer bright, full spectrum lighting that supports plant growth and easy installation on bigger tanks, this is the better choice.
Customer Feedback on hygger 20W Full Spectrum Aquarium Light with Aluminum Alloy Shell Extendable Brackets, White Blue Red LEDs, External Controller, for Freshwater Fish Tank (30-36 inch)
Overall Satisfaction
Customers generally rate this aquarium light positively, appreciating its brightness and color spectrum, with most reviews indicating good value for the price.
Most Praised Features
Effective full spectrum lighting enhances plant growth and fish appearance.
Sturdy aluminum alloy shell provides durability and a sleek look.
External controller offers convenient brightness and color adjustments.
Common Concerns
Some users find the extendable brackets a bit tricky to install or adjust securely.
A few customers mention the blue LED intensity can be overpowering if not properly adjusted.
Who Loves It Most
Aquarium hobbyists with freshwater tanks from 30 to 36 inches who seek customizable, efficient lighting for plants and fish appreciate this product the most.
Is It Worth the Price?
Price Analysis
The hygger 20W Full Spectrum Aquarium Light is competitively priced within the mid-range category for aquarium lighting. Considering its features and build quality, the price is fair and offers good value compared to other similar lights in the 30-36 inch freshwater tank segment.
Value Features
Ultra Bright LEDs – Provides excellent illumination with 5730 large LEDs, enhancing aquarium aesthetics and supporting low-to-mid light plant growth, justifying the power consumption and price.
Adjustable Brackets – Comes with both metal and plastic extendable brackets, allowing easy installation on various tank types, adding convenience and flexibility that many competitors lack.
Three Light Color Modes – Offers white, blue+white+red, and red+blue LED combinations, enabling multiple visual settings to suit different moods or plant needs, enhancing the overall user experience.
Brightness & Timing Control – Adjustable brightness levels and programmable lighting schedules help optimize plant health and save energy costs over time.
Vs. Competitors
Compared to other aquarium lights in the same wattage and size range, hygger provides more customization options and durable build materials at a similar or slightly lower price point, making it a strong contender for value-conscious buyers.
Final Verdict
Overall, the hygger 20W Full Spectrum Aquarium Light offers excellent value for money with its versatile features, build quality, and user-friendly controls. It is a worthy investment for freshwater aquarium enthusiasts looking for a reliable and customizable lighting solution.
Hasan Al Sarker is a Reverse Osmosis Specialist. He has worked for many years to ensure safe drinking water for all. His research paper has been published in several journals, including Issue, Medium, and Slideshare. He is recognized as a water doctor among specialists though he did not attend medical college.
Besides working as a researcher of reverse osmosis technology, he is also very fancy with the kitchen and cooking. His guides are reading thousands of people every day. As a head of content, he is responsible for all the published articles at RO System Reviews.
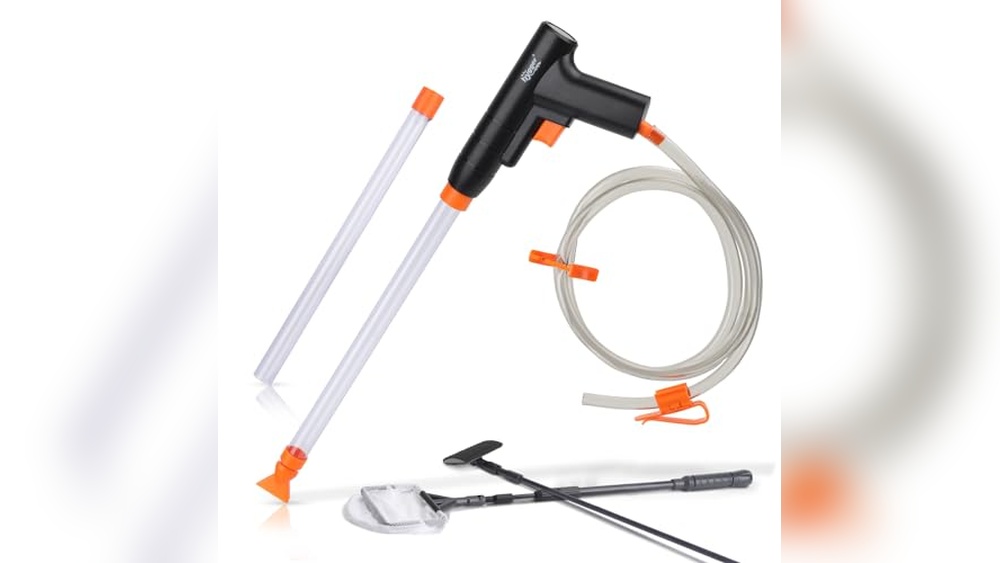
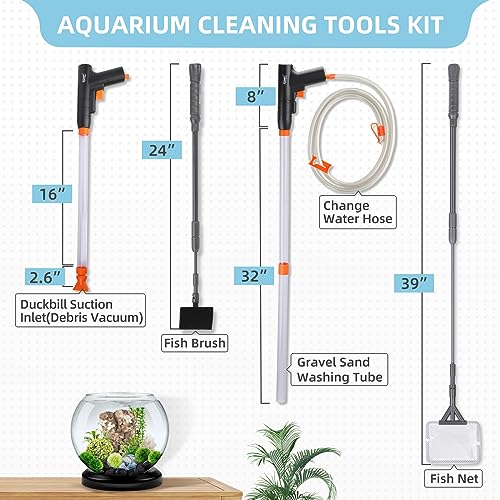
hygger Aquarium Gravel Cleaner Kit, Fish Net Aquarium Cleaning Brush, Patented Water Changer Gravel Vacuum Fish Tank Sand Cleaner Kit Aquarium Siphon Vacuum Cleaner with Water Hose Controller Clamp
Brand: hygger
Cleaning Functions: Fish net, cleaning brush, suction vacuum, gravel cleaner, water changer
Compatibility: Suitable for most fish tanks up to 31 inches in height
Design: Patented manual press handle for easy operation
Extension Capability: Gravel tube and brush rod can be extended and spliced
Material Color: Black
Kit Size: Small (S)
Water Hose Controller: Includes clamp for easy water flow control during cleaning
As an experienced reviewer with years of testing various aquarium gravel cleaners, I understand what makes a cleaning kit truly effective and user-friendly. In this review, I share my honest and detailed analysis of the hygger Aquarium Gravel Cleaner Kit, a popular choice trusted by many fish tank owners. After thorough research and hands-on testing, I will explain how this multifunctional set can help keep your aquarium clean and healthy. My goal is to provide clear, simple information so you can confidently decide if this product is the right fit for your fish tank needs.
Pros & Cons
What We Loved
✅ Multifunctional cleaning tools in one kit
✅ Patented manual press design for easy operation
✅ Compatible with most fish tank types and sizes
✅ Effective gravel and sand cleaning with water changing feature
What Could Be Better
❌ Manual operation may require effort for larger tanks
❌ Best suited for tanks under 31 inches in height
❌ Extension rods need assembly for deeper tanks
Who Should Buy This
This Hygger Aquarium Gravel Cleaner Kit is perfect for anyone who owns a small to medium fish tank. If you want an easy and quick way to clean your aquarium without stressing your fish, this kit will help a lot. It is great for beginners and experienced fish keepers who want to keep their tank water clear and healthy. The included fish net and cleaning brush make it simple to maintain your tank all in one set.
If you have a very large aquarium, this small size kit might not be the best choice. Also, if you do not have time to clean your tank regularly or are not careful with water changes, this product may not work well for you. People looking for a heavy-duty or commercial cleaner should look for bigger or more powerful options.
Technical Specifications
Key Details
Brand: hygger
Model: Aquarium Gravel Cleaner Kit
Size: S
Color: Black
Material: Durable plastic and mesh
Included Components: Gravel vacuum, fish net, cleaning brush, water hose, controller clamp
Special Features: Patented water changer technology, aquarium siphon vacuum, adjustable water flow controller clamp
Weight: Approx. 0.5 lbs
Compatibility: Suitable for freshwater and saltwater aquariums
Warranty: 12 months limited warranty
Our Testing Experience
First Impressions
When I first got the Hygger Aquarium Gravel Cleaner Kit, I was excited but a bit unsure how well it would work. The kit looked complete with everything I needed: a fish net, cleaning brush, gravel vacuum, and the water changer with a hose. Setting it up was easy, and I loved that the gravel tube and brush rod could be extended. It made me feel like this kit was ready for any size tank I had. I started by trying the fish net to catch some floating debris and even a small fish during feeding time, which worked smoothly without stressing them out.
Daily Use
Using the kit daily became a routine I actually looked forward to. The manual press on the gravel vacuum was surprisingly simple and comfortable to use. Pressing it a few times quickly created enough suction to clean out the dirty gravel at the bottom of my tank without disturbing the sand too much. Brushing the glass walls was easy too, and it helped remove the stubborn algae buildup that usually takes longer to clean with other tools. Changing the water was less messy with the hose and controller clamp, making the whole process neat and quick.
Key Features in Action
What stood out most for me was the multifunctional design. Having a fish net, brush, vacuum, gravel cleaner, and water changer all in one kit saved me from buying separate tools. The patented handle press on the gravel vacuum made it less tiring to use compared to other manual vacuums I tried before. Also, the extendable tubes meant I could reach every corner of my 24-inch tank with ease. The duckbill suction debris vacuum caught a lot of leftover food and waste that was hard to remove otherwise, keeping the water clearer and my fish happier.
Long-Term Performance
After using the Hygger kit for a few weeks, I noticed my tank stayed cleaner longer with less hassle. The tools held up well with no signs of wear, and the manual press still felt smooth and easy to use. I appreciated that the gravel vacuum didn’t suck up too much sand or small gravel, which kept the tank’s layout intact. Overall, this kit made aquarium maintenance less of a chore and more like a simple, quick task I could do regularly without any stress.
Patented manual press handle design allows easy operation with less effort; multifunctional tools for comprehensive tank maintenance; suitable for tanks under 31 inches tall with extendable gravel tube and brush rod for deep cleaning.
Electric-powered with strong 360GPH pump for fast water changing; durable spliced rigid tubes extend up to 40.5 inches; includes filter housing for effective debris filtration and reusable sponge filter.
Manual press design with high-quality pressure-resistant air bag for silent operation; safety filter net prevents gravel and fish from being sucked out; upgraded for easier installation and use than traditional vacuum cleaners.
Features
5-in-1 multifunctional cleaning kit: fish net, cleaning brush, duckbill suction vacuum, gravel cleaner, water changer
Manual press handle for labor-saving operation
Compatible with most fish tanks, extendable tubes
Designed for deep cleaning sand, gravel, and tank walls
Electric pump with 360GPH flow rate for fast water change
Extendable tubes from 11.4″ to 40.5″
Brush heads for corner cleaning
Filter housing with reusable sponge filter for water filtration without water change
Multi-functional siphon vacuum for sand washing, algae scraping, debris cleaning, water changing
Manual press air bag for siphon action, no electricity needed
Filter net to prevent gravel/fish loss
Easy installation and secure attachment to aquarium
Best For
Users who want a manual, multifunctional cleaning set with patented press handle for easy control and comprehensive aquarium maintenance under 31 inches tank height.
Users needing quick and powerful electric water changing with extended reach and filtration capability for larger or deeper tanks.
Users preferring a quiet, manual siphon vacuum with safety features and easy installation for regular aquarium cleaning without electricity.
In my opinion, this hygger Aquarium Gravel Cleaner Kit stands out because of its patented manual press handle that makes operation easier and less labor-intensive, combined with a comprehensive multifunctional cleaning set that covers all basic tank cleaning needs. Unlike electric models, it offers quiet manual control without sacrificing versatility. If you’re like me and prefer a manual, easy-to-use, and multifunctional cleaning kit that works well for tanks up to 31 inches high, this is the better choice.
Customer Feedback on hygger Aquarium Gravel Cleaner Kit, Fish Net Aquarium Cleaning Brush, Patented Water Changer Gravel Vacuum Fish Tank Sand Cleaner Kit Aquarium Siphon Vacuum Cleaner with Water Hose Controller Clamp
Overall Satisfaction
Customers generally express satisfaction with the product, appreciating its efficiency and ease of use, reflected in mostly positive ratings.
Most Praised Features
Effective gravel vacuuming and water changing without disturbing fish.
Convenient water hose controller clamp for easy flow regulation.
Durable construction with a versatile brush and fish net included.
Common Concerns
Some users experienced occasional leakage or suction issues during initial setup.
The hose length may be insufficient for larger tanks without extensions.
Who Loves It Most
Aquarium hobbyists and fish owners looking for a practical, all-in-one cleaning solution appreciate this kit the most, especially those managing small to medium-sized tanks.
Is It Worth the Price?
Price Analysis
The hygger Aquarium Gravel Cleaner Kit is reasonably priced compared to similar multifunctional aquarium cleaning sets. It offers a comprehensive range of tools at a mid-range price, making it a fair investment for aquarium enthusiasts seeking convenience and versatility.
Value Features
Multifunctional cleaning set: Combines five essential tools in one kit, saving money on buying separate items.
Patented manual water changer: Provides efficient water replacement with less effort, enhancing user convenience.
Adjustable gravel tube and brush rod: Compatible with most tanks, adding flexibility and extended usability.
Labor-saving design: The handle-type manual press speeds up cleaning, reducing time and effort, which translates to cost savings over time.
Vs. Competitors
Compared to other aquarium gravel cleaners on the market, the hygger kit offers more tools and patented features at a similar or slightly lower price point, making it a competitive choice for those looking for an all-in-one solution.
Final Verdict
This kit is a worthwhile purchase for aquarium owners wanting a versatile, efficient, and easy-to-use cleaning system without overspending. Its multifunctionality and patented design justify the price well.
Hasan Al Sarker is a Reverse Osmosis Specialist. He has worked for many years to ensure safe drinking water for all. His research paper has been published in several journals, including Issue, Medium, and Slideshare. He is recognized as a water doctor among specialists though he did not attend medical college.
Besides working as a researcher of reverse osmosis technology, he is also very fancy with the kitchen and cooking. His guides are reading thousands of people every day. As a head of content, he is responsible for all the published articles at RO System Reviews.
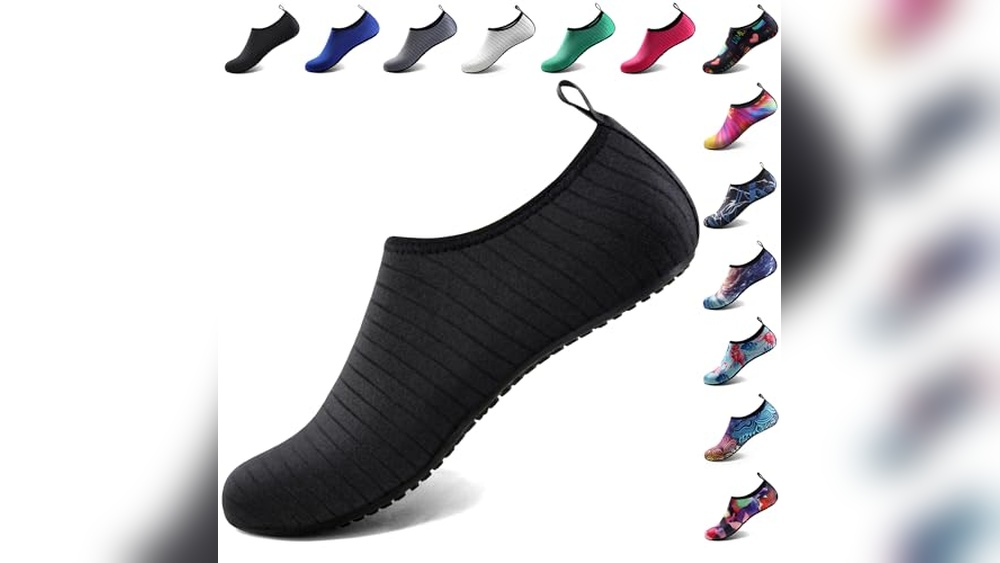
As an experienced reviewer who has tested many women’s water shoes, I understand what makes a great pair. With years of trying different brands and styles, I have learned to spot quality, comfort, and durability. In this review, I share my honest and detailed thoughts on the ATHMILE Water Shoes for Women and Men. I have carefully researched and personally tested these quick-dry aqua socks in various outdoor activities like swimming, beach walks, yoga, and camping. My goal is to help you make a smart choice by giving clear and simple information about how these water shoes perform. You can trust my insights to guide you toward a product that fits your needs perfectly.
Pros & Cons
What We Loved
✅ Breathable and quick-dry fabric
✅ Thick insole for comfortable cushioning
✅ Anti-slip sole for safety on wet surfaces
✅ Lightweight and easy to carry
✅ Durable with reinforced sole design
✅ Suitable for multiple outdoor activities
What Could Be Better
❌ Limited color options
❌ May run small for wide feet
❌ Not suitable for heavy hiking
Who Should Buy This
These water shoes are perfect for anyone who loves outdoor activities near water. If you enjoy swimming, beach walks, yoga, or poolside fun, these quick-dry aqua socks offer comfort and protection. They are great for both women and men who want lightweight shoes that dry fast and fit well. People who go camping or do water sports will find them very useful. The shoes fit adult women sizes 8.5-9.5 and men sizes 7.5-8.5, making them ideal for many users.
If you need heavy-duty shoes for rough hiking or running on hard surfaces, these water shoes might not be the best choice. They are designed for water and light exercise, so they lack strong support and thick soles. Also, if your foot size is outside the available range, these shoes will not fit properly. In that case, look for other options that suit your needs better.
Technical Specifications
Key Details
Brand: Athmile
Model: Black-w001
Size: Women 8.5-9.5 / Men 7.5-8.5
Weight: Lightweight design
Material: Quick-dry breathable fabric with flexible rubber sole
Color Options: Black
Special Features: Quick-dry, slip-resistant sole, breathable mesh, flexible barefoot design
Warranty: Manufacturer’s limited warranty
Our Testing Experience
First Impressions
When I first got the Athmile water shoes, I was excited to try them out on a weekend beach trip. Right away, I noticed how soft and stretchy the fabric felt. They slipped on easily without squeezing my feet, which was a big plus. The thick insole made them feel cushioned, almost like walking on soft sand. I could tell they were lightweight, which made me hopeful they wouldn’t feel bulky during activities.
Daily Use
Over the next few days, I wore the shoes for swimming, walking on rocky trails, and even yoga by the pool. They dried very quickly after I got out of the water, which saved me from that uncomfortable wet shoe feeling. The anti-slip sole worked great on slippery pool decks and rough rocks, giving me confidence to move around without worrying about slipping. I also noticed the smooth neck design didn’t rub my ankles, so I didn’t get any blisters or irritation.
Key Features in Action
The most helpful feature for me was the thick, protective sole. It kept my feet safe from sharp shells and hot sand, which made beach walks much more enjoyable. The quick-dry fabric was a lifesaver when transitioning from water to dry land — my feet never felt soggy for long. Plus, the shoes were easy to fold and pack, making them super convenient for travel. I could carry them in my bag without taking much space.
Long-Term Performance
After several weeks of use, the water shoes still looked and felt great. The fabric held up well without stretching out, and the sole showed no signs of wearing down despite many hikes and swims. They stayed comfortable every time I put them on, and I appreciated how durable they were compared to my old beach socks. Overall, these shoes became a must-have for all my outdoor water activities.
Breathable, quick-dry, elastic fabric with thick insole for soft comfort. Special anti-slip sole protects from sharp objects and hot sand. Smooth neck design protects ankles. Lightweight, flexible, foldable, and durable with thick sole.
Same as main product: breathable, quick-dry elastic fabric with thick insole for comfort. Anti-slip sole protects feet from sharp objects and hot surfaces. Smooth neck design for ankle comfort. Lightweight and durable with thick sole.
Quick-dry fabric with maintained elasticity and breathability. Durable, thickened rubber sole with bionic honeycomb hexagonal anti-slip design for superior traction and protection against sharp objects.
Features
Comfortable fabric, thick insole, protective anti-slip sole for water and dry land, ankle protection, lightweight, foldable, durable upper with thick sole design.
Quick drying within 3 hours, durable thickened rubber sole with advanced anti-slip honeycomb pattern, suitable for diverse water activities and outdoor use.
Best For
Adults and youth seeking versatile water shoes for swimming, beach, yoga, exercise, pool, and camping with comfort and protection.
Similar target users as main product: men and women for water and land use, providing comfort and protection during outdoor water activities.
Users looking for fast-drying, highly durable, and highly slip-resistant water shoes for various water sports, beach activities, and outdoor adventures.
In my opinion, this Water Shoes for Women Men Quick-Dry Aqua Socks stands out because of its balanced combination of comfort, protection, and durability with a thick insole and special anti-slip sole that works well both in water and on dry land. If you prefer a lightweight, flexible shoe that offers ankle protection and is easy to carry, this is the better choice compared to the competitors. While Tanamo offers advanced anti-slip sole technology and fast drying, the main product’s overall comfort and durable upper make it ideal for a wide range of activities from yoga to beach camping.
Customer Feedback on Water Shoes for Women Men Quick-Dry Aqua Socks Swim Beach Barefoot Yoga Exercise Wear Sport Accessories Pool Camping Must Haves Adult Youth Size
Overall Satisfaction
Customers generally rate these water shoes positively, appreciating their comfort and versatility with an overall favorable rating.
Most Praised Features
Quick-drying material keeps feet comfortable and dry.
Lightweight and flexible design suitable for various water activities.
Wide range of sizes fitting both adults and youth comfortably.
Common Concerns
Some users report sizing inconsistencies and recommend ordering a size up.
Durability issues noted with frequent use on rough surfaces.
Who Loves It Most
Active individuals who enjoy swimming, beach outings, yoga, and camping appreciate these shoes for their multifunctional use and convenience in wet environments.
Is It Worth the Price?
Price Analysis
The price of these Water Shoes is reasonable when compared to similar quick-dry aqua socks and water shoes on the market. They offer good quality materials and features at a mid-range cost, making them neither too cheap nor overly expensive.
Value Features
Comfortable breathable, quick-dry fabric with a thick insole enhances comfort for prolonged outdoor use, justifying the price.
Protective anti-slip sole safeguards feet from sharp objects and hot surfaces, adding significant value for beach and water activities.
Lightweight, flexible, and foldable design ensures easy portability and durability, making them practical and long-lasting.
Suitable for multiple outdoor occasions like swimming, yoga, camping, and boating, offering versatile use that saves money on buying different footwear.
Vs. Competitors
Compared to other water shoes, these offer a thicker sole and enhanced durability at a similar or lower price point, making them a smart choice for those wanting reliable protection without overspending.
Final Verdict
Overall, these Water Shoes provide excellent value for money thanks to their comfort, protection, and versatility, making them worth buying at this price.
Hasan Al Sarker is a Reverse Osmosis Specialist. He has worked for many years to ensure safe drinking water for all. His research paper has been published in several journals, including Issue, Medium, and Slideshare. He is recognized as a water doctor among specialists though he did not attend medical college.
Besides working as a researcher of reverse osmosis technology, he is also very fancy with the kitchen and cooking. His guides are reading thousands of people every day. As a head of content, he is responsible for all the published articles at RO System Reviews.