If you rely on a well for your water, you know how important it is to keep that water clean and safe. Installing a whole-house water filter can protect your entire home from contaminants, giving you peace of mind with every tap.
But how do you get started? This guide will walk you through the simple steps to install a whole-house water filter on your well system. By the end, you’ll feel confident taking control of your water quality and ensuring your family’s health.
Keep reading to discover how easy it can be to improve your water today.

Choosing The Right Filter
Choosing the right whole-house water filter for a well is very important. The right filter protects your home and improves water quality. It depends on your water’s condition and your household needs. Taking time to select the correct filter saves money and trouble later.
Assessing Water Quality
Start by testing your well water. Check for sediments, iron, bacteria, and chemicals. Water tests reveal what impurities are present. Knowing this helps pick a filter that removes those specific issues. Many local labs and home kits offer water testing services.
Types Of Whole-house Filters
There are different filters for different problems. Sediment filters remove dirt and rust. Carbon filters improve taste and reduce chlorine and chemicals. Iron filters target iron and sulfur. UV filters kill bacteria and viruses. Choose a filter that matches your water’s needs.
Filter Capacity And Flow Rate
Filter capacity shows how much water it can clean before changing. A higher capacity means less frequent changes. Flow rate is the speed water passes through the filter. It must match your home’s water use. A slow flow rate may reduce water pressure. Choose a filter with proper capacity and flow for your home size.
Gathering Tools And Materials
Gathering the right tools and materials is the first step to install a whole-house water filter on a well. Preparing everything beforehand saves time and avoids interruptions during installation. It also ensures the job goes smoothly and safely.
Essential Tools Checklist
Have these tools ready before starting:
- Pipe cutter or hacksaw
- Adjustable wrench
- Screwdriver set
- Teflon tape
- Measuring tape
- Plumber’s tape
- Bucket or container for water drainage
- Marker or pencil for marking pipes
These tools help cut, fit, and tighten pipes and connectors properly.
Filter Components
Check all parts of your water filter kit. Usually, it includes:
- Filter housing
- Filter cartridges
- Inlet and outlet fittings
- Mounting bracket
- O-rings or seals
Confirm all pieces are present and free from damage. This avoids delays during installation.
Safety Gear
Wear safety gear to protect yourself. Important items include:
- Gloves to protect hands
- Safety glasses to shield eyes
- Work boots for foot safety
Safety gear helps prevent injuries during cutting and handling pipes.
Preparing The Installation Site
Preparing the installation site is the first step to a successful whole-house water filter setup. It ensures the process goes smoothly and safely. This preparation helps avoid problems later and saves time.
Locating The Main Water Line
Find the main water line that brings water into your house. It usually runs from the well to the house’s water system. Look for the pipe closest to the well or where the water meter is installed. Mark this spot clearly. This is where you will connect the filter.
Shutting Off Water Supply
Turn off the water supply before starting any work. This prevents leaks and water damage. Locate the main shut-off valve near the water line. Close it completely. Open a faucet in the house to drain any remaining water in the pipes. This step makes installation safer and cleaner.
Clearing The Area
Clear the space around the main water line. Remove any objects or debris that could block your work. Make sure you have enough room to install and maintain the filter. Good lighting and easy access help during installation. Keep tools and parts nearby for convenience.
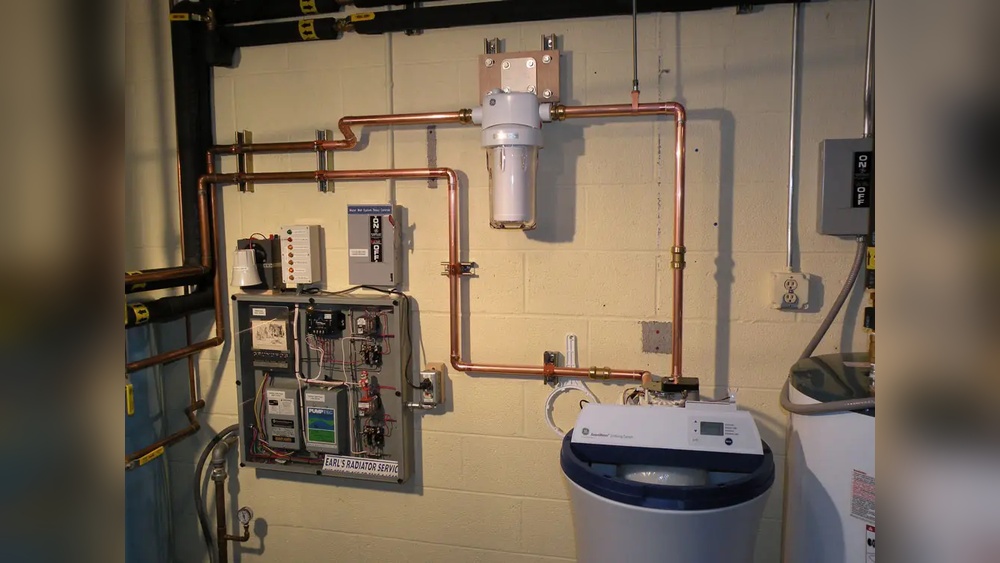
Installing The Filter System
Installing the whole-house water filter system on your well improves water quality. It removes sediments, chlorine, and other impurities. Proper installation ensures the system works well and lasts long. Follow these steps carefully to set up the filter system effectively.
Cutting The Pipe
Turn off the main water supply before starting. Use a pipe cutter to cut the pipe where the filter will go. Make sure the cut is clean and straight. Remove any burrs or sharp edges from the cut pipe ends. This step creates a smooth surface for connections.
Mounting The Filter
Choose a sturdy wall near the pipe for mounting the filter. Use screws and anchors to fix the mounting bracket securely. Hang the filter housing on the bracket. Ensure it is level and easy to access for future cartridge changes. The filter should be stable and not wobble.
Connecting Pipes And Fittings
Attach the correct fittings to the pipe ends. Use plumber’s tape on threaded connections to prevent leaks. Connect the inlet and outlet ports of the filter housing. Tighten all fittings by hand, then use a wrench for a snug fit. Avoid over-tightening to prevent damage. Turn on the water supply slowly and check for leaks.
Testing And Maintenance
Testing and maintenance keep your whole-house water filter working well. Regular checks help catch problems early. Proper care extends the life of your system. It also ensures clean, safe water for your home.
Checking For Leaks
Look for water puddles around the filter system. Check all pipes and connections carefully. Small leaks can waste water and cause damage. Tighten any loose fittings you find. Replace worn-out seals or parts to stop leaks.
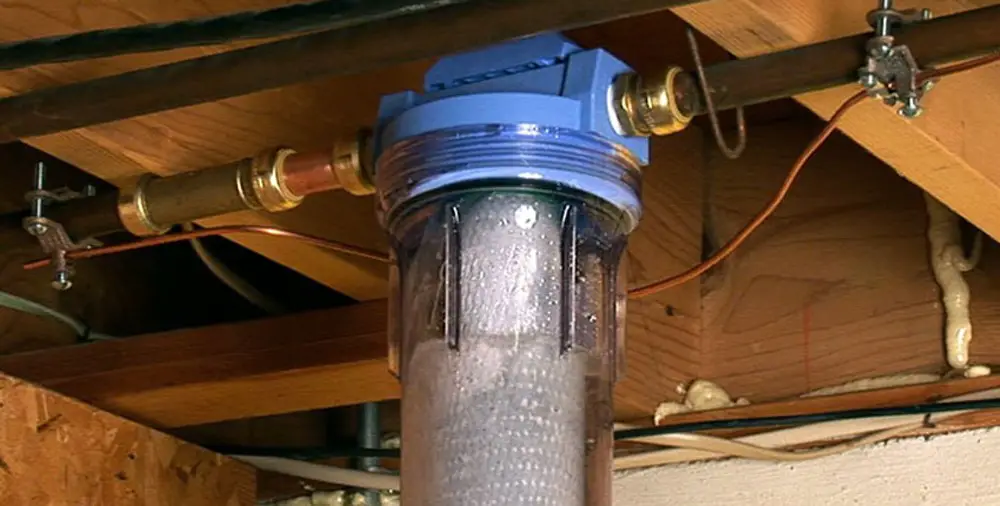
Flushing The System
Flush the filter system to clear out trapped debris. Open the flush valve and let water flow freely. Do this for a few minutes each time. Flushing prevents clogging and maintains good water flow. It also keeps the filter media clean and effective.
Replacing Filter Cartridges
Change filter cartridges according to the manufacturer’s schedule. Old cartridges lose their ability to clean water. Turn off the water supply before removing cartridges. Install new ones carefully to avoid leaks. Regular replacement keeps your water fresh and pure.

Frequently Asked Questions
How Do I Install A Whole-house Water Filter On A Well?
First, shut off the well pump. Cut the main water line and attach the filter housing. Connect fittings securely and flush the system before use. Follow the manufacturer’s guide for best results.
What Tools Are Needed To Install A Whole-house Water Filter?
You need a pipe cutter, wrench, Teflon tape, and screwdriver. Additionally, have the filter housing and fittings ready. These tools ensure a smooth and secure installation process.
How Often Should I Replace The Whole-house Water Filter Cartridge?
Replace the cartridge every 6 to 12 months. Frequency depends on water quality and usage. Regular replacement ensures effective filtration and clean water throughout your home.
Can I Install A Whole-house Filter Without Professional Help?
Yes, if you have basic plumbing skills, you can install it yourself. Carefully follow instructions and turn off the water supply. If unsure, consult a professional to avoid damage.
Conclusion
Installing a whole-house water filter on a well improves water quality greatly. Clean water protects your family’s health every day. The process is simple if you follow the right steps. Check your tools and parts before starting work. Take your time and do each step carefully.
Regular filter changes keep the system working well. Enjoy fresh, clean water from every tap in your home. This small effort brings big benefits to your household.

Hasan Al Sarker is a Reverse Osmosis Specialist. He has worked for many years to ensure safe drinking water for all. His research paper has been published in several journals, including Issue, Medium, and Slideshare. He is recognized as a water doctor among specialists though he did not attend medical college.
Besides working as a researcher of reverse osmosis technology, he is also very fancy with the kitchen and cooking. His guides are reading thousands of people every day. As a head of content, he is responsible for all the published articles at RO System Reviews.