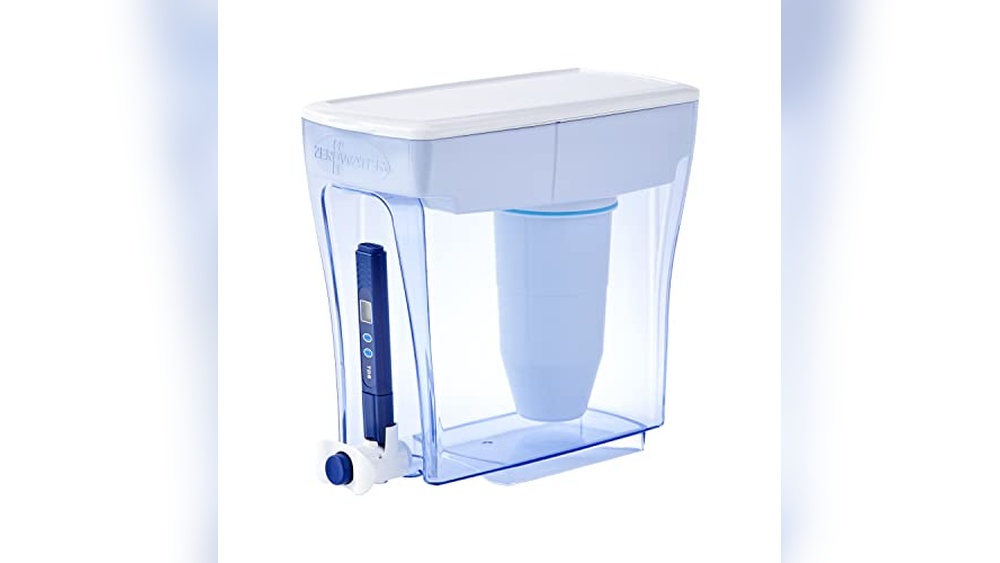
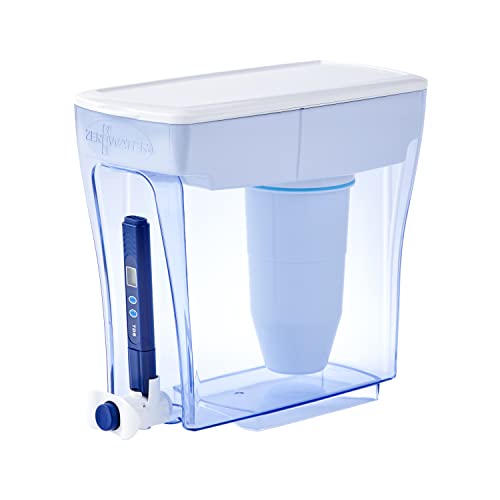
As an expert in testing and reviewing pitcher water filters, I have spent years trying many brands and models to find the best options for clean and safe drinking water. With deep knowledge and hands-on experience, I carefully research and test each product to give you honest and clear insights. In this review, I focus on the ZeroWater 20-Cup Ready-Pour 5-Stage Water Filter Dispenser, a top-rated choice on Amazon, known for its advanced filtration and trusted certifications. My goal is to help you understand its features, benefits, and performance so you can make a smart and confident decision when choosing your next water filter.
Pros & Cons
What We Loved
✅ Accurate TDS meter for easy filter monitoring
✅ 5-stage filtration removes virtually all dissolved solids
✅ IAPMO certified to reduce lead, chromium, and PFOA/PFOS
✅ BPA-free and safe plastic construction
What Could Be Better
❌ Filter replacement frequency can be high depending on water quality
❌ Larger size may take up more counter space
❌ Price slightly higher compared to basic water pitchers
Who Should Buy This
This water filter dispenser is perfect for families and individuals who want clean and safe drinking water. It is great for those who worry about harmful chemicals like lead, chromium, and PFOA/PFOS in their tap water. If you need a large amount of filtered water daily, the 20-cup size will suit you well. It is also ideal for people who want an easy-to-use, ready-pour pitcher with fast shipping available on Amazon Prime.
If you live in a place with already clean tap water or do not drink much water daily, this product might not be necessary. Also, if you prefer a smaller pitcher or want a cheaper option, you may want to look for other water filters. This dispenser is best for those who value high-level filtration and need a bigger water capacity.
Technical Specifications
Key Details
Brand: ZeroWater
Model: ZD-20RP-N
Size: 11.75″ x 5.5″ x 10.63″
Weight: 3.3 Pounds
Material: BPA-Free Plastic
Color Options: White and Blue
Special Features: 5-Stage Filtration, Ready-Pour Spout, 0 TDS Water Filter, IAPMO Certified to Reduce Lead, Chromium, and PFOA/PFOS
Warranty: Limited Manufacturer’s Warranty
Our Testing Experience
First Impressions
When I first received the ZeroWater 20-Cup Ready-Pour Dispenser, I was impressed by its sleek design and good size. The 11.75 x 5.5 x 10.63 inches dimensions made it fit nicely on my kitchen counter without taking up too much space. I was excited to test it because the built-in TDS meter promised to show me the water quality in real-time. Setting it up was simple, and I immediately filled it with tap water to see how the filtration worked.
Daily Use
Using the dispenser every day was easy and convenient. The ready-pour lid made pouring water smooth, and I loved being able to check the TDS levels before pouring a glass. It was reassuring to see the meter drop to nearly zero after the water passed through the 5-stage filter. I used it for drinking, cooking, and even making coffee, and the water tasted noticeably cleaner and fresher compared to before.
Key Features in Action
The 5-stage ion exchange filter really stood out during my testing. It removed almost all the dissolved solids, which I could verify thanks to the TDS meter. Knowing that the filter is IAPMO certified to reduce harmful substances like lead, chromium, and PFOA/PFOS made me feel safer drinking the water. Plus, the BPA-free plastic gave me peace of mind about the dispenser’s safety. The TDS meter was especially helpful because it told me exactly when it was time to change the filter, so I didn’t have to guess.
Long-Term Performance
After using the ZeroWater dispenser for several weeks, I noticed that the water quality stayed consistently high. The TDS meter would slowly rise as the filter got used up, signaling when a replacement was needed. Changing the filter was straightforward and didn’t cause any mess. Overall, the dispenser held up well and kept providing great-tasting water without any issues. It’s become a daily essential in my home.
6-pack replacement filters; Each filter lasts ~15 gallons or up to 6 months; 5-stage ion exchange filtration; BPA-Free plastic
Best For
Users wanting a mid-size dispenser with easy TDS monitoring and pure water for everyday use
Users needing larger capacity dispenser with instant TDS readout for bigger households
Existing ZeroWater dispenser owners needing multiple replacement filters for long-term use
In my opinion, this ZeroWater 20-Cup Ready-Pour 5-Stage Water Filter Dispenser stands out because it offers a balanced 20-cup capacity combined with a reliable integrated TDS meter that helps you know exactly when to change the filter. Unlike the larger 32-cup option, it fits well in most kitchens without taking up too much space but still delivers the advanced 5-stage filtration certified to reduce harmful contaminants. If you’re like me and prefer a compact yet highly efficient water filter dispenser with easy monitoring, this is the better choice.
Customer Feedback on ZeroWater 20-Cup Ready-Pour 5-Stage Water Filter Dispenser with 0 TDS Water Filter – IAPMO Certified to Reduce Lead, Chromium, and PFOA/PFOS
Overall Satisfaction
Customers generally rate this water filter dispenser highly, appreciating its effective filtration and value for the price, reflected in the strong 4.67/5 seller rating.
Most Praised Features
Exceptional water purity with noticeable reduction in TDS (Total Dissolved Solids) levels.
Large 20-cup capacity convenient for families and frequent use.
Easy-to-use Ready-Pour design that prevents spills and makes refilling simple.
Common Concerns
Filter replacement frequency can be higher than expected, leading to ongoing costs.
Some users find the dispenser’s plastic parts less durable over time.
Who Loves It Most
This product is especially popular among health-conscious consumers and families who prioritize clean drinking water and want a reliable filtration system certified to reduce harmful contaminants like lead and chromium.
Is It Worth the Price?
Price Analysis
At $39.99, the ZeroWater 20-Cup Ready-Pour 5-Stage Water Filter Dispenser is competitively priced compared to other advanced water filter pitchers with similar capacity and certification. It offers a middle ground between budget models and premium options, making it fairly priced for the features included.
Value Features
5-Stage Ion Exchange Filter – ensures the removal of virtually all dissolved solids, providing exceptionally pure water that justifies the investment.
Built-in TDS Meter – allows you to monitor water quality in real-time, helping to know exactly when to change filters and avoid unnecessary replacements.
IAPMO Certification – guarantees reduction of harmful contaminants like lead, chromium, and PFOA/PFOS, adding peace of mind about water safety.
BPA-Free Construction – promotes health safety and durability, reducing the need for frequent replacements and saving costs over time.
Vs. Competitors
Compared to other pitcher filters with similar filtration stages and certifications, ZeroWater offers excellent value with its unique 5-stage filtration and TDS meter. While some competitors may be cheaper, they often lack the comprehensive contaminant removal and monitoring features, making ZeroWater a smarter long-term choice.
Final Verdict
The ZeroWater 20-Cup Ready-Pour Dispenser is worth buying at this price for those seeking highly purified, contaminant-free water with easy monitoring. Its balance of advanced filtration, safety certifications, and user-friendly features makes it a valuable investment for health-conscious consumers.
Hasan Al Sarker is a Reverse Osmosis Specialist. He has worked for many years to ensure safe drinking water for all. His research paper has been published in several journals, including Issue, Medium, and Slideshare. He is recognized as a water doctor among specialists though he did not attend medical college.
Besides working as a researcher of reverse osmosis technology, he is also very fancy with the kitchen and cooking. His guides are reading thousands of people every day. As a head of content, he is responsible for all the published articles at RO System Reviews.
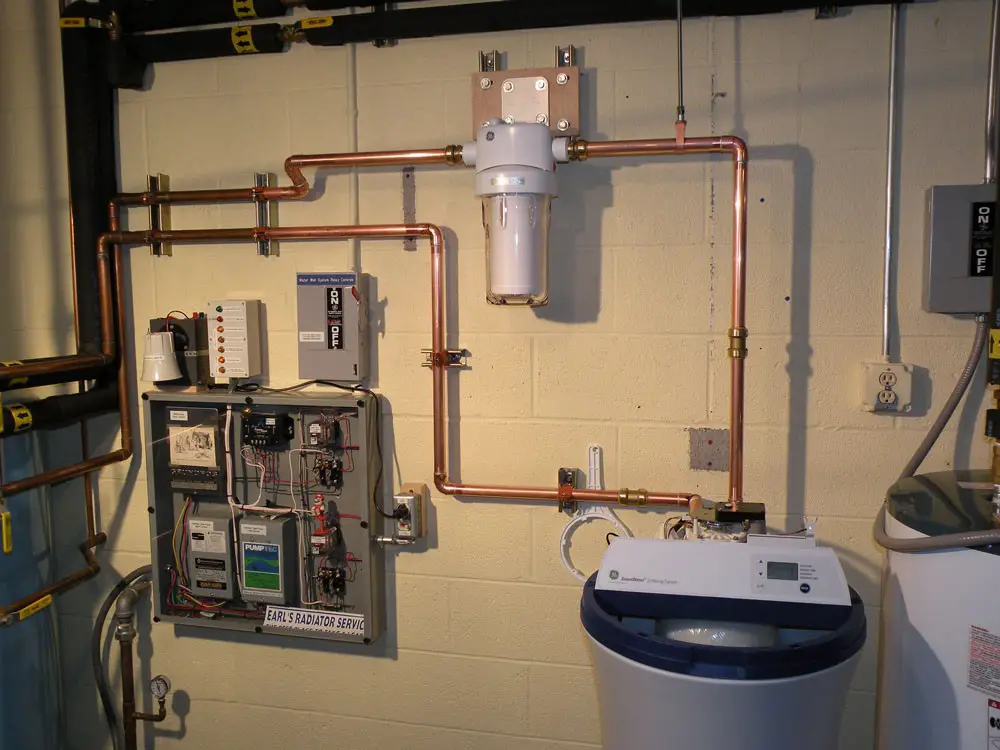
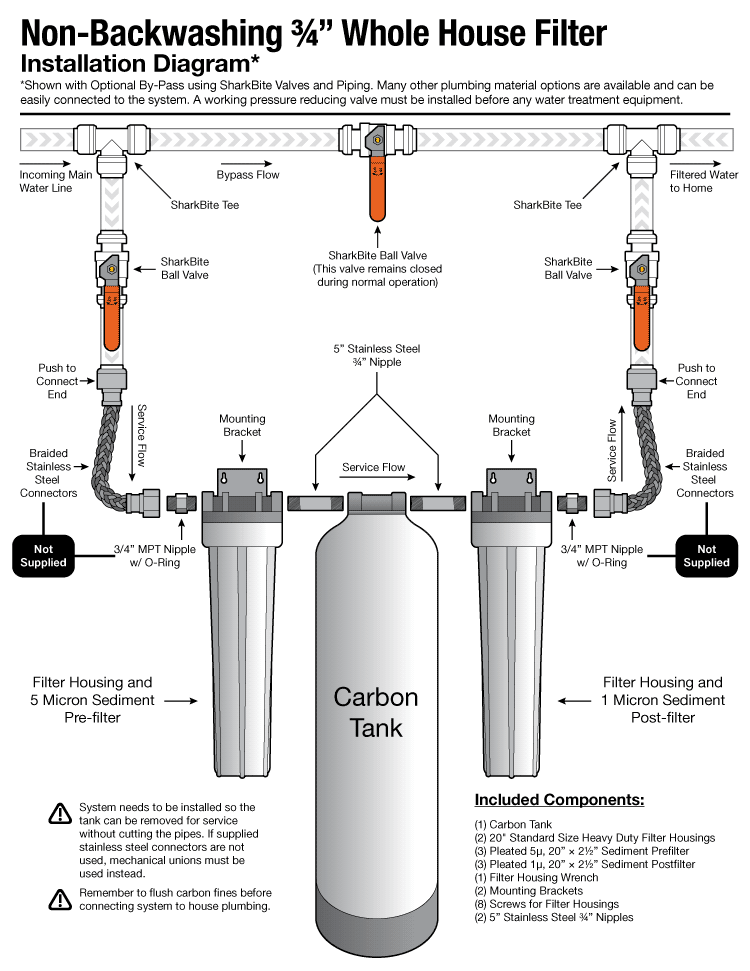
Are you tired of worrying about the quality of water flowing through your home? Installing a whole house water filter is a smart move to protect your family’s health and your plumbing system.
But where exactly should you install it for the best results? The right placement can make all the difference in ensuring clean, fresh water reaches every tap. Keep reading, and you’ll discover the key spots to install your water filter so you get the purest water possible throughout your entire home.
Benefits Of Whole House Water Filters
Whole house water filters bring many benefits to your home. They clean water from every tap and outlet. This means better water quality for drinking, cooking, and bathing. These filters remove harmful chemicals, dirt, and bad smells. Your family gets safer and fresher water all the time.
Using a whole house water filter also protects your plumbing and appliances. It stops scale buildup and corrosion caused by hard water. Your pipes last longer, and appliances like water heaters work better. This saves money on repairs and replacements.
Improves Water Taste And Smell
Water filtered by the whole house system tastes cleaner and fresher. It removes chlorine and other odors. This makes drinking water more enjoyable. Cooking with filtered water also enhances food flavor.
Protects Skin And Hair
Filtered water is softer and less harsh. It reduces skin dryness and irritation. Hair feels smoother and looks healthier. Bathing in clean water improves overall skin and hair care.
Reduces Health Risks
Whole house filters remove harmful contaminants like lead and bacteria. This lowers the risk of waterborne illnesses. Your family drinks safer water every day. It supports better health and well-being.
Extends Appliance Life
Filtered water prevents mineral buildup in appliances. Water heaters, washing machines, and dishwashers last longer. This reduces maintenance costs and improves appliance efficiency.
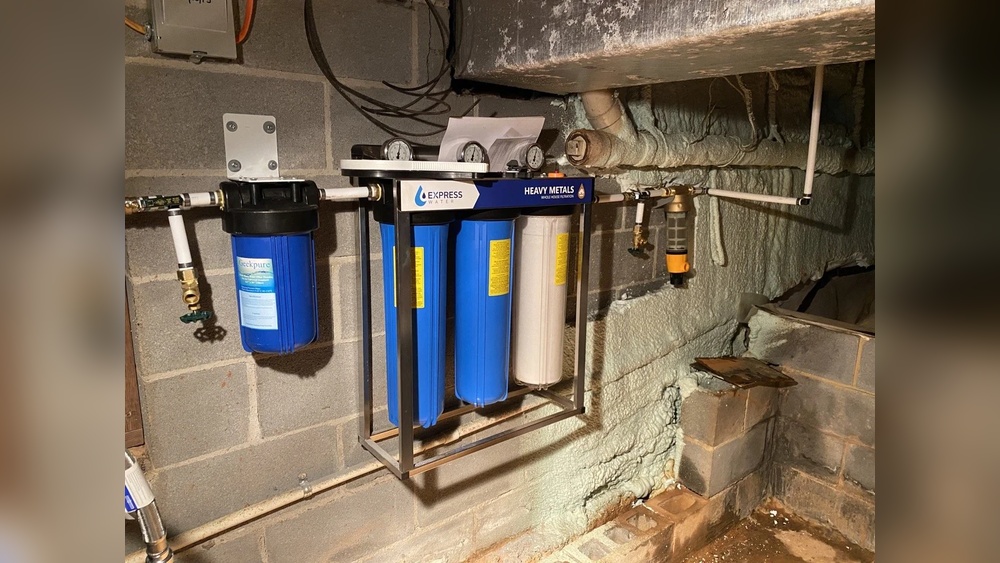
Ideal Locations For Installation
Choosing the right place to install a whole house water filter is important. The location affects how well the filter works and how easy it is to maintain. Ideal spots are close to the water source and safe from damage. The area should also allow easy access for filter changes and repairs.
Near Main Water Line
Installing the filter near the main water line is common. This spot treats all water entering the home. It protects pipes and appliances from dirt and chemicals. Placing it here ensures clean water in every faucet.
Basement Or Utility Room
The basement or utility room is a great indoor option. These areas usually have space and easy access to plumbing. They keep the filter safe from weather and temperature changes. Maintenance is simple in these controlled environments.
Garage Placement
The garage is another practical location. It offers protection from outdoor elements. The space is often near the main water line. A garage filter setup is easy to reach for regular checks.
Outdoor Setup Considerations
Outdoor installation needs extra care. The filter must be shielded from rain, sun, and cold. Use a protective housing or enclosure. Ensure easy access for filter changes and cleaning. Outdoor setups suit homes with limited indoor space.
Factors Affecting Filter Placement
Choosing the right place to install a whole house water filter is important. Several factors affect where the filter will work best. These factors help keep the water clean and the system running well. Understanding them can save time and money in the long run.
Water Pressure And Flow
Water pressure must be strong enough to pass through the filter. Low pressure can reduce flow and cause problems. The filter should not block water flow. It needs enough space to keep water moving freely.
Space Availability
Filters need enough room for installation and operation. Check the available space before choosing a spot. Tight spaces can make installation hard. Leave extra space for pipes and fittings.
Temperature And Environment
Keep the filter away from extreme heat or cold. High temperatures can damage filter parts. Freezing can cause cracks or leaks. Choose a dry place with steady temperature for best results.
Accessibility For Maintenance
Filters need regular checks and changes. Place the filter where it is easy to reach. Avoid hard-to-access areas like behind heavy machinery. Easy access saves effort and keeps the filter working well.
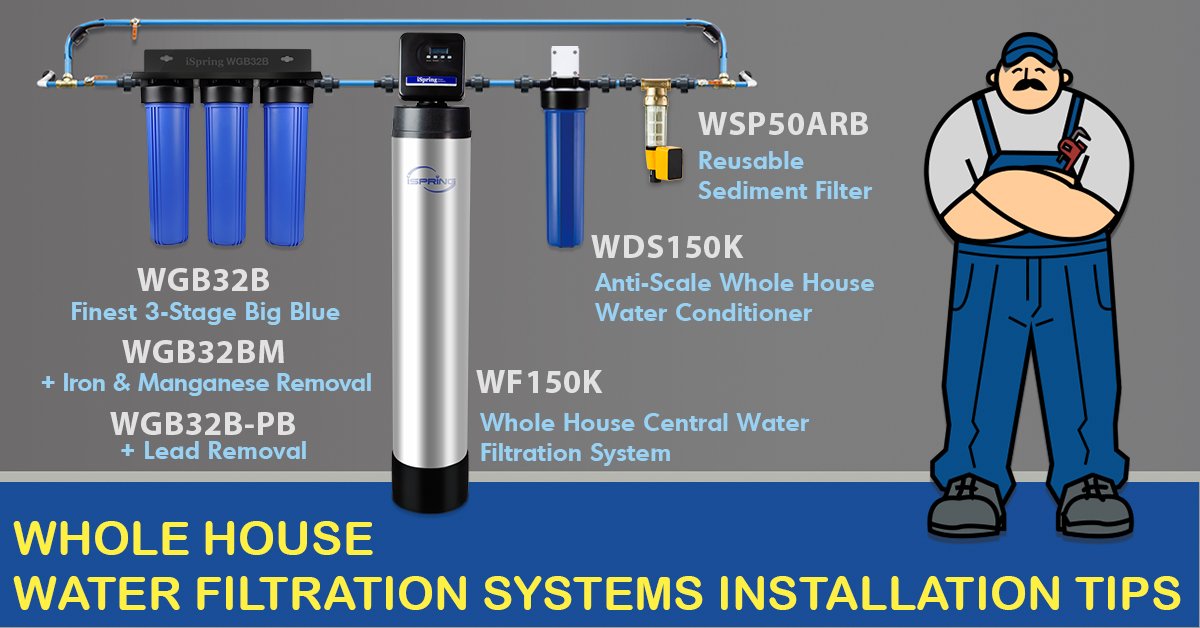
Installation Tips From Experts
Installing a whole house water filter needs careful attention. Experts share tips to help you avoid problems and get the best results. Follow these simple guidelines to make your installation smooth and effective.
Avoiding Common Mistakes
Do not install the filter too far from the main water line. This reduces water pressure and filter efficiency. Check the pipe size before installation. Make sure the filter fits well and matches your plumbing system. Avoid placing the filter near heat sources or direct sunlight.
Ensuring Proper Sealing
Use plumber’s tape on all threaded connections. This prevents leaks and keeps water pressure steady. Tighten fittings by hand first, then use a wrench gently. Over-tightening can damage parts and cause leaks. Inspect seals and O-rings for damage before installing them.
Using Bypass Valves
Install bypass valves to control water flow during maintenance. This allows you to clean or replace filters without shutting off the entire water supply. Bypass valves also help maintain water flow during emergencies. Position valves so they are easy to access.
Professional Vs Diy Installation
DIY installation saves money but needs careful planning and tools. Professionals ensure correct setup and check for hidden issues. Consider your skill level before starting. Hiring a plumber can avoid costly mistakes and save time. Professional help is best for complex plumbing systems.
Signs Your Filter Is In The Right Spot
Knowing if your whole house water filter is in the right spot is important. It helps keep your water clean and safe. A well-placed filter works better and lasts longer. You can tell the filter is placed right by watching a few key signs.
These signs show the filter is doing its job and is easy to maintain. They also protect your home’s plumbing. Pay attention to these clues to make sure your filter is where it should be.
Consistent Water Quality
Your water should taste clean and look clear all the time. No strange smells or colors should appear. If your water feels the same at every tap, the filter is likely in the right place. This means it is removing dirt and chemicals well before water reaches your home.
Stable Water Pressure
Water pressure should stay steady throughout your house. No sudden drops or weak flow. If pressure stays strong, your filter is not blocking water too much. This shows the filter is installed correctly and allows water to pass easily.
Ease Of Filter Replacement
You should be able to change the filter without hassle. The filter should be easy to reach and remove. A good location means less work and no special tools needed. Easy replacement helps keep your water clean all the time.
Frequently Asked Questions
Where Is The Best Location To Install A Whole House Water Filter?
The best location is near the main water supply line. This ensures all water entering your home is filtered. Installing it before the water heater protects appliances and improves water quality throughout the house.
Can I Install A Whole House Water Filter Myself?
Yes, if you have basic plumbing skills and tools. However, hiring a professional ensures proper installation and avoids leaks. Proper placement and secure fittings are critical for optimal filter performance and longevity.
Should The Filter Be Installed Before Or After The Water Heater?
It should be installed before the water heater. This placement protects the heater from sediment and contaminants. It also ensures clean water is available from all taps and appliances.
How Far From The Main Water Line Should The Filter Be Installed?
Install the filter as close to the main water line as possible. This maximizes filtration efficiency. Avoid long pipe runs before the filter to reduce contamination risks.
Conclusion
Choosing the right spot for your whole house water filter matters a lot. Install it near the main water line for best results. This way, every tap gets clean water. Avoid placing it too far from pipes to save space and effort.
A good location helps the filter work well and last longer. Think about easy access for future filter changes. Clean water protects your family and home. Simple steps bring big benefits. Start with the main water entry point. Keep your water fresh and safe every day.
Hasan Al Sarker is a Reverse Osmosis Specialist. He has worked for many years to ensure safe drinking water for all. His research paper has been published in several journals, including Issue, Medium, and Slideshare. He is recognized as a water doctor among specialists though he did not attend medical college.
Besides working as a researcher of reverse osmosis technology, he is also very fancy with the kitchen and cooking. His guides are reading thousands of people every day. As a head of content, he is responsible for all the published articles at RO System Reviews.
If you want fresh, clean water from your Sub Zero refrigerator, changing the water filter regularly is a must. But maybe you’re unsure how to do it or worried about making a mistake.
Don’t worry—replacing your Sub Zero water filter is easier than you think. In this guide, you’ll discover simple, step-by-step instructions that anyone can follow. By the end, you’ll have clear, great-tasting water flowing right from your fridge again. Ready to learn how to replace your Sub Zero water filter quickly and confidently?
Let’s get started.
Signs To Replace Your Filter
Knowing when to replace your Sub Zero water filter is important. A worn-out filter can affect your water quality and appliance performance. Watch for clear signs to keep your water clean and fresh.
Reduced Water Flow
Notice your water flow is slower than usual. This often means the filter is clogged. A blocked filter restricts water movement. Replacing it restores normal flow and pressure.
Unusual Taste Or Odor
Water tastes different or smells strange. These changes show the filter no longer cleans well. Old filters let impurities pass through. Fresh filters keep water tasting pure and fresh.
Filter Life Indicator
Check the filter life indicator on your fridge. It signals when the filter needs changing. This feature helps maintain filter efficiency. Follow its alerts to avoid water problems.
Tools And Materials Needed
Replacing a Sub Zero water filter needs specific tools and materials. Having the right items makes the job easier and faster. It also helps avoid damage to your fridge or filter system. Gather everything before starting the replacement process.
Replacement Filter Model
Use the exact filter model for your Sub Zero fridge. Check your user manual or the old filter for the model number. Using the wrong filter can cause leaks or poor water quality. Purchase a genuine or certified replacement filter. This ensures safe and clean water every time.
Basic Tools
Most filter changes require only simple tools. A flathead screwdriver helps remove the filter cover. A towel or small container catches any water drips. Keep a pair of gloves handy to protect your hands. These basic tools help you complete the task smoothly.
Safety Precautions
Turn off the water supply before starting. This stops water spills and protects your floor. Unplug the fridge to avoid electrical hazards. Handle the filter carefully to prevent damage. Work slowly and avoid forcing parts. Safety helps you finish without accidents.
Locate The Water Filter
Locating the water filter is the first step to replacing your Sub Zero water filter. Knowing its exact position saves time and effort. It also helps avoid damage to your appliance. This section guides you through common filter locations and how to access the filter housing safely.
Common Filter Locations
Sub Zero water filters are often placed in easy-to-reach spots. The most common location is inside the refrigerator compartment. Look near the top right or left corner. Some models have the filter at the base, behind a grille or kick plate. Another spot is the back wall of the fridge. Check your user manual for the exact location.
Accessing The Filter Housing
Once you find the filter, the next step is to access its housing. Most filters twist out with a simple turn. Some have a push-button release for quick removal. Use gentle force to avoid breaking the housing. Clean the area around the filter before removing it. This prevents dirt from entering the water system.
Remove The Old Filter
Removing the old Sub Zero water filter is the first step in replacement. It keeps the system clean and working well. This part guides you through simple actions to remove the old filter safely. Follow each step carefully to avoid leaks or damage.
Shutting Off Water Supply
Start by turning off the water supply to the fridge. This stops water from flowing during the filter removal. Find the valve behind or under the fridge. Turn it clockwise until it stops. Check that water flow has stopped by opening the fridge water dispenser. No water means you are ready.
Twisting And Pulling Out The Filter
Locate the filter inside the fridge compartment or near the base grille. Hold the filter firmly. Twist it counterclockwise about a quarter turn. Pull the filter straight out slowly. Some water may drip; keep a cloth nearby. Avoid forcing the filter to prevent damage. Set the old filter aside for disposal.
Install The New Filter
Installing the new Sub Zero water filter is a simple task. It ensures clean, fresh water for your home. Follow clear steps to fit the filter perfectly. Proper installation avoids leaks and keeps water pure.
Aligning The Filter Correctly
First, check the new filter’s shape and size. Match it with the filter slot in your fridge. Look for arrows or marks on the filter. These guide the correct position. Hold the filter firmly and line it up straight. Avoid forcing it into place. A proper fit is smooth and easy.
Securing The Filter In Place
Push the filter gently into the slot. Turn it clockwise until you feel it lock. This click means the filter is secure. Don’t over-tighten, or it may break. Once locked, pull lightly to test if it’s fixed. A firm hold means the filter won’t move. Now, your new filter is ready to use.
Flush The New Filter
Flushing the new Sub Zero water filter is a key step after installation. It prepares the filter for use and improves water taste. This process removes air and any loose particles inside the filter. Proper flushing helps the filter work effectively and keeps your water clean.
Running Water Through The Filter
Start by turning on the cold water tap connected to the filter. Let water run through the filter for about five minutes. This clears out any carbon dust or residue from the new filter. Use a container to catch the water if needed. Running water ensures the filter is ready for safe use.
Clearing Air And Debris
Air trapped inside the filter can cause sputtering or weak water flow. Flushing pushes out this air and any loose debris. Watch for steady water flow without bubbles or noise. This means air is fully removed. Clear water flow means your filter is clean and working properly.
Reset The Filter Indicator
Resetting the filter indicator is important after changing your Sub Zero water filter. This step keeps your fridge’s system accurate. The indicator helps you know when the filter needs a change again. Without resetting, the light may stay on and cause confusion.
Resetting the indicator is simple and quick. There are two main ways to do it. You can reset it manually or use the fridge’s control panel. Both methods ensure your filter status updates correctly.
Manual Reset Steps
First, find the reset button on the fridge. It is often near the water filter or inside the fridge door. Press and hold this button for 3 to 5 seconds. The filter light should blink or turn off. This means the reset worked.
Make sure not to release the button too soon. If the light stays on, try again. The manual reset is a fast way to update the filter status.
Using The Control Panel
Locate the control panel on your Sub Zero fridge. Look for the filter reset or water filter button. Press and hold it for several seconds. Watch for the filter indicator to turn off or blink.
This method works well on newer models with digital displays. It is easy and does not require opening the fridge. The control panel reset keeps your fridge’s filter info accurate.
Maintenance Tips
Proper maintenance keeps your Sub Zero water filter working well. Clean water depends on timely care. Follow these simple tips to ensure fresh water flow and good filter life.
Regular Replacement Schedule
Change the water filter every six months. This prevents clogging and keeps water pure. Mark the date on your calendar. Don’t wait for water taste to change. Regular replacement saves you from costly repairs.
Cleaning The Filter Housing
Clean the filter housing during every replacement. Use a soft cloth and mild soap. Rinse well to remove soap residue. Dirt buildup can cause leaks or reduce water flow. Keep the housing dry before inserting the new filter.
Frequently Asked Questions
How Often Should I Replace My Sub Zero Water Filter?
Replace your Sub Zero water filter every 6 to 12 months. Frequent replacement ensures clean, fresh-tasting water and optimal filtration performance. Check your model’s user manual for exact timing and signs that indicate a filter change is needed.
What Tools Do I Need To Replace The Filter?
You generally only need your hands to replace the Sub Zero water filter. Some models may require a filter wrench. Always consult your user manual to confirm necessary tools before beginning the replacement process.
How Do I Reset The Filter Indicator Light?
To reset the filter indicator light, press and hold the reset button. Hold it for 3 to 5 seconds until the light turns off. This action signals that the filter has been replaced and the system is ready.
Can I Use Any Filter Brand For My Sub Zero Fridge?
It’s best to use genuine Sub Zero replacement filters. These ensure compatibility and maintain water quality. Using third-party filters may void your warranty or reduce filtration effectiveness.
Conclusion
Replacing your Sub Zero water filter keeps water clean and fresh. It only takes a few simple steps to do it right. Regular changes help your fridge work well and improve water taste. Watch for signs that the filter needs swapping.
A clean filter protects your health and saves money. Stay on schedule to avoid problems later. You can do this yourself without special tools. Clear water means better drinks and meals every day. Keep your home healthy and your water pure.
Hasan Al Sarker is a Reverse Osmosis Specialist. He has worked for many years to ensure safe drinking water for all. His research paper has been published in several journals, including Issue, Medium, and Slideshare. He is recognized as a water doctor among specialists though he did not attend medical college.
Besides working as a researcher of reverse osmosis technology, he is also very fancy with the kitchen and cooking. His guides are reading thousands of people every day. As a head of content, he is responsible for all the published articles at RO System Reviews.
Have you ever wondered if you can turn salty ocean water into fresh, drinkable water? If you’re facing a shortage of clean water or just curious about survival skills, knowing whether you can filter salt water is crucial.
Imagine having the power to transform something unusable into a life-saving resource. You’ll discover the truth behind filtering salt water, how it works, and what methods actually make it safe for you to drink. Keep reading—you might be surprised by what’s possible and how easy it can be to access fresh water even from salty sources.
Why Filter Salt Water
Salt water contains high amounts of salt and minerals. It is not safe to drink or use directly. Filtering salt water removes harmful elements and makes it usable. This process helps provide clean water for many needs.
Challenges Of Salt Water
Salt water has many dissolved salts. These salts cause dehydration if consumed. It also contains tiny particles and pollutants. Removing salt is difficult with normal filters. Special techniques are needed to get clean water.
Salt can damage pipes and appliances. It also harms plants if used for irrigation. Salt water needs careful treatment before use. This makes filtering salt water a complex task.
Benefits Of Filtering
Filtering salt water creates fresh water for drinking. It helps communities with limited fresh water sources. Clean water improves health and hygiene. Filtering also protects equipment from salt damage.
Filtered water can support farming and industries. It reduces dependence on bottled water. Filtering salt water saves money and resources. It provides a reliable water supply in dry areas.
Common Filtration Methods
Salt water cannot be used directly for drinking or farming. It needs to be cleaned first. Several methods exist to remove salt from water. These methods vary in cost, speed, and efficiency. Understanding these common filtration techniques helps you choose the right one.
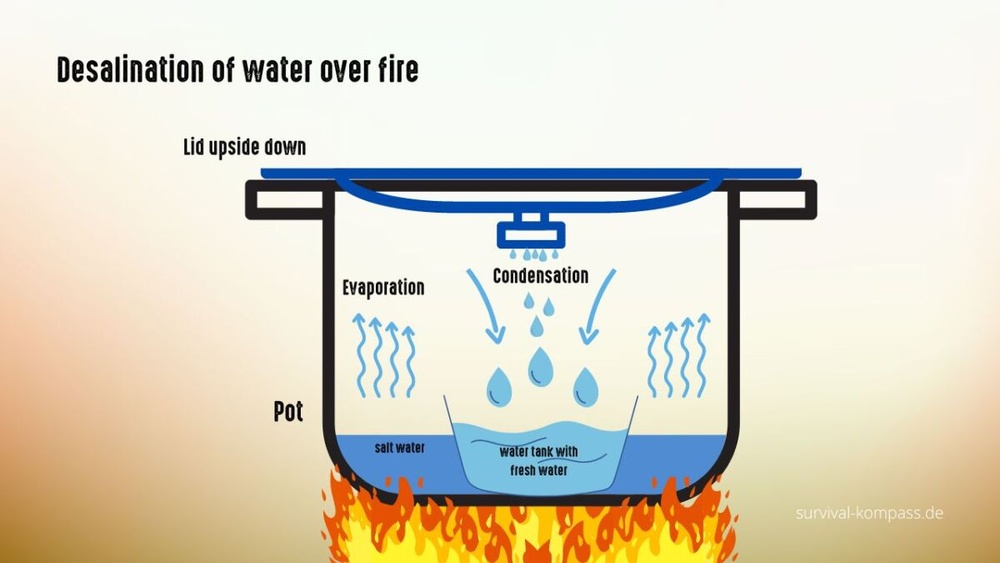
Boiling And Distillation
Boiling water creates steam. The steam leaves salt and impurities behind. Distillation collects this steam and cools it down. The result is fresh, salt-free water. This method is simple and effective. It works well on a small scale. But it uses a lot of energy and time.
Reverse Osmosis
Reverse osmosis uses a special filter called a membrane. Water is pushed through this membrane under pressure. Salt and other particles cannot pass through. Only clean water comes out the other side. This method removes most salts and impurities. It is common in homes and industries. It needs electricity and regular maintenance.
Electrodialysis
Electrodialysis uses electric currents to remove salt. It passes water between membranes that attract salt ions. These ions move out of the water, making it fresh. This method works well for water with low to medium salt levels. It saves energy compared to other methods. Often used in factories and large plants.
Diy Salt Water Filters
Filtering salt water at home is possible with simple tools. DIY salt water filters help remove salt and make water safer to drink. These methods need patience and care but can work well in emergencies or outdoor trips.
Two common ways to filter salt water are using a solar still and making homemade charcoal filters. Both use natural materials and basic steps anyone can follow.
Using Solar Still
A solar still uses the sun’s heat to clean salt water. It works by boiling water and collecting the steam. The steam leaves salt and impurities behind.
To build a solar still, dig a small hole in the ground. Place a container in the center to catch water. Cover the hole with plastic wrap and put a small stone in the middle. The stone makes the wrap dip, allowing steam to drip into the container.
Leave the still in direct sunlight for several hours. The steam will turn back into fresh water inside the container. This method is slow but safe and does not need extra tools.
Homemade Charcoal Filters
Charcoal can help clean salt water by removing bad tastes and some chemicals. It does not remove all salt but improves water quality. You can make a simple charcoal filter using wood charcoal.
First, crush the charcoal into small pieces. Then, layer it inside a clean bottle or container. Add sand and small stones above and below the charcoal to filter bigger particles.
Pour salt water slowly through the filter. The water will come out clearer and taste better. This filter is best used after boiling water or with other methods to remove salt.
Commercial Desalination Systems
Commercial desalination systems remove salt from seawater to provide fresh water. These systems play a key role in areas with limited freshwater resources. They use advanced technology to make seawater safe for drinking and irrigation. There are different types of commercial desalination systems. Each type serves different needs and scales of water production.
Home Units
Home desalination units are small and designed for personal use. They often use reverse osmosis to filter salt from water. These units fit easily in kitchens or small spaces. People use them to ensure clean drinking water from seawater or brackish water. These systems need regular maintenance to keep working well. Home units are cost-effective for families living near the coast.
Large-scale Plants
Large-scale desalination plants serve entire cities or industries. These plants use complex processes like thermal distillation or reverse osmosis. They produce thousands to millions of gallons of fresh water daily. Such plants require high energy but provide reliable water supply. They help solve water shortages in dry and coastal regions. Large plants often connect to public water systems for distribution.
Factors Affecting Filtration Efficiency
Filtration efficiency depends on several key factors. These factors determine how well a filter can clean salt water. Understanding them helps improve water quality and system performance.
Many things affect how much salt and impurities a filter can remove. Knowing these helps in choosing the right filter and maintaining it properly.
Water Quality
The quality of the salt water plays a big role in filtration. Water with a lot of sediments or organic material clogs filters quickly. High salt concentration can also reduce filter effectiveness. Clearer water allows filters to work better and last longer.
Testing water before filtration helps identify what needs to be removed. This guides the selection of the best filter type for the job.
Filter Maintenance
Regular maintenance keeps filters working at top efficiency. Dirty or clogged filters lose their ability to remove salt and impurities. Cleaning or replacing filter parts on time is crucial.
Ignoring maintenance shortens filter life and reduces water quality. Following the manufacturer’s instructions ensures filters perform well over time.
Health And Safety Considerations
Filtering salt water requires careful attention to health and safety. Salt water contains salt and other impurities that can harm your body. Proper treatment ensures the water is safe to drink. Understanding the risks and how to remove harmful substances is essential.
Removing Contaminants
Salt water has many contaminants besides salt. These include bacteria, viruses, and chemicals. Simple filters cannot remove all these dangers. Advanced methods like reverse osmosis or distillation work best. These processes can eliminate most impurities and salt. Using clean equipment also reduces contamination risks.
Ensuring Potability
Potable water is safe for drinking without health risks. After filtering salt water, testing is important. Testing checks for salt levels and harmful microbes. Water with high salt can cause dehydration and health issues. Boiling water kills bacteria but does not remove salt. Proper filtration followed by testing guarantees safe drinking water.
Cost And Energy Implications
Filtering salt water involves both cost and energy factors. These affect whether filtering is practical for daily use or large-scale needs. Understanding these aspects helps in making smart decisions about salt water filtration methods.
Operating Costs
Operating costs include maintenance and replacement parts. Filters and membranes wear out and need regular changes. Chemicals used in cleaning also add to expenses. Salt water systems require more frequent upkeep than fresh water ones. Budgeting for these costs is crucial to keep the system running smoothly.
Energy Consumption
Energy use depends on the filtration technology. Reverse osmosis, a common method, uses high pressure pumps that consume a lot of power. Solar-powered systems offer a low-energy alternative but need sunlight. Energy needs affect overall cost and environmental impact. Efficient systems reduce energy use and save money over time.
Frequently Asked Questions
Can You Filter Salt Water At Home?
Yes, you can filter salt water at home using methods like distillation or reverse osmosis. These processes remove salt and impurities, making the water safe to drink. However, simple filters like charcoal cannot desalinate salt water effectively.
What Is The Best Method To Filter Salt Water?
Reverse osmosis is the best method to filter salt water. It uses a semipermeable membrane to remove salt and contaminants. This method is efficient, widely used, and produces clean, safe drinking water from seawater.
Is Filtered Salt Water Safe To Drink?
Filtered salt water can be safe if properly desalinated. Methods like reverse osmosis and distillation remove harmful salts and bacteria. Always ensure the filtration process is thorough before drinking filtered salt water.
How Long Does It Take To Filter Salt Water?
The time to filter salt water varies by method. Reverse osmosis systems typically take several hours for a gallon. Distillation might take longer due to heating and cooling stages. Efficiency depends on equipment and water volume.
Conclusion
Filtering salt water is possible but needs special tools and care. Simple filters cannot remove all salt and minerals. Techniques like reverse osmosis work best for clean water. This process uses pressure to separate salt from water. Clean water is important for health and daily use.
Remember, not all methods suit every situation. Choose wisely based on your needs and resources. Safe water access remains a top priority worldwide. Keep learning about water treatment options to stay informed.
Hasan Al Sarker is a Reverse Osmosis Specialist. He has worked for many years to ensure safe drinking water for all. His research paper has been published in several journals, including Issue, Medium, and Slideshare. He is recognized as a water doctor among specialists though he did not attend medical college.
Besides working as a researcher of reverse osmosis technology, he is also very fancy with the kitchen and cooking. His guides are reading thousands of people every day. As a head of content, he is responsible for all the published articles at RO System Reviews.
Are you curious about what’s really in your tap water? You might be surprised by the hidden impurities that can slip through and affect your health.
That’s where a Berkey water filter comes in. But what exactly does it remove from your water? Understanding this can help you decide if it’s the right choice for your home and your family’s well-being. Keep reading to discover how a Berkey filter can transform your water into something cleaner, safer, and better tasting.
Berkey Filter Basics
Berkey water filters are popular for their strong cleaning power. They use special filter elements to remove many harmful substances. People choose Berkey for clean, safe drinking water without chemicals or electricity.
Understanding the basics helps you see why Berkey filters stand out. They work well in many situations, from home use to outdoor activities. The design is simple but very effective at purifying water.
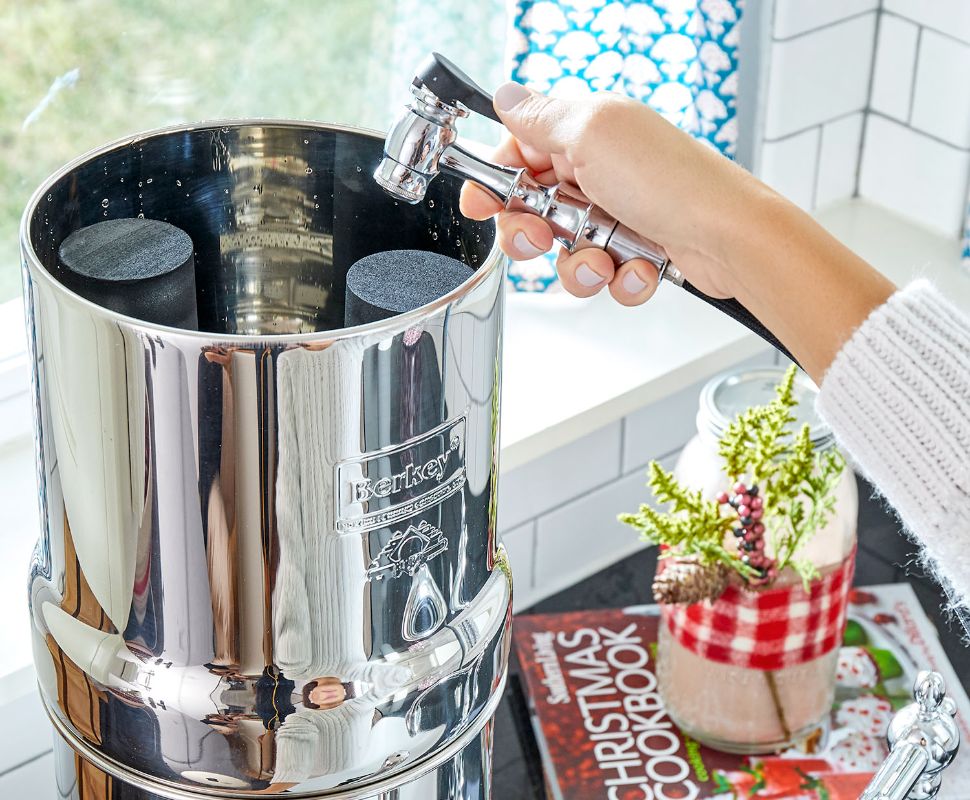
How Berkey Filters Work
Berkey filters use gravity to push water through filter elements. These elements have tiny pores that trap dirt, bacteria, and viruses. They also reduce chemicals like chlorine and pesticides. The filters do not need power or chemicals to clean water.
The water flows down slowly, allowing time for thorough filtration. The filter elements use a special black carbon block. This block adsorbs harmful substances and removes bad tastes and odors. The result is clean and fresh water.
Types Of Berkey Filters
Berkey offers several filter types for different needs. The Black Berkey elements are the most common and remove the most contaminants. There are also PF-2 fluoride and arsenic reduction filters. These fit onto the Black Berkey elements for extra cleaning.
Some models include additional filters for specific issues. Choose filters based on your water source and what you want to remove. All filters are reusable and easy to clean. This makes Berkey a cost-effective choice for pure water.
Common Contaminants Removed
Berkey water filters clean water by removing many common contaminants. These filters help improve water taste, safety, and clarity. Understanding what they remove can help you trust your water source more.
Bacteria And Viruses
Berkey filters remove harmful bacteria and viruses from water. They block pathogens that cause illnesses. This makes water safer to drink, especially from unknown sources.
Heavy Metals
These filters reduce heavy metals like lead, mercury, and arsenic. Heavy metals can cause health problems if consumed. Berkey filters trap these metals, ensuring cleaner water.
Chlorine And Chemicals
Chlorine and many chemicals affect water taste and smell. Berkey filters remove chlorine and other harmful chemicals. This improves the water’s flavor and odor.
Sediment And Particulates
Sediment, dirt, and other particles make water cloudy. Berkey filters block these particles to clear the water. Clean water looks better and feels fresher.
Less Common Contaminants Filtered
Berkey water filters remove many common pollutants. They also target less common contaminants that affect health. These include chemicals and residues not always filtered by other systems. Understanding these helps you see the full benefits of a Berkey filter.
Pesticides And Herbicides
Pesticides and herbicides often remain in water after farming use. These chemicals can harm the body over time. Berkey filters reduce these harmful substances efficiently. This results in cleaner and safer drinking water.
Pharmaceutical Residues
Traces of medicines enter water from human and animal waste. Even small amounts can disrupt hormones and health. Berkey filters remove many pharmaceutical residues. This helps protect you from unseen risks in tap water.
Fluoride And Arsenic
Fluoride and arsenic appear naturally or from pollution. High levels can cause serious health problems. Berkey water filters reduce both fluoride and arsenic effectively. This creates healthier water for daily use.
Testing And Certification
Testing and certification are key to understanding what a Berkey water filter removes. These processes prove how well the filter cleans water. They give buyers confidence. They also show the filter meets safety standards. The testing results help compare Berkey to other filters.
Independent Lab Results
Berkey filters undergo tests in independent labs. These labs check for many contaminants. They test bacteria, viruses, chemicals, and heavy metals. The labs use real water samples. Results show the filter removes over 99% of harmful substances. Independent testing means the results are unbiased. This helps customers trust the filter’s performance.
Nsf And Other Standards
NSF certification is a well-known water filter standard. It verifies the filter meets strict safety rules. Berkey filters meet or exceed many NSF standards. They are tested for reducing lead, chlorine, and other pollutants. Other organizations also set standards for water filters. Berkey’s certifications show it can provide clean, safe drinking water. These certifications guide buyers in choosing quality filters.
Maintenance And Filter Lifespan
Maintaining a Berkey water filter is simple but important. Proper care keeps the water clean and the filter lasting longer. Understanding how to clean and when to replace filters helps you get the best use from your system.
Cleaning The Filters
Cleaning the filters removes dirt and buildup. It improves water flow and keeps the filter working well. Use a soft brush or sponge with water only. Gently scrub the filter’s surface without damaging it. Avoid soap or chemicals, as they can harm the filter. Clean the filters every few months or when water flow slows down.
When To Replace Filters
Filter lifespan depends on water quality and usage. Berkey filters usually last for thousands of gallons. Watch for signs like slower water flow or a change in taste. Replace the filters if they no longer clean water well. Most users replace filters every 3 to 5 years. Regular checks ensure your water stays safe and fresh.
Comparing Berkey To Other Filters
Comparing Berkey to other water filters helps you understand what makes it unique. Many filters clean water but differ in effectiveness and design. Knowing these differences guides you to pick the right filter for your needs.
Advantages Over Pitcher Filters
Berkey filters remove more contaminants than typical pitcher filters. They target bacteria, viruses, and heavy metals effectively. Pitcher filters mostly reduce chlorine and some sediments only. Berkey units also hold more water, ideal for families or groups. Their filters last longer, saving money over time. Berkey filters work without electricity, useful in emergencies or outdoors. They also improve water taste and clarity better than many pitchers.
Limitations To Consider
Berkey filters cost more upfront than pitcher filters. They take up more space on counters or tables. The filtering process is slower because water passes through slowly. Berkey filters need regular cleaning to keep working well. They are not certified by all water safety organizations. Some users find the black filter elements messy to handle. The system may not fit well in small kitchens.
Frequently Asked Questions
What Contaminants Does A Berkey Water Filter Remove?
A Berkey water filter removes bacteria, viruses, chlorine, pesticides, heavy metals, and sediment. It effectively improves water taste and safety. The filter uses advanced purification technology to ensure clean, safe drinking water. It is suitable for both treated and untreated water sources.
Can Berkey Filters Remove Fluoride From Water?
Yes, with the addition of PF-2 fluoride filters, Berkey removes fluoride effectively. Standard Black Berkey filters do not remove fluoride alone. The PF-2 filters are designed specifically to reduce fluoride and arsenic from water for safer consumption.
How Effective Is Berkey Against Bacteria And Viruses?
Berkey filters remove 99. 99% of harmful bacteria and viruses. The filtration system uses micro-porous filtration technology to block pathogens. This makes it highly reliable for purifying water from various sources, including untreated water.
Does A Berkey Filter Remove Heavy Metals?
Yes, Berkey filters remove heavy metals like lead, mercury, and cadmium. The filter media bind and trap these contaminants, preventing them from passing through. This feature ensures cleaner, safer drinking water by reducing toxic metal content.
Conclusion
A Berkey water filter removes many harmful substances from water. It takes out bacteria, viruses, and chemicals. It also reduces bad tastes and odors. Clean water helps keep you healthy every day. This filter works well without electricity or plumbing.
Many people trust it for safe drinking water. Choosing a Berkey filter means choosing cleaner water at home. Simple, effective, and reliable. That’s what good water filtration should be.
Hasan Al Sarker is a Reverse Osmosis Specialist. He has worked for many years to ensure safe drinking water for all. His research paper has been published in several journals, including Issue, Medium, and Slideshare. He is recognized as a water doctor among specialists though he did not attend medical college.
Besides working as a researcher of reverse osmosis technology, he is also very fancy with the kitchen and cooking. His guides are reading thousands of people every day. As a head of content, he is responsible for all the published articles at RO System Reviews.