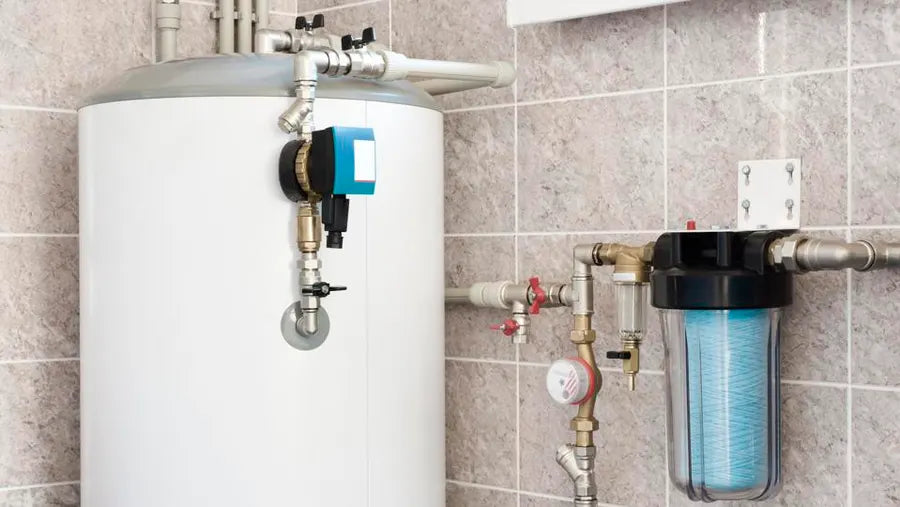
Have you ever wondered if installing a filter on your hot water line could make a real difference in your home? You might think filtering cold water is enough, but what about the water coming directly from your heater?
The truth is, unfiltered hot water can carry impurities that affect your skin, appliances, and even your health. If you care about cleaner water, longer-lasting appliances, and a safer home environment, this is something you need to consider. Keep reading to find out whether adding a filter to your hot water line is the smart choice for you.
Benefits Of Hot Water Line Filters
Installing a filter on the hot water line offers several important benefits. It improves the quality of water you use every day. The filter removes impurities that can affect taste and safety. It also helps protect your home appliances and supports healthier skin and hair. These advantages make a strong case for having a hot water line filter.
Improved Water Quality
Hot water filters remove sediments, chlorine, and other contaminants. This creates cleaner water for cooking and cleaning. It helps reduce odors and tastes caused by impurities. Cleaner water improves your overall home environment and health.
Protection For Appliances
Impurities in hot water can damage appliances like water heaters and dishwashers. A filter prevents buildup of minerals and rust inside these devices. This extends their life and reduces repair costs. Appliances run more efficiently with filtered hot water.
Enhanced Skin And Hair Health
Hot water can strip natural oils from skin and hair. Filters reduce harsh chemicals that cause dryness and irritation. Using filtered hot water helps keep skin soft and hair smooth. It supports a gentle and healthy daily routine.
Types Of Filters Suitable For Hot Water
Choosing the right filter for your hot water line is important. Hot water can carry different impurities than cold water. Some filters work better with hot water to protect your pipes and appliances. Understanding the types of filters helps you make a smart choice.
Each filter type has its own way of cleaning water. Some remove particles, others reduce chemicals or soften hard water. Let’s explore the common filters that suit hot water lines.
Sediment Filters
Sediment filters trap dirt, sand, and rust from water. They protect your water heater and pipes from damage. These filters are usually made of pleated fabric or spun fibers. They work well with hot water but need regular cleaning or replacement. Sediment filters keep your water clear and your system safe.
Carbon Filters
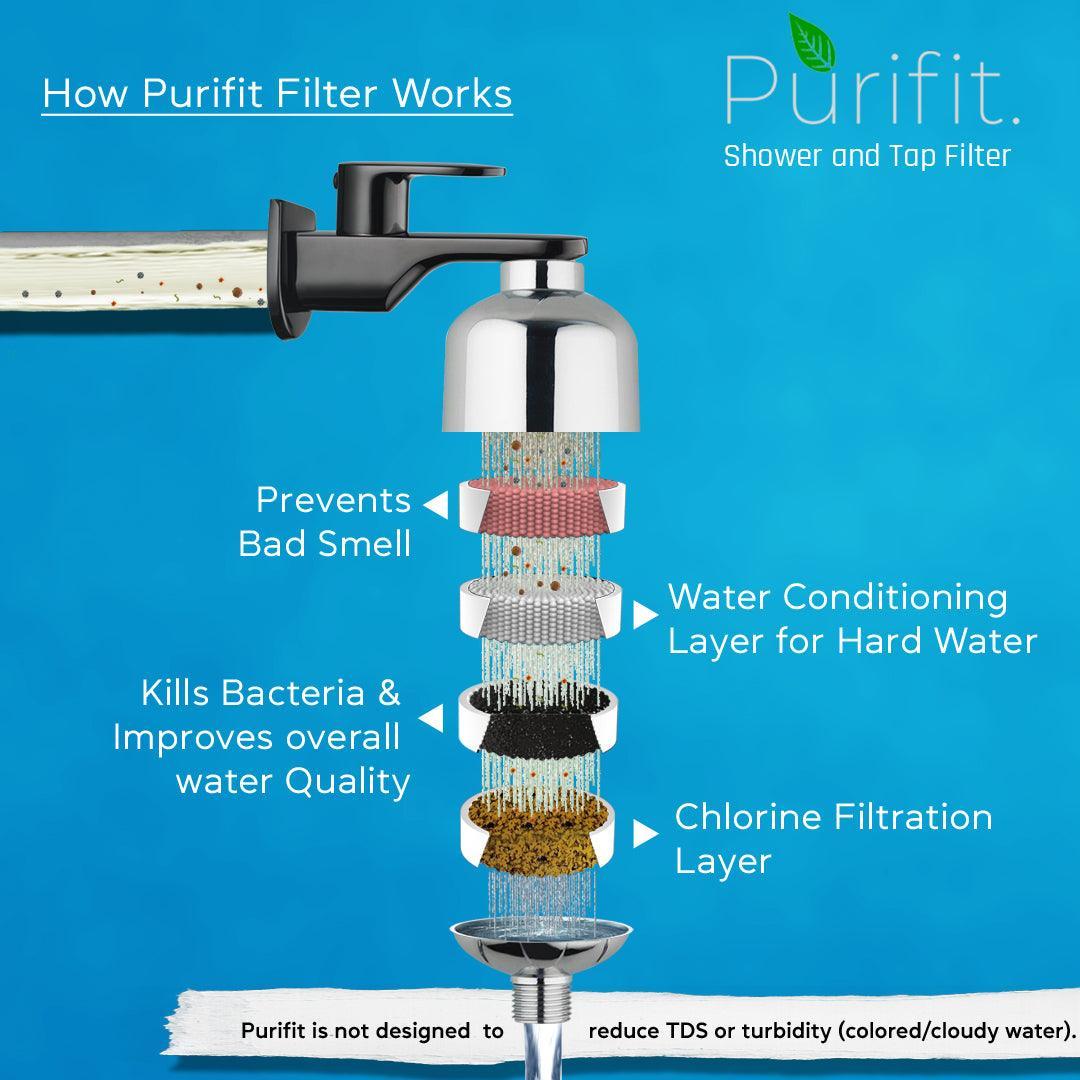
Carbon filters reduce chlorine, bad tastes, and odors in water. They use activated carbon to absorb chemicals and impurities. Some carbon filters can handle hot water temperatures. They improve water quality and make it safer for use. Carbon filters also protect appliances by reducing scale and build-up.
Water Softeners
Water softeners remove hardness minerals like calcium and magnesium. Hard water can cause scale in pipes and heaters. Softeners use salt or potassium to replace these minerals. They work well with hot water and extend the life of your water heater. Softened water feels smoother and helps soap work better.
Installation Considerations
Installing a filter on the hot water line needs some planning. You must think about where to place it, if it fits your plumbing, and how to keep it working well. These factors help you get the best results and avoid problems later.
Placement Options
Choose a spot that is easy to reach. Filters need space for installation and future care. Near the water heater is common. It protects the heater and gives clean hot water. Avoid places with extreme heat or cold. Check for enough room to open and replace the filter. A good spot saves time and effort.
Compatibility With Plumbing
Make sure the filter matches your pipes. Check pipe size and type before buying. Some filters fit only certain pipe materials. Use adapters if needed, but avoid complex setups. The filter should not reduce water flow. A mismatch can cause leaks or damage. Proper fit keeps water clean and system safe.
Maintenance Requirements
Filters need regular care to work well. Learn how often to change or clean the filter. Some need monthly attention, others less often. Easy access helps with quick maintenance. Ignoring maintenance lowers water quality and filter life. Keep a reminder to check the filter on time. Clean filters give better water and last longer.
Potential Drawbacks
Installing a filter on the hot water line has clear benefits. Still, it can come with some drawbacks. Knowing these issues helps make the right choice for your home. Consider these potential challenges before installation.
Cost Factors
Filters for hot water lines often cost more than cold water filters. The materials must withstand higher temperatures. This raises the price of buying and installing them. Maintenance costs add up over time too. Budgeting for these expenses is important.
Impact On Water Pressure
Adding a filter to the hot water line can lower water pressure. The filter blocks some flow to catch impurities. This can make showers and taps feel weaker. Homes with already low water pressure may notice this more. Checking pressure levels before installing is wise.
Filter Lifespan And Replacement
Hot water filters may wear out faster than others. Heat can reduce the filter’s effectiveness over time. Regular replacement is necessary to keep water clean. Forgetting to change filters can cause clogs and damage. Staying on a replacement schedule saves trouble later.
Signs You Need A Hot Water Filter
Knowing the signs that indicate the need for a hot water filter helps protect your home and health. Contaminants in hot water can cause taste, odor, and appliance problems. Detecting these issues early can save money and improve water quality.
Below are common signs that suggest installing a hot water filter is a smart choice.
Water Taste And Odor Issues
Hot water may taste metallic, sour, or strange. Unpleasant smells like rotten eggs or chlorine can also appear. These signs point to impurities in your water. A filter can remove these unwanted tastes and odors for cleaner water.
Appliance Damage Or Inefficiency
Minerals and sediments can build up inside water heaters and appliances. This causes rust, clogs, and reduces efficiency. Your water heater may take longer to heat water or break down early. A hot water filter helps prevent damage and keeps appliances running well.
Hard Water Symptoms
Hard water leaves white spots on dishes and soap scum in sinks. It also makes soap less effective and can dry out skin. High levels of calcium and magnesium cause these issues. Filtering hot water can reduce hardness and protect plumbing and skin.
Comparing Hot And Cold Water Filtration
Hot and cold water filtration serve different purposes and face unique challenges. Understanding their differences helps decide if a filter is needed on the hot water line. Each type of water contains distinct contaminants. Filter materials react differently to heat. Usage patterns also affect filter performance and lifespan.
Differences In Contaminants
Cold water often carries dirt, rust, and chlorine. Hot water may have minerals like calcium and magnesium. These minerals cause scale buildup inside pipes and heaters. Some bacteria can grow faster in warm water. Filters for hot water must handle these unique problems. Cold water filters focus more on taste and odor removal.
Filter Material Durability
Not all filter materials work well with hot water. Heat can damage or weaken some filter media. Plastic parts may warp or crack under high temperatures. Specialized filters use materials designed for heat resistance. These filters last longer and keep working properly. Choosing the right filter material is crucial for hot water lines.
Usage Frequency
Hot water is used less frequently than cold water. Showers, cooking, and cleaning use hot water. Cold water is used for drinking, washing, and more. Filters on cold water lines may need more frequent changes. Hot water filters might clog slower but still need maintenance. Regular checks ensure both filters work efficiently.
Frequently Asked Questions
Should I Install A Filter On My Hot Water Line?
Installing a filter on the hot water line can improve water quality and protect appliances. It removes sediments and contaminants that may affect taste and safety. Consider your water source and specific needs before installation for best results.
What Are The Benefits Of Filtering Hot Water?
Filtering hot water reduces sediments, chlorine, and harmful chemicals. It protects pipes and appliances from buildup and corrosion. Additionally, filtered water improves taste and odor, making it safer and more pleasant for daily use.
Can A Hot Water Filter Protect My Water Heater?
Yes, a hot water filter can protect your water heater by reducing scale and sediment buildup. This extends the heater’s lifespan and improves efficiency. It also reduces maintenance costs and potential repairs.
How Often Should I Change A Hot Water Filter?
Hot water filters typically need changing every 6 to 12 months. Frequency depends on water quality and usage levels. Regular replacement ensures optimal filtration and prevents clogging, maintaining clean and safe hot water.
Conclusion
Installing a filter on your hot water line can protect your pipes and appliances. It helps remove dirt and minerals that cause damage. Clean water means better water quality for your home. Filters also extend the life of water heaters.
Think about your water source and needs before deciding. A good filter adds value and peace of mind. Small steps like this improve daily water use. Consider this option to keep your water clean and safe.
Hasan Al Sarker is a Reverse Osmosis Specialist. He has worked for many years to ensure safe drinking water for all. His research paper has been published in several journals, including Issue, Medium, and Slideshare. He is recognized as a water doctor among specialists though he did not attend medical college.
Besides working as a researcher of reverse osmosis technology, he is also very fancy with the kitchen and cooking. His guides are reading thousands of people every day. As a head of content, he is responsible for all the published articles at RO System Reviews.
Is your water leaving spots on your dishes or making your skin feel dry? You might be dealing with hard water.
Hard water contains minerals that can cause buildup in your pipes, appliances, and even on your skin. But don’t worry—there are simple ways you can filter hard water and improve its quality right at home. You’ll discover easy methods to soften your water, protect your home, and enjoy cleaner, fresher water every day.
Keep reading to find the solution that fits your needs perfectly.
Causes Of Hard Water
Hard water forms naturally as it passes through soil and rocks. It picks up minerals that make water “hard.” These minerals cause many issues in homes and appliances. Understanding what causes hard water helps in choosing the right filter.
Minerals Behind Hard Water
Calcium and magnesium are the main minerals in hard water. They dissolve from limestone, chalk, and other rocks underground. These minerals do not harm health but affect water quality. They cause scale buildup on pipes and appliances. This buildup reduces water flow and efficiency.
Common Signs Of Hard Water
Soap does not lather well with hard water. You may see white spots on dishes and glassware. Clothes washed in hard water may look dull and feel rough. Faucets and showerheads can get crusty deposits. These signs show minerals in water need filtering.
Health And Home Effects
Hard water affects both health and home in many ways. It contains high levels of minerals like calcium and magnesium. These minerals cause problems for skin, hair, and household items. Understanding these effects helps in choosing the right water filter.
Impact On Skin And Hair
Hard water can make skin dry and itchy. The minerals block soap from rinsing off well. This leaves a residue that clogs pores. It may cause irritation or worsen skin conditions.
Hair feels rough and looks dull with hard water. It can cause scalp dryness and dandruff. Washing hair with hard water reduces softness and shine. Over time, hair may become brittle and break easily.
Damage To Appliances And Plumbing
Minerals in hard water build up inside pipes and appliances. This causes clogging and reduces water flow. Appliances like dishwashers and water heaters work less efficiently. They may break down sooner and need costly repairs.
Limescale buildup increases energy use in water heaters. Pipes can corrode, leading to leaks and water damage. Filtering hard water protects plumbing and saves money on repairs. It also extends the life of household appliances.
Types Of Water Softeners
Water softeners help reduce hard water problems. They remove minerals like calcium and magnesium. There are different types of water softeners. Each type works in a unique way. Understanding these types helps you pick the right one for your home.
Salt-based Softeners
Salt-based softeners use ion exchange to soften water. They replace hard minerals with sodium ions. This method effectively reduces scale buildup in pipes and appliances. Salt needs regular refilling for the system to work well. These softeners are popular in homes with very hard water.
Salt-free Conditioners
Salt-free conditioners do not remove minerals from water. Instead, they change minerals so they do not stick to surfaces. This helps reduce scale without using salt. They require less maintenance and no salt refills. Salt-free conditioners are good for mild to moderate hard water.
Magnetic And Electronic Devices
Magnetic and electronic devices use fields to affect minerals. They claim to prevent scale buildup in pipes and appliances. These devices are easy to install and require no chemicals. Their effectiveness varies and depends on water type and flow. Many homeowners use them as a simple water treatment option.
Diy Hard Water Filtration Methods
Hard water can cause problems like stains and soap scum. Filtering it at home helps protect your pipes and skin. You can try simple DIY methods using common items. These ways reduce minerals that make water hard. They are easy and cheap to do yourself.
Using Vinegar And Baking Soda
Vinegar and baking soda work well to soften hard water. Vinegar contains acid that breaks down minerals. Baking soda helps balance pH levels. Mix one cup of vinegar with water in a container. Add a teaspoon of baking soda slowly. Let the solution sit for 10 minutes. Use it to rinse surfaces or laundry. This method reduces mineral buildup and cleans effectively.
Boiling And Distillation
Boiling water helps remove some hardness. Heat water until it bubbles and boils for 5 minutes. Minerals like calcium settle at the bottom. Pour off the clean water carefully. Distillation is a stronger method. It collects steam and turns it back into water. This leaves minerals behind. Distilled water is very soft but needs special equipment. Boiling and distillation improve water quality for drinking and cooking.
Charcoal Filters
Charcoal filters absorb impurities from hard water. Use activated charcoal in a simple filter setup. Pour water through the charcoal slowly. It traps minerals and other particles. Charcoal filters are reusable after cleaning. They improve taste and reduce hardness slightly. This method works well for small amounts of water. Easy to make at home and affordable too.
Installing A Water Softener
Installing a water softener is a practical way to treat hard water in your home. It helps reduce minerals like calcium and magnesium. These minerals cause scale buildup and affect water quality. A water softener improves water for drinking, cleaning, and bathing.
This process involves choosing the right system, installing it properly, and maintaining it regularly. Each step is important for the system to work well and last long.
Choosing The Right System
Pick a system based on your water hardness and home size. Check the grain capacity; it shows how much hardness the system can handle. Salt-based softeners are common and effective. Salt-free systems prevent scale but don’t remove minerals. Consider your budget and maintenance needs too.
Step-by-step Installation Guide
Turn off the main water supply first. Find a spot near the main water line for the softener. Cut the pipe and attach bypass valves to control water flow. Connect the softener’s inlet and outlet to the pipes. Plug in the system and add salt to the tank. Open the water supply and check for leaks. Follow the manufacturer’s instructions to start the system.
Maintenance Tips
Check the salt level in the tank every month. Refill with the recommended salt type as needed. Clean the brine tank once a year to avoid buildup. Inspect the system for leaks or damage regularly. Test water hardness to ensure the softener works well. Proper care extends system life and keeps water soft.
Cost And Efficiency Comparison
Choosing the right method to filter hard water depends on cost and efficiency. Knowing the balance helps you pick a system that fits your budget and needs. Some options have high upfront costs but save money over time. Others cost less initially but might use more water or salt. Comparing these factors leads to better decisions.
Initial Investment Vs Long-term Savings
Water softeners and filters vary in price. Basic models start low but may need frequent maintenance. Advanced systems cost more but last longer and need less upkeep. Spending more now can reduce water damage and soap use later. This means lower bills for repairs and cleaning. Check the cost of salt, electricity, and parts too. These add to the total expense over time.
Water Softener Efficiency Ratings
Efficiency ratings show how well a system uses resources. Look for ratings on water use and salt consumption. High-efficiency models save more water and salt, lowering monthly costs. Some softeners use less salt per cycle. Others recycle water during regeneration. These features reduce waste and help the environment. Always compare efficiency scores before buying a softening system.
Alternative Solutions
Hard water causes problems like scale buildup and dry skin. Many people seek ways to reduce these issues. Besides common water softeners, some alternative solutions help filter hard water effectively. These options are easy to use and can improve water quality in different situations.
Using Bottled Or Filtered Water
Bottled water offers a simple way to avoid hard water minerals. It is convenient for drinking and cooking. Filtered water from stores also provides a mineral-free option. This solution requires no installation or maintenance at home. It suits those who want a quick fix without equipment.
Water Filtration Pitchers
Water filtration pitchers are affordable and easy to use. They remove many hard water minerals and impurities. Just fill the pitcher and wait a few minutes for filtered water. These pitchers fit well in refrigerators and are portable. They need regular filter changes for best results.
Professional Water Treatment Services
Experts can test your water to find hard minerals. They suggest the best filtration or softening system for your home. Professional services install and maintain equipment for smooth operation. This option ensures long-term water quality improvement. It suits people wanting a permanent and reliable solution.
Frequently Asked Questions
What Is The Best Method To Filter Hard Water?
The best method to filter hard water is using a water softener. It removes calcium and magnesium ions that cause hardness. Other options include reverse osmosis and ion exchange filters. These methods improve water quality and prevent scale buildup in pipes and appliances.
How Does A Water Softener Remove Hard Water Minerals?
A water softener uses ion exchange to replace calcium and magnesium with sodium or potassium ions. This process softens the water and prevents mineral deposits. It’s effective, easy to maintain, and widely used in homes to improve water quality and protect plumbing.
Can Hard Water Be Filtered Without Chemicals?
Yes, hard water can be filtered without chemicals using physical methods like reverse osmosis or magnetic water conditioners. These methods reduce hardness by removing minerals or altering their structure without adding chemicals, offering an eco-friendly solution for water treatment.
How Often Should Hard Water Filters Be Replaced?
Hard water filters should be replaced every 6 to 12 months. Replacement frequency depends on water hardness and filter type. Regular replacement ensures optimal filtration performance and prevents buildup that can reduce water flow and filter efficiency.
Conclusion
Filtering hard water protects your home and health. Simple methods like using water softeners or filters work well. Regular maintenance keeps your system efficient and reliable. Clean water improves taste, appliance life, and skin health. Choose the right option based on your needs and budget.
Start filtering today for better water quality tomorrow.
Hasan Al Sarker is a Reverse Osmosis Specialist. He has worked for many years to ensure safe drinking water for all. His research paper has been published in several journals, including Issue, Medium, and Slideshare. He is recognized as a water doctor among specialists though he did not attend medical college.
Besides working as a researcher of reverse osmosis technology, he is also very fancy with the kitchen and cooking. His guides are reading thousands of people every day. As a head of content, he is responsible for all the published articles at RO System Reviews.
Have you ever found yourself needing clean water but had nothing around except a simple bottle? What if you could turn that bottle into a lifesaving water filter right now?
You’re about to discover an easy, step-by-step way to make your own water filter using just a bottle and a few common materials. This isn’t just a clever trick—it’s a skill that can help protect your health in emergencies or outdoor adventures.
Keep reading, because by the end, you’ll have the confidence to create clean, safer water anytime you need it.
Materials Needed
Making a water filter with a bottle needs simple materials. These items help remove dirt and impurities from water. You can find most materials at home or local stores. Preparing the right materials makes the process easy and effective.
Choosing The Right Bottle
Pick a clean plastic bottle, about 1 to 2 liters. A clear bottle helps see the water level inside. Avoid bottles with cracks or holes. The bottle should be easy to cut and handle.
Essential Filtration Components
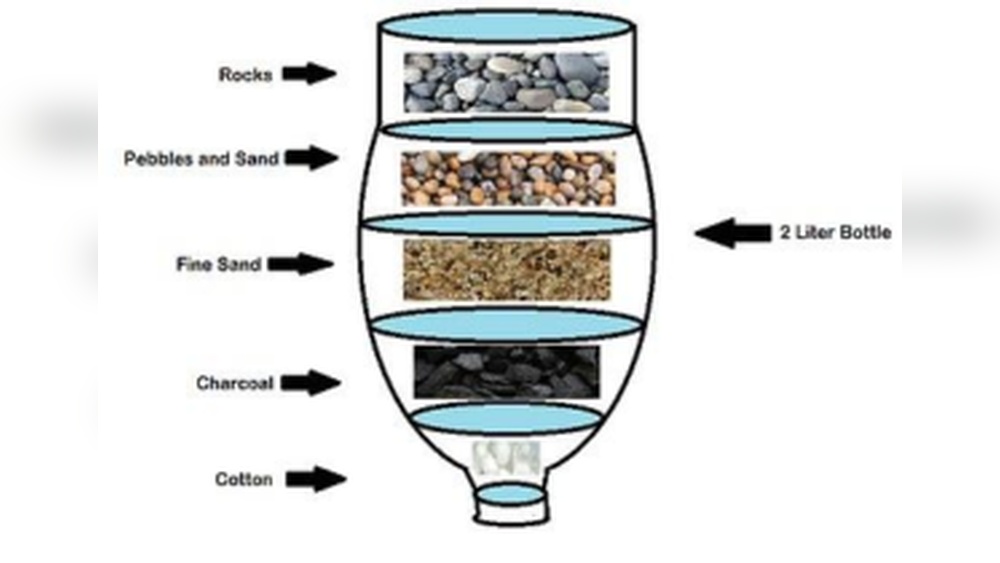
Use layers that filter water well. Start with clean cloth or coffee filter to stop big dirt. Add activated charcoal to remove bad smells and chemicals. Use fine sand and gravel to catch small particles. Each layer plays a key role in cleaning water.
Additional Tools
Gather scissors or a sharp knife to cut the bottle. Use a lighter or tape to fix parts if needed. Have a container to catch filtered water below. Clean hands and a workspace keep the process safe.
Preparing The Bottle
Preparing the bottle is the first step in making a simple water filter. It sets the base for all the filtering layers. A clean and well-prepared bottle helps the filter work better. This part focuses on cutting the bottle and making the filter layers inside it.
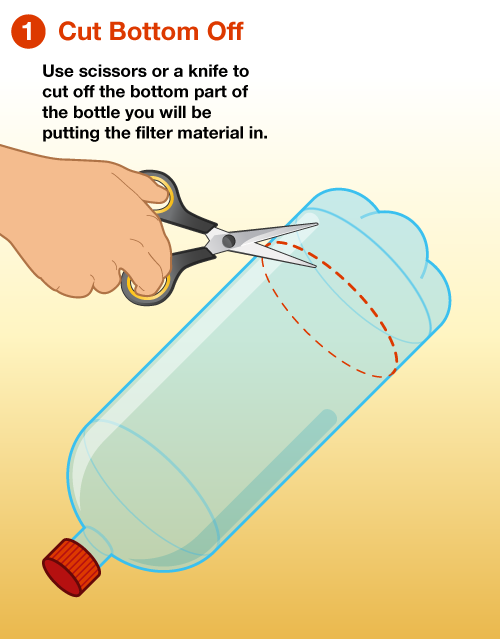
Cutting The Bottle
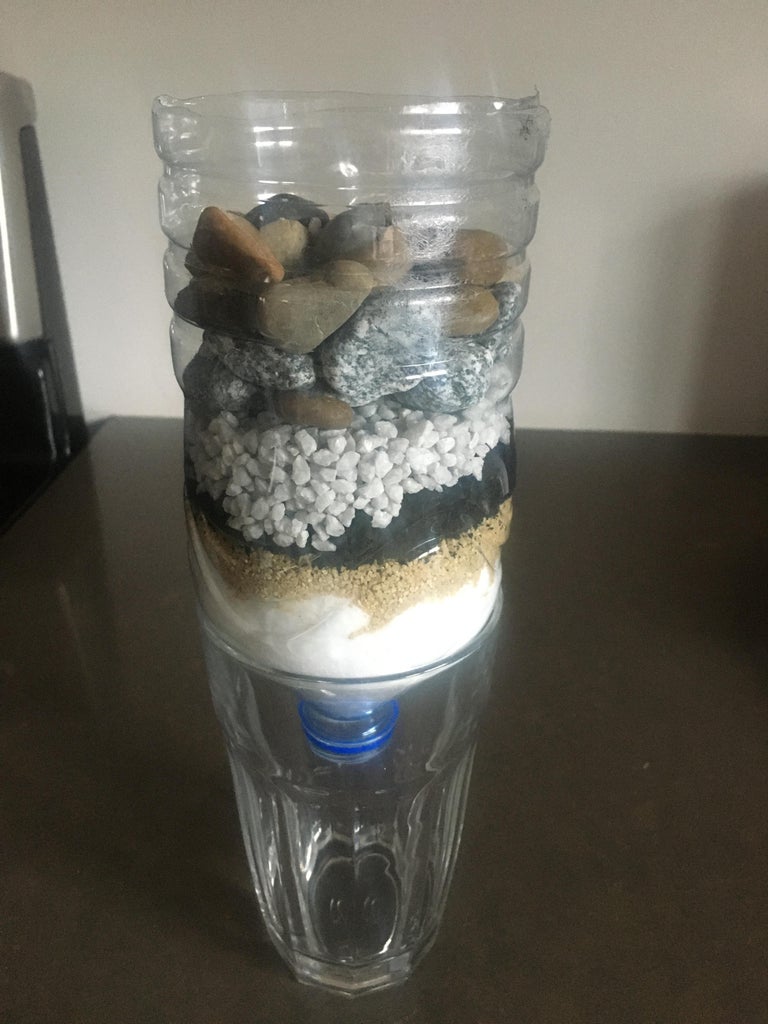
Start with a clean plastic bottle. Use scissors or a sharp knife carefully. Cut the bottle in half or a little above the middle. The top part will hold the filter materials and water. The bottom part will catch the clean water. Make sure the cut is smooth to avoid injuries.
Creating The Filter Layers
Turn the bottle top upside down like a funnel. Add the filter materials in layers. Start with a small piece of cloth or coffee filter at the neck. Next, add fine sand to trap small particles. Then add coarse sand or dirt. Finally, put activated charcoal or small stones on top. Each layer helps clean the water step by step.
Assembling The Filter
Assembling the water filter is a simple and important step. It helps clean water by trapping dirt and particles. Using a plastic bottle, you can create a basic filter at home. This section explains how to build the filter correctly.
Layering Materials Correctly
Start by cutting the bottle in half. Use the top part upside down like a funnel. Place cloth or coffee filter at the neck to stop materials from falling out. Add layers carefully.
First, put small stones or gravel. It blocks big debris and dirt. Next, add sand. Sand helps trap smaller particles. On top of sand, add activated charcoal. This removes bad smells and chemicals.
Finish with another cloth layer. It keeps all materials in place. Each layer must be even and tight. This helps water flow smoothly through the filter.
Securing The Filter Setup
Hold the filter layers firmly in place. Use rubber bands or tape to wrap around the bottle neck. This keeps layers from mixing. Make sure the filter does not move.
Place the bottom half of the bottle under the filter funnel. It collects clean water. Keep the filter steady on a flat surface. Pour water slowly into the filter top. Watch the clean water drip down.
Using The Water Filter
Using the water filter made from a bottle is simple and practical. This section explains how to use your homemade filter effectively. Follow each step carefully to ensure the water gets cleaner and safer to drink.
Filtering Process Steps
First, pour the dirty water slowly into the top of the filter. Let the water pass through each layer inside the bottle. The layers trap dirt, sand, and other particles.
Collect the clean water from the bottom of the bottle. It may take a few minutes for the water to filter completely. Repeat the process if the water still looks cloudy or dirty.
Do not rush. Give the filter time to work. Clean water is safer and tastes better.
Tips For Effective Filtration
Use small amounts of water at a time. This helps the filter clean the water well. Avoid pouring water too fast. Fast flow means less cleaning.
Replace the filter materials regularly. Old materials lose their ability to clean water. Keep the bottle and layers dry when not in use. This stops mold and bacteria from growing.
Use the filter only for clear water sources. Very muddy or chemical-contaminated water may need other treatment methods.
Cleaning And Maintenance
Keeping your homemade water filter clean is very important. Clean filters work better and last longer. Regular care stops bad smells and dirt build-up. This keeps the water safe and fresh.
When To Replace Filter Materials
Filter materials like charcoal, sand, and cloth wear out over time. Change them every 1 to 2 months. Watch for slow water flow or strange smells. These signs mean the filter is dirty. Using old materials can let dirt pass through. Always use fresh materials for clean water.
Cleaning The Bottle
Wash the bottle every week with warm soapy water. Rinse it well to remove soap. Avoid strong chemicals that can harm the filter. Dry the bottle completely before refilling. Clean bottles stop bacteria from growing inside. This keeps your water pure and safe.
Troubleshooting Common Issues
Making a water filter with a bottle is simple, but sometimes problems occur. These issues can affect how well the filter works. Knowing how to fix common problems helps keep the water clean and safe to drink.
Slow Filtration Problems
Slow filtration happens when water moves too slowly through the filter. Dirt or small particles can block the filter layers. Check if the filter materials are packed too tightly. Loosen them gently to allow water to pass easier. Make sure the bottle holes are not clogged. Clean the holes with a small tool or needle. Using fresh filter materials also improves flow speed.
Dealing With Cloudy Water
Cloudy water means the filter is not cleaning well. Tiny particles may still be in the water. Replace the sand, charcoal, or cloth layers if they look dirty. Wash the filter parts with clean water before reuse. Avoid using dirty or old materials that reduce filter quality. Adding a fine layer of charcoal helps clear the water better. Let the water sit a little after filtering to allow particles to settle.
Safety Considerations
Making a water filter with a bottle is a helpful skill. It can provide cleaner water in emergencies or outdoor trips. Safety matters most when using these filters. Knowing what they can and cannot do keeps you safe. Understanding how to check water safety is very important. This section covers key safety points for DIY water filters.
Limitations Of Diy Filters
DIY water filters remove dirt and some particles. They do not remove all germs or chemicals. Viruses can pass through these filters. Chemicals from pollution may still be in the water. Using these filters alone may not make water safe. Do not rely only on a bottle filter for drinking water.
These filters help improve water clarity. They work best with water that looks clean. Cloudy or smelly water needs more treatment. Boiling or using chemical purifiers may be necessary. Always know the limits before drinking filtered water.
Ensuring Water Is Safe To Drink
Boil filtered water to kill bacteria and viruses. Boiling for at least one minute is best. Use chemical tablets or drops if boiling is not possible. Follow instructions carefully for safe use. Store filtered water in clean containers only.
Check water for strange color or smell before use. If water looks or smells bad, do not drink it. Use clear, fresh water sources for filtering. Clean your DIY filter parts regularly. Dirty filters can cause more harm than good.
Frequently Asked Questions
How Do You Make A Water Filter With A Bottle?
Cut the bottle in half and invert the top as a funnel. Layer cotton, sand, and charcoal inside. Pour water through to filter out impurities effectively.
What Materials Are Needed For A Bottle Water Filter?
You need a plastic bottle, cotton balls, activated charcoal, fine sand, and gravel. These layers help remove dirt and contaminants from water.
How Effective Is A Homemade Water Filter Bottle?
It removes large particles and some impurities but doesn’t eliminate all bacteria or viruses. Use it as a basic filter, not a complete purifier.
Can A Bottle Water Filter Remove Chemicals From Water?
No, homemade filters mainly remove sediments and debris. Chemicals and dissolved contaminants require advanced filtration methods like activated carbon filters or purification tablets.
Conclusion
Making a water filter with a bottle is simple and useful. You only need a few basic materials. This filter helps remove dirt and some impurities from water. It is not perfect for all water types but works well in emergencies.
Always try to boil water after filtering for safety. This easy method can help when clean water is hard to find. Practice making the filter before you need it. Stay safe and keep water clean wherever you go.
Hasan Al Sarker is a Reverse Osmosis Specialist. He has worked for many years to ensure safe drinking water for all. His research paper has been published in several journals, including Issue, Medium, and Slideshare. He is recognized as a water doctor among specialists though he did not attend medical college.
Besides working as a researcher of reverse osmosis technology, he is also very fancy with the kitchen and cooking. His guides are reading thousands of people every day. As a head of content, he is responsible for all the published articles at RO System Reviews.
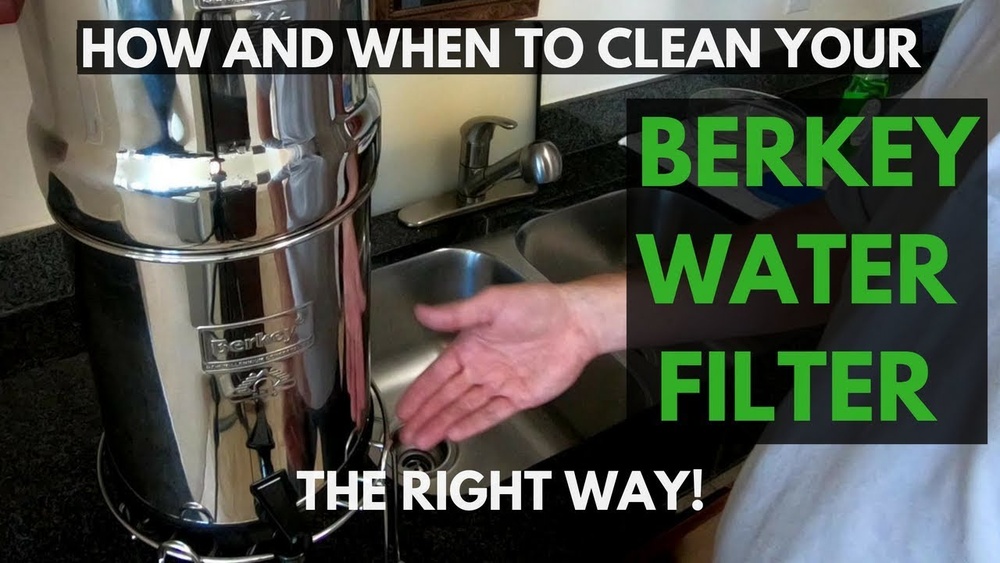
You rely on your Berkey water filter to provide clean, fresh water every day. But did you know that keeping your filter in top shape means regular cleaning?
If you want to enjoy pure water without any hassle, knowing how to clean your Berkey water filter properly is key. In this guide, you’ll discover simple steps to maintain your filter’s performance and extend its life. Ready to keep your water tasting its best?
Let’s dive in.
Berkey Filter Basics
The Berkey water filter is a popular choice for clean drinking water. It uses a special system to remove many harmful substances. Understanding its basics helps in proper cleaning and maintenance. This ensures pure water every time.
Knowing how the filter works and its parts makes the cleaning process easier. Below are the key components and the working principle of the Berkey filter.
Key Components
The Berkey system has two main parts. The upper chamber holds the dirty water. The lower chamber collects the clean water. Between these chambers are the Black Berkey filters. These filters remove contaminants from the water.
The unit also includes spigots for easy water access. The chambers are made of stainless steel or BPA-free plastic. This design keeps the water safe and fresh.
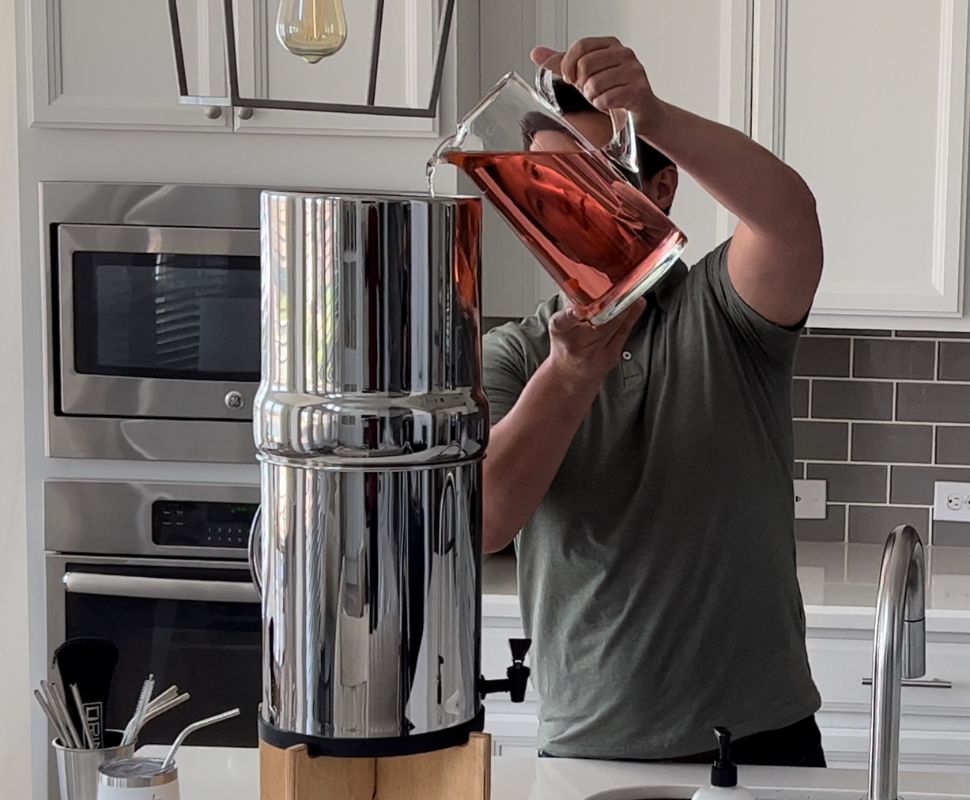
How It Works
Water flows from the top chamber through the filters. The Black Berkey filters trap bacteria, viruses, and chemicals. They also reduce bad tastes and odors. Clean water then drips into the lower chamber.
This process does not use electricity or chemicals. It relies on gravity and the special filter media. The result is safe, fresh water ready for drinking or cooking.
When To Clean Your Berkey
Knowing when to clean your Berkey water filter helps keep water pure and fresh. Regular cleaning stops dirt and buildup from harming the filter’s performance. It also extends the life of your Berkey system.
Cleaning at the right time ensures smooth water flow and good taste. Watch for signs that show your Berkey needs cleaning soon. Follow a cleaning schedule based on use and water quality.
Signs Of Clogging
Slow water flow is the first sign of clogging. Water may take longer to pass through the filter. The taste of water may change, becoming odd or stale. You might see dirt or black particles in the water. These signs mean it’s time to clean the filter elements. Ignoring clogging can reduce water quality and filter life.
Cleaning Frequency
Clean the Berkey filter elements every 3 to 6 months. Heavy use or dirty water calls for more frequent cleaning. If the water flow slows or taste worsens, clean the filters sooner. Regular cleaning keeps your Berkey working well and your water safe. Follow the manufacturer’s instructions for the best results.
Tools Needed For Cleaning
Cleaning your Berkey water filter keeps it working well and ensures safe water. Having the right tools makes the job easier and faster. You need simple items that you might already have at home.
Soft Brush Or Sponge
A soft brush or sponge helps remove dirt without damaging the filter. Avoid hard brushes that can scratch the surface. Use gentle strokes to clean the filter elements and the container walls.
Mild Dish Soap
Mild dish soap works well to clean the filter parts. Use only a small amount to avoid leaving soap residue. Rinse thoroughly with clean water after washing.
Clean Water
Clean water is important for rinsing the filter and parts. Use fresh, cold water to wash away dirt and soap. Avoid using hot water as it can harm the filter elements.
Soft Cloth Or Towel
A soft cloth or towel helps dry the filter parts after cleaning. Pat dry gently to avoid damage. Make sure all parts are fully dry before reassembling the filter.
Step-by-step Cleaning Process
Cleaning your Berkey water filter ensures clean, fresh water every day. The process is simple and takes only a few steps. Follow this guide to keep your filter in top shape.
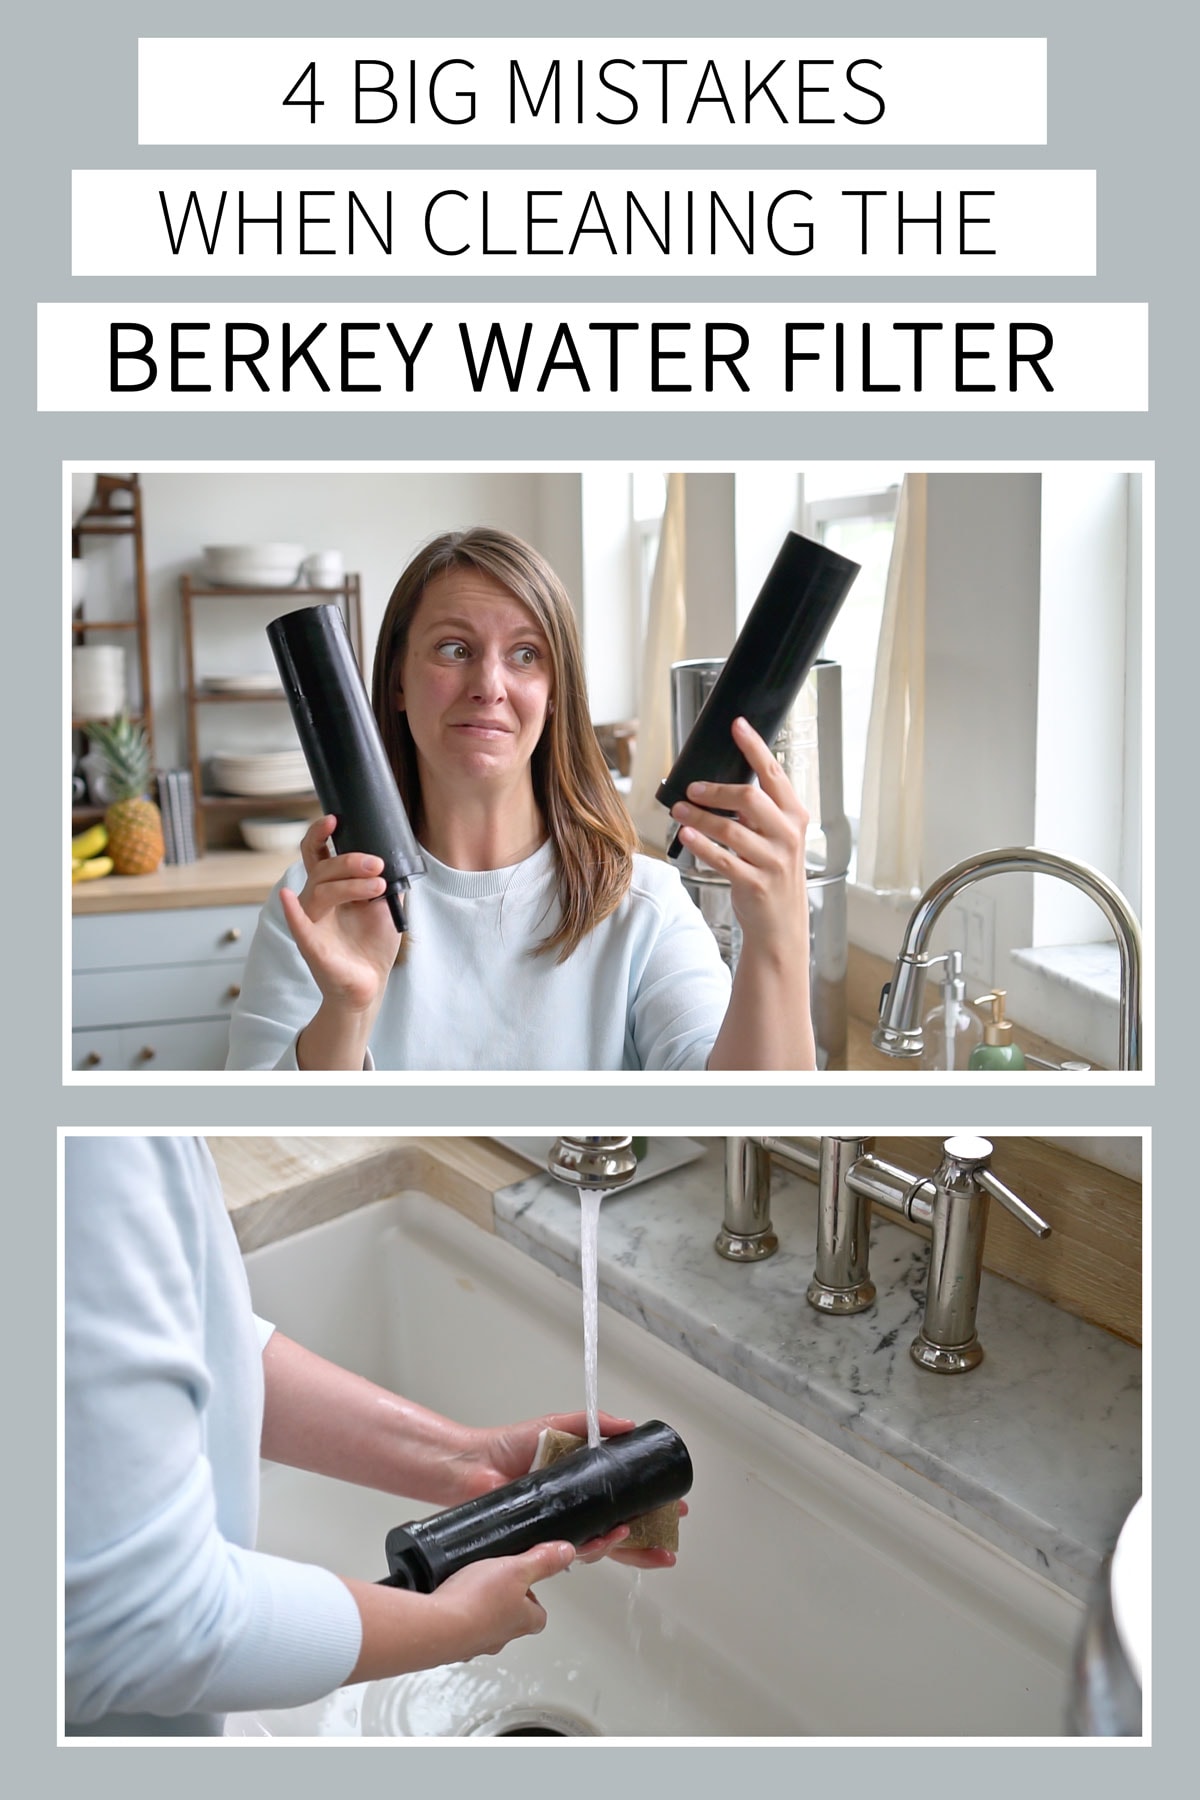
Disassembling The Filter
Start by removing the top chamber from the bottom. Take out the Black Berkey elements carefully. Avoid touching the filter holes to keep them clean. Set the parts on a clean surface.
Scrubbing The Elements
Use a soft brush or sponge to scrub the filter elements. Focus on removing any dirt or buildup on the surface. Do not use soap or detergent. Rinse the elements under cold water after scrubbing.
Rinsing And Reassembling
Rinse the chambers with clean water to remove any debris. Place the Black Berkey elements back into the top chamber. Secure the top chamber on the bottom part tightly. Your Berkey filter is ready for use again.
Deep Cleaning Tips
Deep cleaning your Berkey water filter keeps it working well. It removes dirt and buildup that regular cleaning might miss. This helps your filter last longer and keeps your water pure. Follow these tips for a thorough clean.
Soaking Techniques
Fill a clean container with warm water. Add a small amount of mild dish soap. Submerge the filter elements in the solution. Let them soak for 30 minutes to loosen dirt. After soaking, rinse the filters with clean water. Avoid using harsh chemicals or bleach. These can damage the filter’s material.
Removing Stubborn Deposits
Use a soft brush to scrub away tough spots. Gently clean the surface without pressing too hard. Focus on areas with visible buildup or stains. Rinse the filter thoroughly after scrubbing. Repeat the process if deposits remain. Clean filters ensure better water flow and taste.
Maintaining Your Berkey Filter
Maintaining your Berkey filter is key to clean, safe drinking water. Proper care helps the filter work longer and better. Simple steps keep your water pure and fresh. Regular attention prevents problems and saves money.
Storage Advice
Store your Berkey filter in a dry, cool place. Avoid direct sunlight to protect the filter parts. Keep the system covered with a clean cloth when not in use. This stops dust and dirt from entering. Empty water from the system if storing for a long time. Dry all parts well before storage to prevent mold growth.
Avoiding Contamination
Always wash your hands before handling the filter. Use clean containers and tools when cleaning or refilling. Avoid touching the inside of the filter or the filtered water. Replace filter elements on time to keep water safe. Clean the system regularly to stop bacteria and dirt buildup. Follow the manufacturer’s instructions for cleaning and care.
Troubleshooting Common Issues
Berkey water filters are reliable, but some issues may arise over time. Troubleshooting common problems helps keep your filter working well. Understanding simple fixes can save time and ensure clean water.
Low Flow Rate
Low flow rate means water takes too long to pass through the filter. Dirt or sediment may block the filter elements. Clean the filters by soaking them in water and gently scrubbing with a soft brush.
Check if the filter elements are fully tightened. Loose filters can slow water flow. Also, make sure the water level in the upper chamber is high enough. Low water pressure affects flow speed.
Off Tastes Or Odors
Strange tastes or smells often come from new filters or dirty parts. Before first use, prime the filters as instructed. Rinse the system thoroughly to remove any residue.
Regular cleaning of the chambers and spigot helps avoid odors. Replace filters after their lifespan to keep water fresh. Avoid using soap inside the filter parts, as it may leave a taste.
Extending Filter Lifespan
Extending the lifespan of your Berkey water filter saves money and ensures clean water longer. Taking care of the filter is easy with simple steps. These steps keep the filter working well and improve water quality.
Regular Maintenance
Rinse the Black Berkey filters every 3-6 months. Use clean water and a soft brush to remove buildup. Avoid harsh soaps or chemicals that harm the filter. Clean the clear elements gently to keep pores open. Check the system parts often for cracks or leaks. Replace worn parts promptly to avoid damage. Regular checks prevent common problems and keep water flowing well.
Proper Usage Tips
Only use the Berkey filter with clean, clear water. Avoid filtering muddy or salty water. Do not let water sit in the filter for days. Store the system in a cool, dry place when not in use. Fill the system slowly to avoid overflow and damage. Follow the manufacturer’s instructions for best results. Proper use helps the filter last longer and work better.
Frequently Asked Questions
How Often Should I Clean My Berkey Water Filter?
You should clean your Berkey water filter every 3 to 6 months. This keeps it efficient and free from buildup. Regular cleaning ensures better water flow and taste. Always follow manufacturer instructions for best results.
What Is The Best Way To Clean Berkey Filters?
Use a soft brush and clean water to scrub the filter elements gently. Avoid soap or chemicals as they can damage the filters. Rinse thoroughly before reassembling. This method maintains filter effectiveness and longevity.
Can I Use Vinegar To Clean Berkey Filters?
No, using vinegar or harsh chemicals can damage the Berkey filters. Stick to using water and a soft brush for cleaning. This preserves the filter’s integrity and ensures safe drinking water.
How Do I Remove Black Residue From Berkey Filters?
Black residue is normal and comes from the filter’s purification process. Rinse and scrub the filters gently with water to remove excess residue. Do this during regular cleaning to maintain filter performance.
Conclusion
Cleaning your Berkey water filter keeps water fresh and safe. Regular cleaning stops dirt and buildup from clogging the system. Use gentle scrubbing and clean water to protect the filter. Take care of your filter to enjoy pure water daily.
A clean Berkey means healthy water for you and your family. Simple steps can extend your filter’s life and improve water taste. Keep your Berkey clean and enjoy fresh water every day.
Hasan Al Sarker is a Reverse Osmosis Specialist. He has worked for many years to ensure safe drinking water for all. His research paper has been published in several journals, including Issue, Medium, and Slideshare. He is recognized as a water doctor among specialists though he did not attend medical college.
Besides working as a researcher of reverse osmosis technology, he is also very fancy with the kitchen and cooking. His guides are reading thousands of people every day. As a head of content, he is responsible for all the published articles at RO System Reviews.
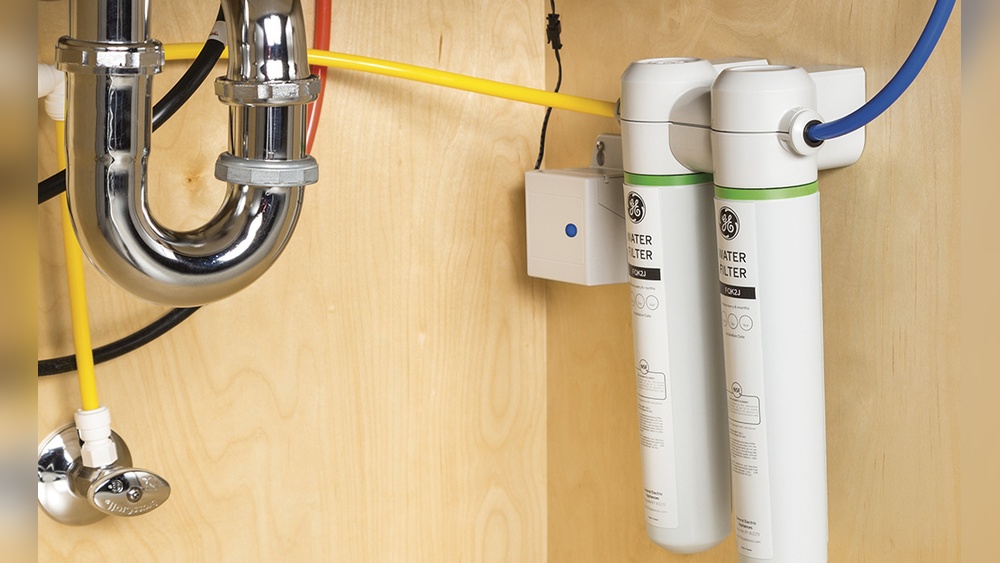
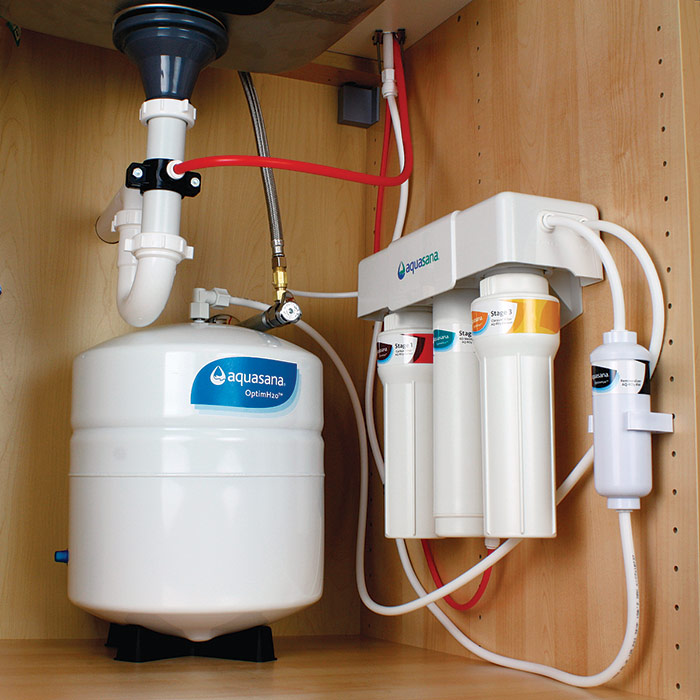
Thinking about installing a water filter under your sink but unsure how much it will cost? You’re not alone.
Knowing the price upfront can help you decide if this upgrade fits your budget—and your lifestyle. You’ll discover the real costs involved, from buying the filter to professional installation. By the end, you’ll have a clear idea of what to expect, so you can make the best choice for your home and health.
Keep reading to find out how much you need to invest for clean, fresh water right at your fingertips.
Factors Affecting Installation Cost
Several factors influence the cost to install a water filter under your sink. Understanding these elements helps you plan your budget better. Costs can vary widely based on the type of filter, plumbing work, and other needs.
Type Of Water Filter
The kind of water filter affects installation costs significantly. Basic filters are cheaper and easier to install. Advanced systems like reverse osmosis need more work and cost more. Some filters require electrical connections, adding to the price.
Complexity Of Plumbing
Simple plumbing setups lower installation costs. Older or complicated plumbing raises the price. Extra work like cutting pipes or adding valves takes more time. Difficult access to the sink area can also increase labor costs.
Labor Charges
Labor costs depend on where you live and the professional’s experience. Experienced plumbers charge more but work faster and better. Some installers charge a flat fee, others by the hour. Always ask for a clear quote before work begins.
Additional Materials Needed
Extra materials can add to the total cost. This includes fittings, brackets, or tubing not included with the filter. Sometimes you need a new faucet or drain parts. These small items add up and affect the final price.
Average Price Range
Installing a water filter under your sink can improve water quality. Prices vary based on the type and features of the system. Knowing the average cost helps plan your budget wisely.
Basic Filters
Basic under-sink water filters cost between $50 and $100. They usually include simple cartridges that remove chlorine and sediment. Installation is often easy and can be done without a plumber. These filters suit small households or renters.
Mid-range Filters
Mid-range systems range from $100 to $300. They offer better filtration, including removing heavy metals and bacteria. These filters often have multiple stages and longer-lasting cartridges. Installation might require professional help for best results.
High-end Systems
High-end under-sink filters cost $300 to $600 or more. They provide advanced filtration like reverse osmosis and UV purification. These systems deliver the purest water but need professional installation. Maintenance is more frequent but keeps water quality high.
Diy Vs Professional Installation
Deciding between DIY and professional installation for an under-sink water filter can affect your budget and time. Some homeowners choose to install the filter themselves to save money. Others prefer to hire a professional to ensure the job is done right. Understanding the pros and cons of each option helps you make the best choice for your needs.
Pros And Cons Of Diy
Doing the installation yourself saves money on labor costs. You only pay for the filter and materials. You can start the project anytime without waiting for an appointment. Learning new skills can be satisfying and useful for future repairs.
DIY installation may take longer if you lack experience. Mistakes can cause leaks or damage under your sink. Some filters need special tools or plumbing knowledge. Warranty may be void if you install it incorrectly. Troubleshooting problems can be frustrating without guidance.
When To Hire A Pro
Hire a professional if you lack plumbing skills or tools. Complex plumbing systems or older pipes need expert handling. Professional installation usually comes with a warranty on work done. It saves time and reduces the risk of damage. Pros ensure proper filter setup for clean, safe water. They can also advise on filter maintenance and replacement.
Cost-saving Tips
Installing a water filter under your sink can be costly. Saving money on this project is possible with smart choices. Small steps can reduce expenses without losing quality. Focus on picking the right filter, combining services, and keeping your system well maintained. These tips help stretch your budget and ensure clean water.
Choosing The Right Filter
Select a filter that fits your water needs and budget. Avoid buying the most expensive model. Basic filters often remove common impurities effectively. Check product reviews and certifications for quality assurance. A suitable filter saves money on replacements and repairs later.
Bundling Installation Services
Hire professionals who offer package deals. Combining plumbing and filter installation cuts labor costs. Many companies give discounts for bundled services. This approach saves time and money. It also ensures proper setup, avoiding future problems.
Regular Maintenance Benefits
Keep your filter clean and change cartridges on time. Regular care prevents damage and maintains water quality. A well-maintained system lasts longer and needs fewer repairs. This reduces unexpected expenses. Set reminders to check your filter regularly.
Common Installation Challenges
Installing a water filter under the sink can improve your home’s water quality. The process seems simple but often comes with challenges. Knowing common problems helps prepare for a smooth installation. Below are key issues many face during setup.
Space Constraints
Under-sink areas are usually tight and crowded. Pipes, garbage disposals, and other items reduce available space. Finding a spot for the filter can be tough. Small filters fit better but may cost more. Measuring the space first saves time and trouble.
Water Pressure Issues
Water filters need the right pressure to work well. Too low pressure means slow water flow. Too high pressure can damage the filter system. Checking your home’s water pressure helps pick the right filter. Sometimes, a pressure regulator is needed to protect the filter.
Leak Prevention
Leaks can cause water damage and waste. Tight connections and proper sealing stop leaks. Using plumber’s tape on threads helps secure fittings. Testing for leaks after installation is important. Fix any drips immediately to avoid bigger problems.
Long-term Investment Value
Installing a water filter under the sink is more than a one-time cost. It is a smart choice that pays off over time. This upgrade supports your health, saves money, and can even boost your home’s worth. Understanding its long-term value helps you see why it matters.
Health Benefits
Filtered water removes harmful chemicals and germs. Drinking clean water supports your body’s organs and immune system. It also improves taste and smell. Good water means fewer health problems and less chance of sickness. This leads to fewer doctor visits and lower medical bills.
Reducing Bottled Water Expenses
Bottled water costs add up quickly. Installing a filter cuts down the need to buy bottled water. Clean water from your tap is ready anytime. This saves you money every month. Less plastic waste also helps the environment.
Increasing Home Value
Homes with modern features attract buyers. A water filter under the sink shows care and quality. It can make your home more appealing. This upgrade may increase your home’s resale price. It is a small change with a big impact on value.
Frequently Asked Questions
How Much Does Under Sink Water Filter Installation Cost?
Installation costs typically range from $100 to $300. Prices vary based on filter type, labor fees, and location. Simple DIY installations cost less, while professional services increase expenses. Additional plumbing work may add to the total cost. Always get multiple quotes for the best price.
Is Professional Installation Necessary For Under Sink Filters?
Professional installation ensures proper setup and leak prevention. Complex plumbing connections may require expertise. DIY installation suits experienced homeowners but risks errors. A professional guarantees warranty and system efficiency. Consider hiring a plumber for reliable results and peace of mind.
How Long Does Installing An Under Sink Water Filter Take?
Installation usually takes 1 to 2 hours. Time depends on plumbing complexity and filter model. DIY setups may take longer for beginners. Professionals complete the job faster with proper tools. Scheduling extra time ensures thorough testing for leaks and function.
What Factors Affect The Cost Of Installation?
Factors include filter type, labor charges, and plumbing complexity. High-end filters cost more to install. Additional parts or modifications increase expenses. Regional labor rates also impact pricing. Understanding these helps budget for your water filter project.
Conclusion
Installing a water filter under your sink helps improve water quality at home. The cost depends on the filter type, brand, and installation complexity. Basic models and DIY installation save money but take time. Professional help costs more but ensures correct setup.
Consider long-term savings on bottled water and health benefits. Choose a filter that fits your budget and needs. Clean water is worth the investment for your family’s health and peace of mind. Take time to compare options before deciding. Clear, fresh water is always a smart choice.
Hasan Al Sarker is a Reverse Osmosis Specialist. He has worked for many years to ensure safe drinking water for all. His research paper has been published in several journals, including Issue, Medium, and Slideshare. He is recognized as a water doctor among specialists though he did not attend medical college.
Besides working as a researcher of reverse osmosis technology, he is also very fancy with the kitchen and cooking. His guides are reading thousands of people every day. As a head of content, he is responsible for all the published articles at RO System Reviews.